How to Make Notepad++ Default in Windows 11
Notepad++ becomes your default text editor in Windows 11 when you change the settings.
Notepad++ is a free program that offers much more power than the basic Windows Notepad. It’s especially good for writing code and works with over 50 programming languages.
This change means that whenever you double-click a text file, like a .txt document, Notepad++ will open automatically. This saves you from opening the basic Windows Notepad by mistake.
Change your default app settings for plain text files. Go to Settings Apps Default Apps, find Notepad, and switch the default app for .txt and other text files to Notepad++.
How to install Notepad++ on 🪟 Windows 11
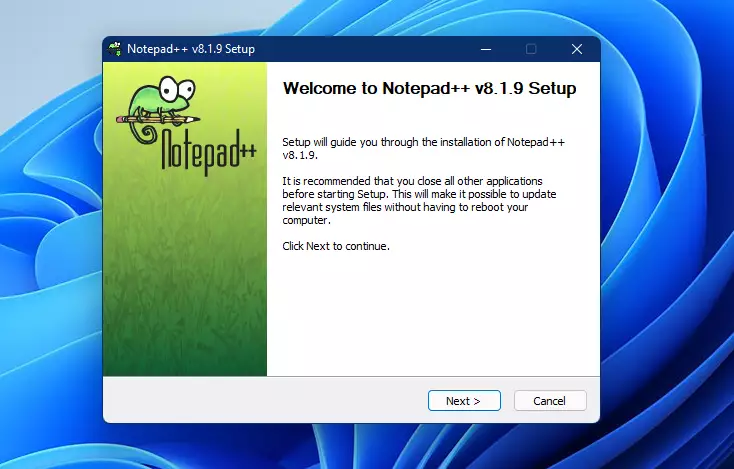
Installing Notepad++ on Windows 11 gives you a much better tool for editing text files than the basic one. You can download the installer from the official Notepad++ website, find the downloaded file, and run it to follow the setup steps.
First, go to the link below to download Notepad++
Once downloaded, go to your Downloads folder and run the executable. Follow the installation wizard to complete the setup.
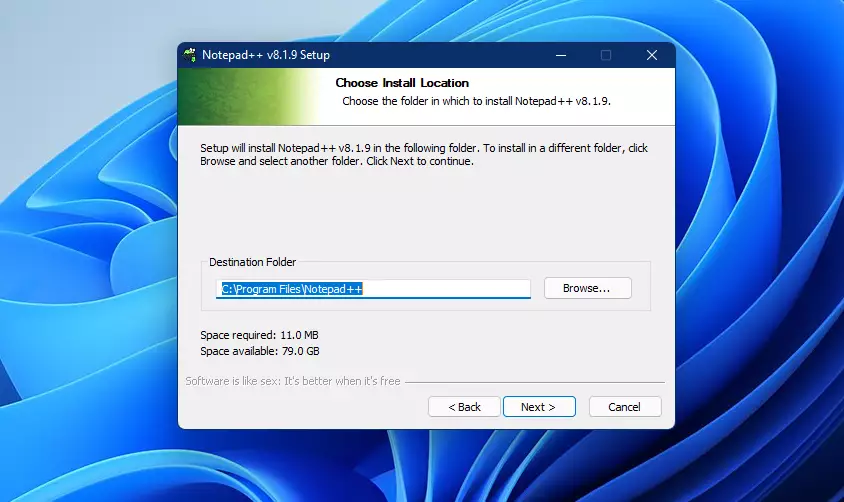
By default, Notepad++ will install in the C:Program FilesNotepad++ folder. To install in a different folder, click Browse and select another folder.
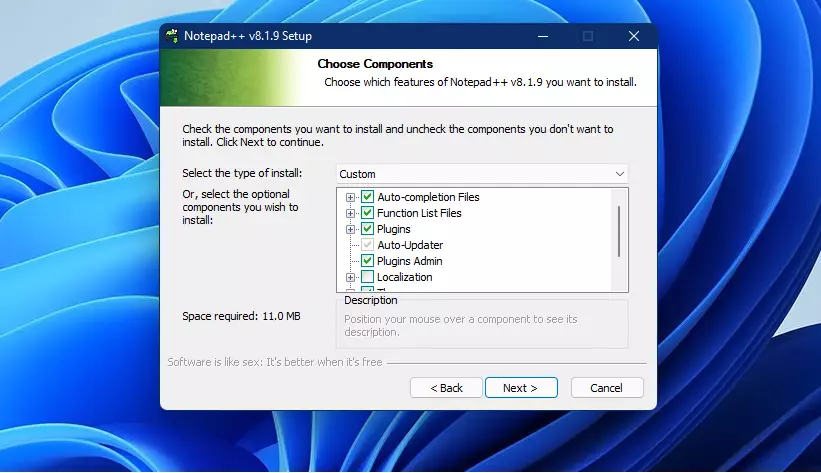
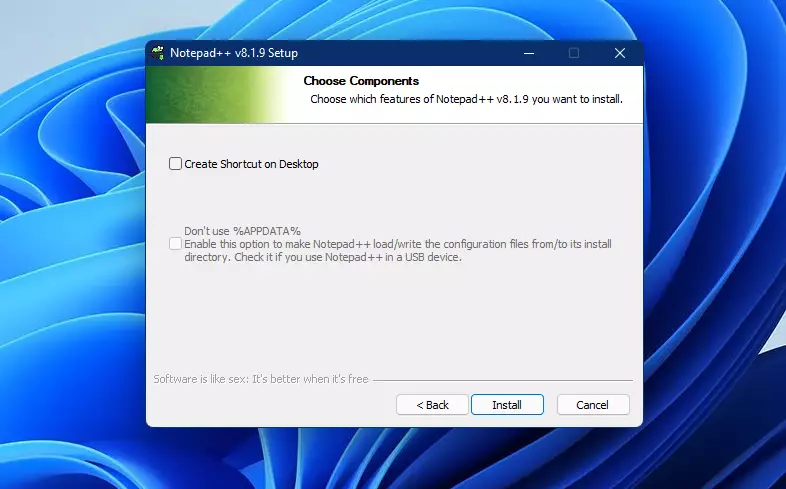
You choose installation components by ticking boxes for the features you want and unticking those you don’t. The default choices usually work well for most people. Clicking ‘Next’ moves the Windows 11 installation forward.
Next, click Install to finish the installation wizard.
How to make Notepad++ default text editor in 🪟 Windows 11
Now that Notepad++ is installed, let’s get it set as your default text editor.
Windows 11 keeps most of its settings in one place, the System Settings. Here, you can manage everything from system configurations to creating new users and updating Windows.
You can access System Settings by pressing the Windows key and the “I” key together. Alternatively, you can click the “Start” button, then select “Settings.” This action opens the main configuration area for Windows 11.

You can find Windows Settings by typing “Settings” into the taskbar’s search box. Selecting the “Settings” app from the search results will open the application, allowing you to adjust system preferences. This is a quick way to get to Windows Settings without going through the Start menu.
Your Windows Settings pane should look similar to the image below. In Windows Settings, click Apps, and select Default Apps on the right pane of your screen.

Once the Default Apps settings are open, you can use the search box to find the default app for applications. Type ‘Edge’ here.
Microsoft Edge will appear in the result below. Click on Notepad.
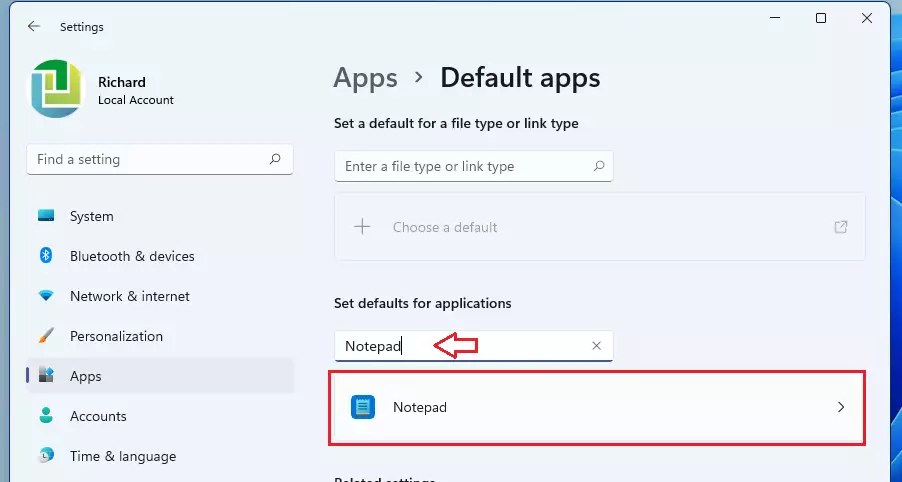
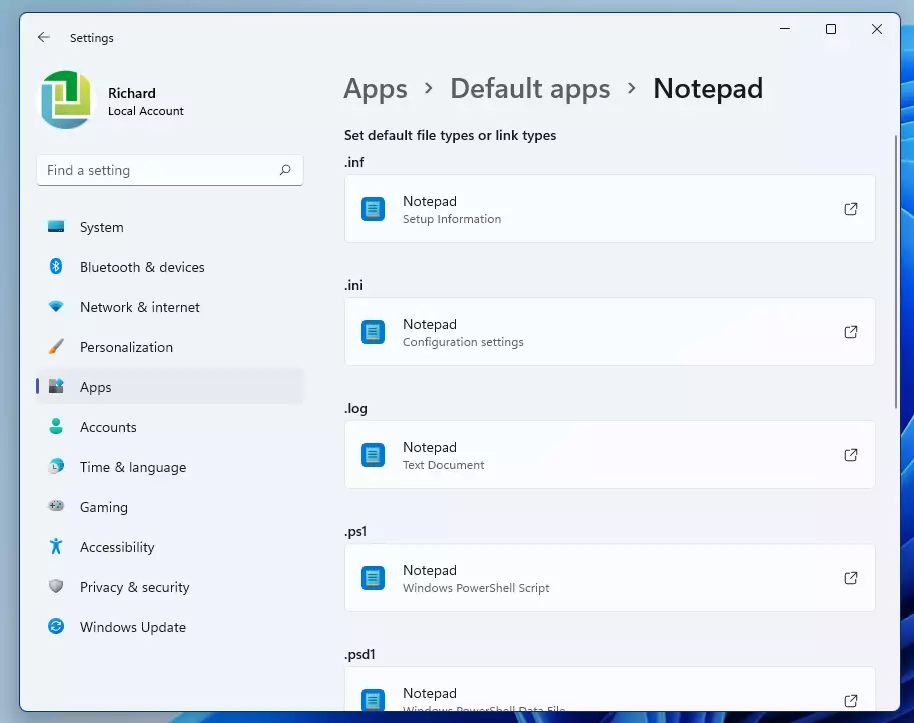
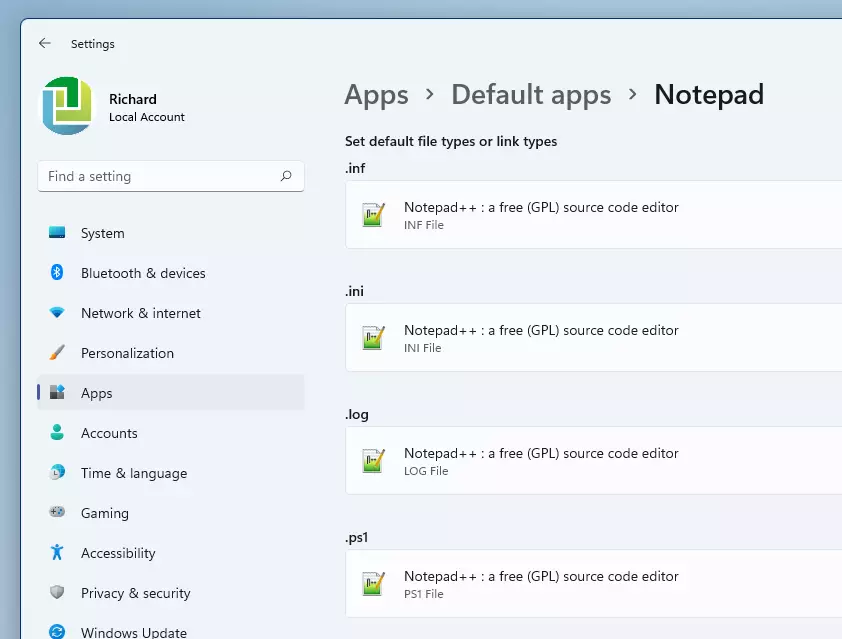
The next screen lists all the file types currently opening with Notepad. You’ll need to select each one and change it to open with Notepad++.
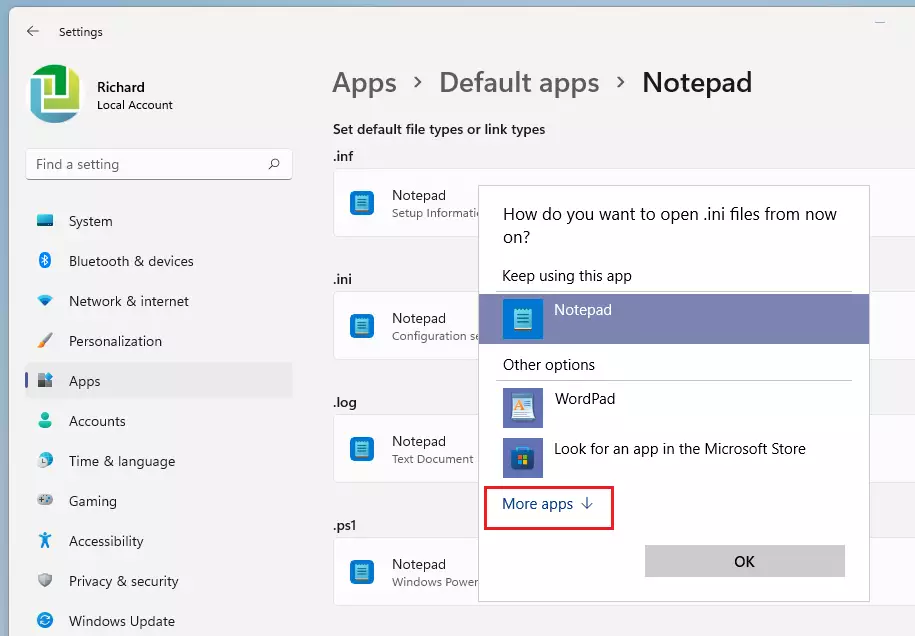
When you select Notepad, a pop-out window will prompt you to choose the app you want to always open this file type.
Click on the More apps link as highlighted below.
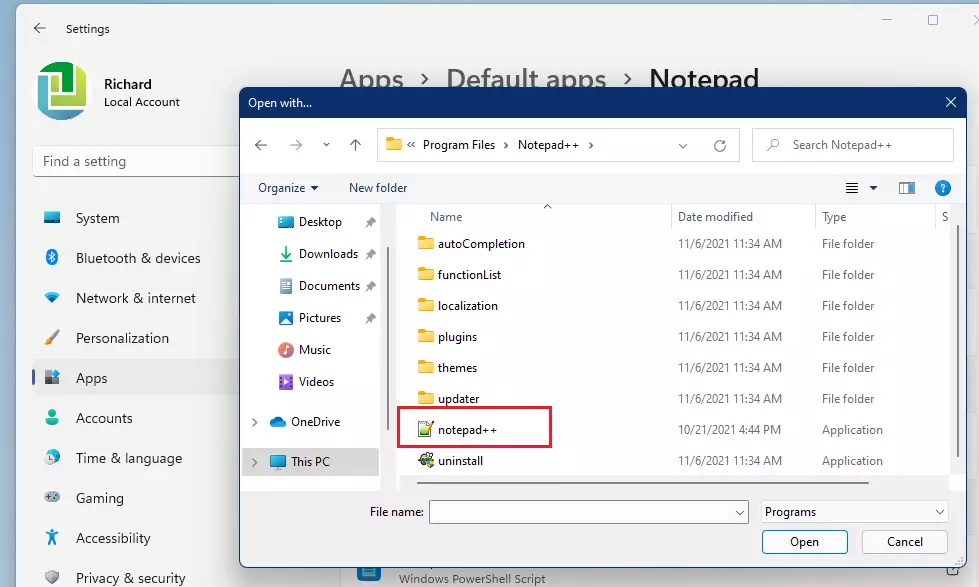
Next, select Look for another app on this PC.
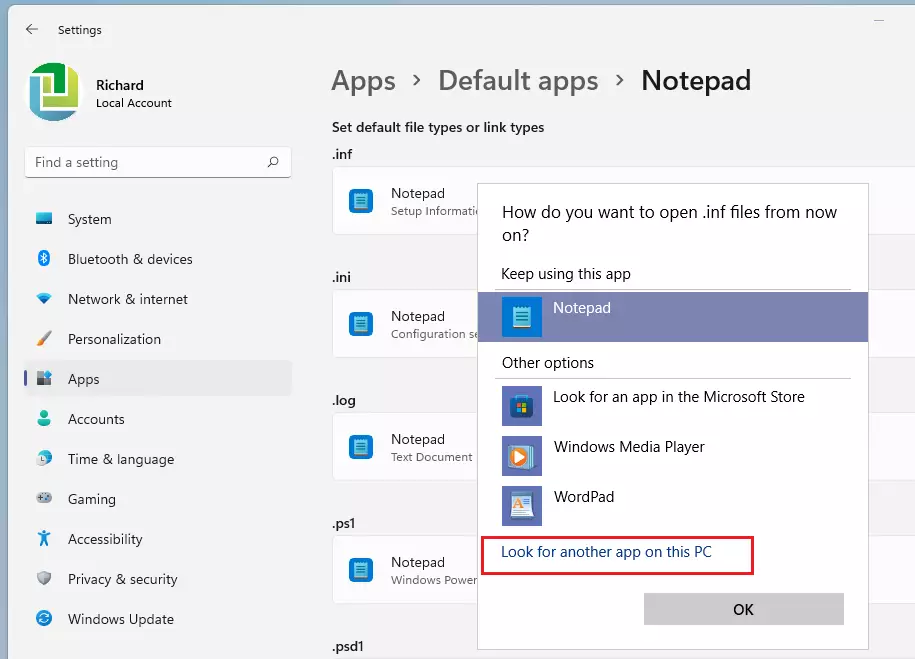
The default Windows file explorer opens the C:Program Files directory. To set Notepad++ as the default program, you must open the Notepad++ folder within this directory and then select the Notepad++ application file. This makes sure all text files open automatically in Notepad++, a powerful free text editor.
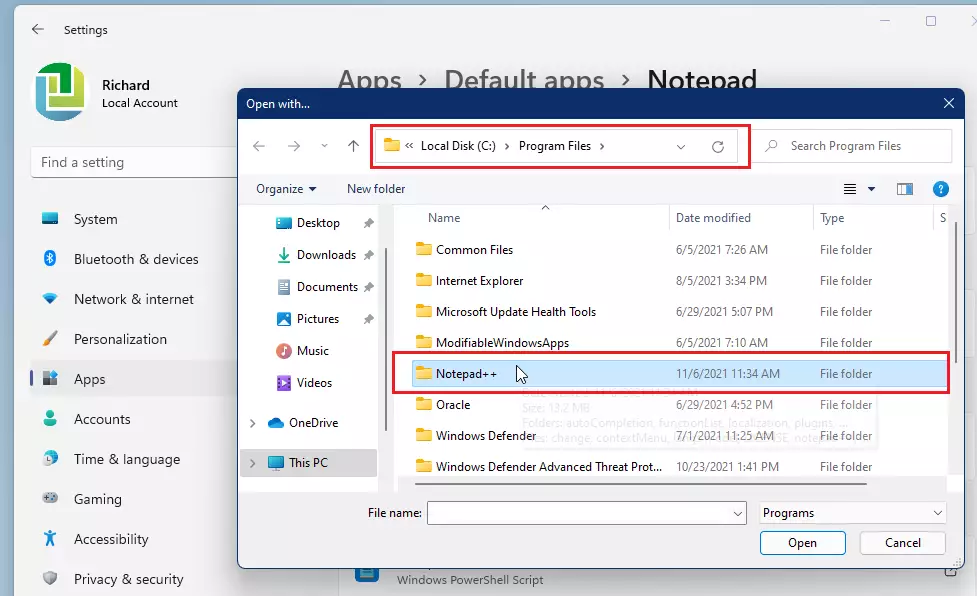
Select the Notepad++ app and click Open to always open this file with Notepad++.
Repeat the file association process for every file type, such as .txt, .log, and .ini, until Notepad++ becomes the chosen program to open all these files. This ensures Notepad++ consistently handles your text-based documents.
How to completely make Notepad++ default in 🪟 Windows 11
Making Notepad++ the default editor in Windows 11 means all your text files, like .txt and .log files, will open with it automatically. To set Notepad++ as your default editor, you need to open the Command Prompt as an administrator first. Click the Start menu, search for Command Prompt, then right-click and choose ‘Run as administrator’.
First, open the command prompt as administrator. Click the Start menu, search for Command Prompt, right-click, and select Run as administrator.

Once the Command Prompt opens, run the commands below:
REG ADD “HKLMSOFTWAREMicrosoftWindows NTCurrentVersionImage File Execution Optionsnotepad.exe” /v “Debugger” /t REG_SZ /d “”%ProgramFiles%Notepad++notepad++.exe” -notepadStyleCmdline -z” /f
To undo the commands above, run the commands below:
REG DELETE “HKLMSOFTWAREMicrosoftWindows NTCurrentVersionImage File Execution Optionsnotepad.exe” /v “Debugger” /f
That should do it!
Conclusion:
- Notepad++ offers advanced features and support for multiple programming languages, making it an excellent alternative to the default Notepad application in Windows 11.
- The installation process is straightforward, ensuring that users can quickly set up and configure Notepad++ to meet their needs.
- Changing the default text editor to Notepad++ allows for a more efficient workflow, particularly for developers and users handling various file types.
- By following the outlined steps, users can personalize their text editing experience and take full advantage of what Notepad++ has to offer.
- Remember to apply the additional command line steps if you want to ensure Notepad++ fully replaces Notepad in all scenarios.
Enjoy your enhanced text editing experience with Notepad++!
What is the default Notepad in 🪟 Windows 11?
Windows 11 comes with two versions of Notepad. One is the classic notepad.exe, a simple text editor. The other is a newer “app” version. Both are included to handle basic text editing needs for most people.
How to get classic Notepad back in 🪟 Windows 11?
You can restore the classic notepad.exe by opening Command Prompt as an administrator. Then, you can use specific commands to re-enable the traditional Notepad if it was removed or replaced by another application.
What is the default text editor for 🪟 Windows 11?
The built-in text editor for Windows 11 is Notepad. It’s a simple program for opening and editing basic text files. For more advanced features, people often install alternative editors like Notepad++.
How do I make Notepad me default editor?
To make Notepad your default editor, go to Windows Settings and search for ‘Default apps’. Find Notepad in the list and select it. This ensures that when you open text files, Notepad will open automatically.
Was this guide helpful?

About the Author
Richard
Tech Writer, IT Professional
Richard, a writer for Geek Rewind, is a tech enthusiast who loves breaking down complex IT topics into simple, easy-to-understand ideas. With years of hands-on experience in system administration and enterprise IT operations, he’s developed a knack for offering practical tips and solutions. Richard aims to make technology more accessible and actionable. He's deeply committed to the Geek Rewind community, always ready to answer questions and engage in discussions.


Thanks for covering this. I have one issue – that last command if I copy/paste it in a admin window and go to execute it I get “ERROR: Invalid syntax. Type “REG ADD /?” for usage.
I am running windows 11 Pro. Thanks…