Stop Your Mic from Picking up Keyboard Typing in Windows 11

- 29 steps
- Needs administrator rights
Stopping your mic from picking up keyboard typing in Windows 11 comes down to three changes. Lower the input volume, turn on noise suppression, and move the mic away from the keys. The quickest fix is in Settings System Sound, where you can reduce the microphone’s input volume and switch on an audio enhancement if your PC offers one.
Noise suppression is a filter that removes steady background sounds, such as fans and key clicks, before your voice reaches the other person. Which options you see depends on your sound driver (the software that lets Windows control your audio hardware) and the exact version of Windows 11 you run. This post covers the built-in settings first, then the classic Sound control panel, app-level settings, and physical changes.
To stop your mic picking up keyboard typing in Windows 11, open Settings System Sound, click your microphone under Input, and lower the Input volume by 10 to 20 points. Then turn on Audio enhancements and choose Voice Clarity if it is offered. Retest by typing while you speak, and move the mic closer to your mouth.
Why Your Mic Picks Up Keyboard Typing
A microphone records every sound that reaches it, and a keyboard produces sharp, short clicks that carry well. Two things make it worse: high input volume and distance. When the input volume or Microphone Boost is high, the mic amplifies quiet sounds, including keystrokes, along with your voice.
Laptops add a second problem. The built-in mic sits a few centimetres from the keys, and every keystroke shakes the laptop’s body, and that shake travels straight to the mic. A headset or desk mic placed away from the keyboard avoids most of this.
Software fixes reduce the problem but rarely remove it completely. For the best result, combine a lower input level, noise suppression and better mic placement.
How to Stop Your Mic from Picking up Keyboard Typing in 🪟 Windows 11
- Open Settings. Press Win+I. The Settings app opens on the System page.
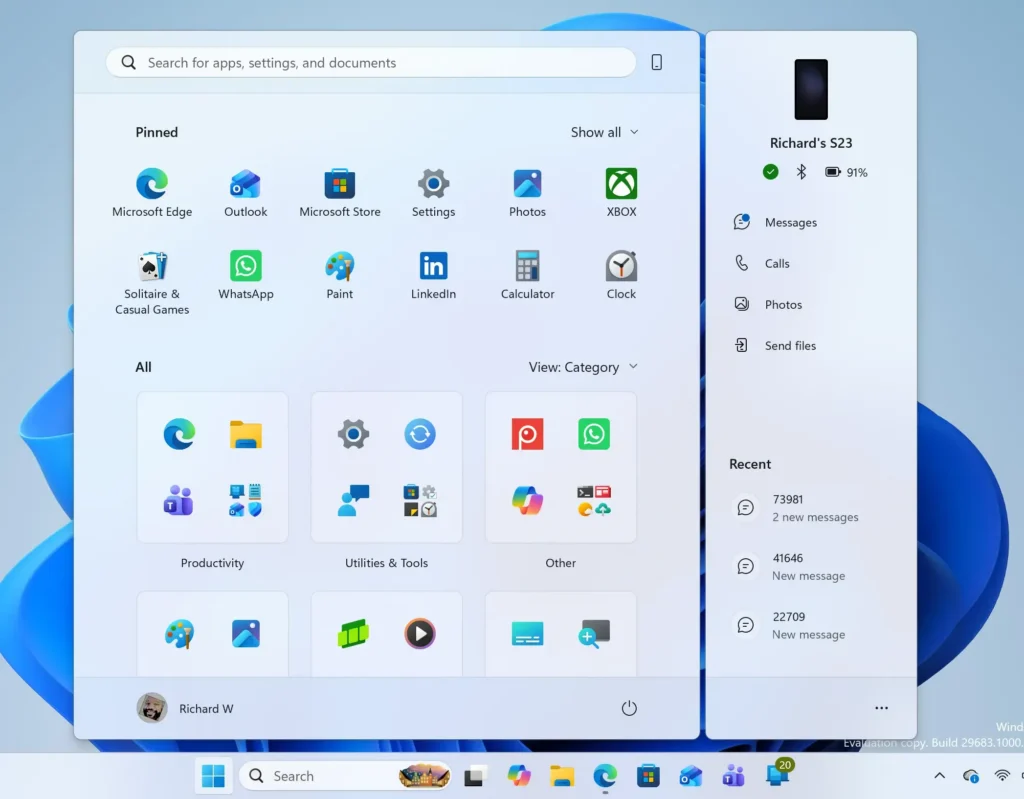
Start Menu - Select Sound. Click System in the left pane if it is not already selected, then click Sound. The list of output and input devices appears.
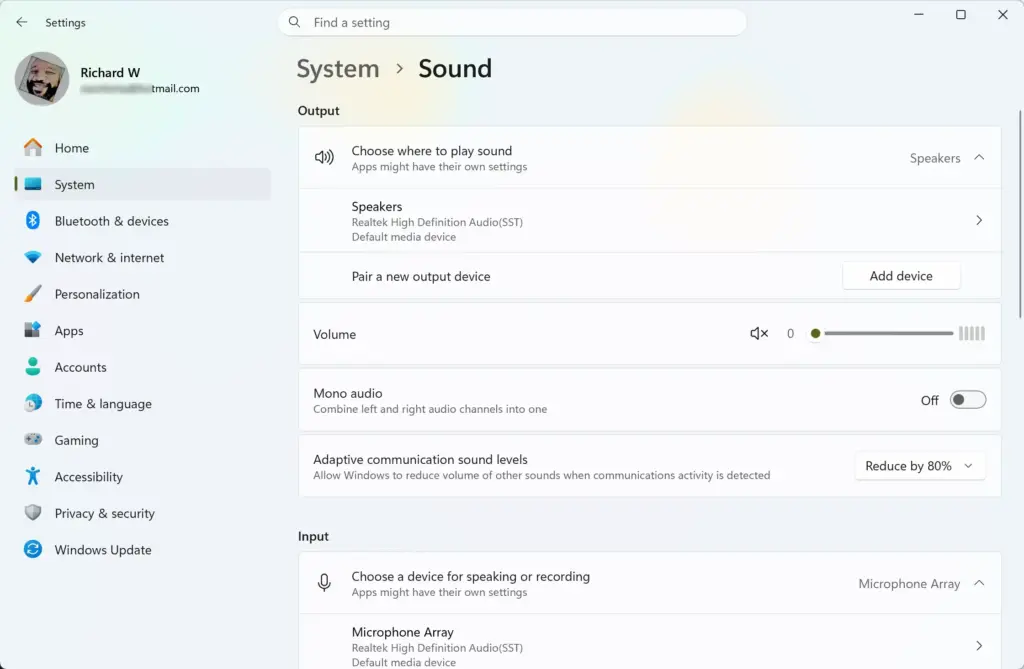
Settings › System › Sound - Scroll down to Input. The Input section lists every microphone Windows detects, including the one built into your laptop, a webcam mic or a headset.
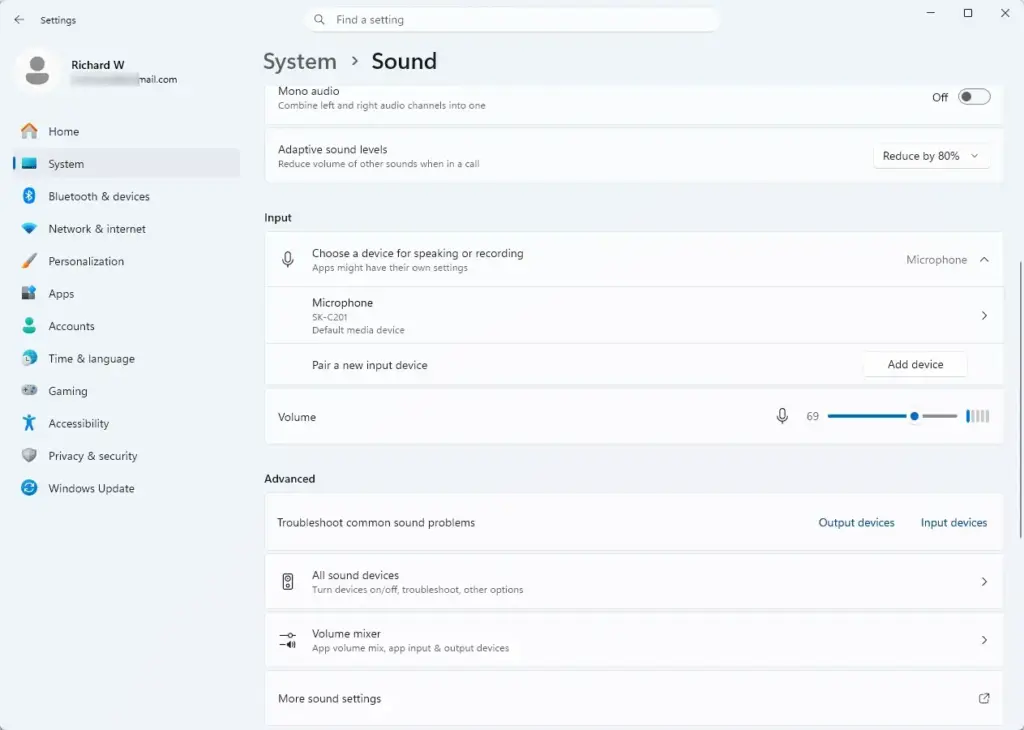
Settings › Sound › Input - Click your microphone. Pick the one you use for calls. Its Properties page opens, with the input volume, a test option and audio enhancement settings.
- Start the microphone test. Under Test your microphone, click Start test. Windows now measures what the mic hears.
- Type while the test runs. Type at your normal speed and watch the level bar. Note how far the bar moves with keystrokes compared with your speaking voice.
- Click Stop test. The test ends and Windows shows a result as a percentage of the peak volume it recorded. A high number on typing alone means the mic is too sensitive.
- Lower Input volume. Drag the Input volume slider down by about 10 to 20 points. Quieter input reduces how much the mic amplifies keystrokes.
- Open Audio enhancements. If you see an Audio enhancements option, turn it on or open its drop-down list. The wording varies by build and driver.
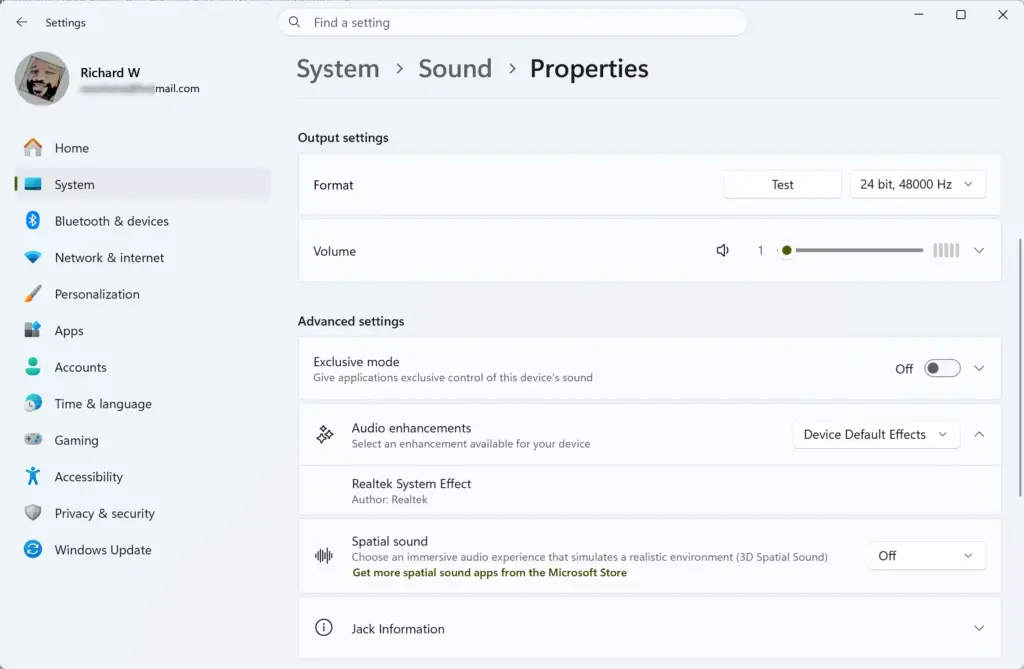
Settings > System > Sound - Choose a noise-reducing effect. On PCs that support it, pick an option such as Voice Clarity (a Microsoft effect that favours your voice over background noise). If your list only offers Default Device Effects, choose that.
- Run the test again. Click Start test, speak, type, then click Stop test. Your voice should still register clearly, and the typing should now be much lower.
- Adjust the volume if your voice is too quiet. Raise Input volume in small steps of 5 points, and test again. Aim for the highest setting that still keeps typing low.
If your voice sounds too quiet after lowering the volume, move the mic closer to your mouth rather than raising the level again. Distance to your mouth is the strongest control you have, because it raises your voice relative to the keys.
If Audio Enhancements Is Missing or Greyed Out
Windows 11 Home and Pro show the same microphone settings, so the edition is not the cause. The Audio enhancements option comes from the sound driver, and many drivers do not provide one for a given mic.
Check these things in order:
- Confirm you are in Windows 11 version 22H2 or later. In Settings System About, look under Windows specifications for the Version line. On version 21H2, the Properties page is laid out differently and may have fewer options.
- Select a different microphone. A USB headset mic may show no enhancements while the built-in mic does, or the reverse.
- Run Windows Update. Open Settings Windows Update, click Check for updates, and install any audio driver updates listed under Advanced options Optional updates. Installing drivers needs an administrator account.
- Check your PC maker’s support page. Laptop makers often ship their own audio software with noise suppression that does not appear in Windows Settings.
If nothing appears, skip to the app-level settings below. Calling apps include their own noise suppression, and it works with any mic.
Reduce Typing Noise in the Classic Sound Control Panel
- Open the Run box. Press Win+R. A small window with a text field appears.
- Open the Sound control panel. Type
mmsys.cpland press Enter. The Sound window opens. - Click the Recording tab. It lists your microphones, with a green level bar beside the one that is active.
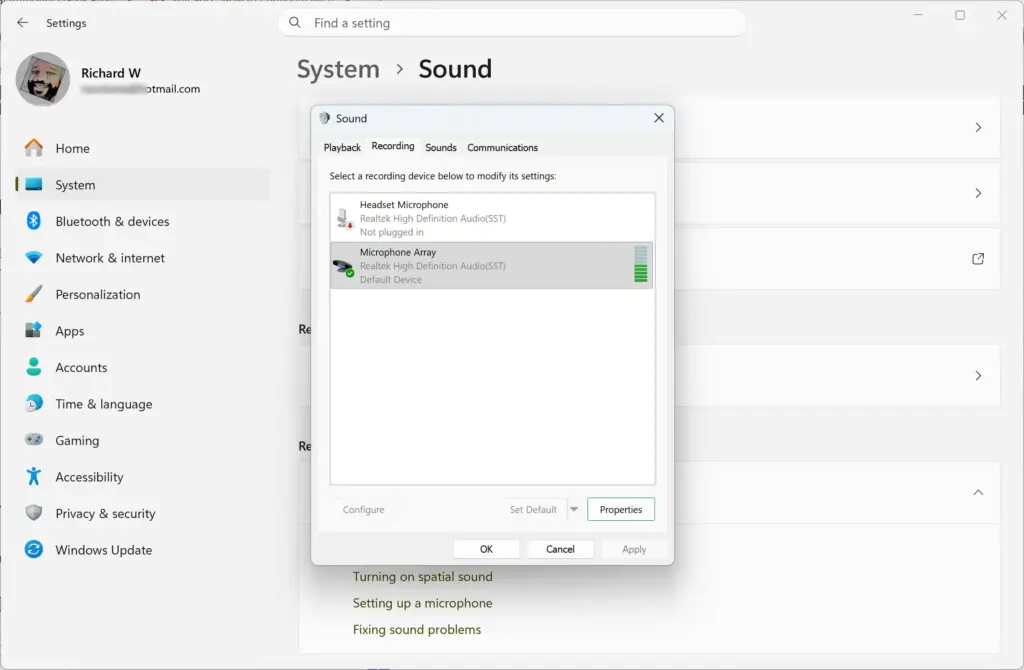
Settings > System > Sound - Select your microphone. Click it once, then click Properties. The Microphone Properties window opens.
- Click the Levels tab. You see a Microphone slider and, on some drivers, a Microphone Boost slider.
- Lower Microphone Boost. Move it to 0.0 dB or the lowest value that still picks up your voice. A high boost makes keystrokes much louder.
- Check the Enhancements tab. If it exists, look for Noise Suppression and turn it on. Do not tick Disable all sound effects, because that switches every enhancement off.
- Click Apply, then OK. The changes take effect straight away. You do not need to restart Windows.
If the Enhancements tab is missing, the driver does not expose it. That is normal on many PCs that use the generic Windows audio driver.
Check Your Result by Listening to Yourself
The Listen tab lets you hear what your mic sends, which makes typing noise obvious. Use headphones for this. With speakers, the sound feeds back into the mic and causes loud squealing.
- Open Microphone Properties again. In the Sound window, select your mic on the Recording tab and click Properties.
- Click the Listen tab. It holds one main option for playback.
- Tick Listen to this device. Put your headphones on first. You now hear your mic live.
- Type and speak. Judge whether the keystrokes are still too loud, and adjust the levels you changed earlier.
- Clear the Listen to this device box. Click Apply and OK. Leaving it on keeps playing your mic through your output device, which is distracting.
Turn On Noise Suppression Inside Your Call App
Calling and recording apps have their own noise filters, and these often work better than Windows settings for keystrokes. Menu names change between app versions, so look for a setting labelled something like noise suppression or background noise in the app’s audio settings.
- Microsoft TeamsOpen the app’s settings, go to the device or audio section, and set Noise suppression to a higher level. Higher levels remove more background noise but can cut off the start of words.
- ZoomOpen Settings Audio and use the background noise suppression list. Choose a stronger level if keystrokes still come through.
- DiscordOpen User Settings Voice & Video and turn on Noise Suppression.
- Browser-based callsThe browser needs permission to use your mic before any call app can work. For Microsoft Edge, see how to allow a website to use your mic and camera in Edge.
Do not stack too many filters. Windows noise suppression plus app suppression can make your voice sound thin or robotic. If that happens, turn one off and keep the other.
Many call apps also have a mute shortcut. By default, Teams uses Ctrl+Shift+M and Zoom uses Alt+A. Muting while you type long messages stops every keystroke from reaching the call.
Change Your Mic Setup to Cut Typing Noise at the Source
Software filters work after the noise has already reached the mic. Changing where the sound comes from works better. None of the changes below involves Windows settings.
- Use a headset with a boom mic. The mic sits at the corner of your mouth, far from the keyboard. This is the most effective single change for most people.
- Move a desk mic off the desk surface. Place it on a boom arm or a stand with a shock mount (a holder that absorbs vibration), so keystrokes do not travel through the desk into the mic.
- Point a directional mic away from the keys. Many USB mics pick up sound from the front and reject the back. Aim the back of the mic at the keyboard.
- Raise your laptop. If you use the built-in mic, a laptop stand and an external keyboard separate the keys from the mic.
- Add a desk mat. A soft mat under the keyboard absorbs the thud of each keystroke.
- Type with a lighter touch. Loud mechanical keyboards transmit more noise than quieter keyboards with soft or flat keys.
Some Bluetooth headsets also have a noise filter built in, so check the headset itself as well. If yours has one, check the headset’s own app or buttons for a noise reduction mode.
Check That You Are Fixing the Right Sound
Sometimes the clicking you hear is not your mic. If you hear clicks from your own speakers every time you type, the touch keyboard may be playing its own key sound. That is separate from the mic and has its own switch. Read how to turn the touch keyboard sound on or off in Windows 11.
If you use voice typing, the mic is also active when you dictate, so background typing can affect accuracy. To show or hide that button, see how to show or hide the voice typing mic on the Windows 11 touch keyboard.
To tell whether the noise reaches the recording, open the Voice Recorder app from the Start menu. Record a few seconds of typing, then play it back. If you hear the keys in the recording, the mic is picking them up. If you do not, the problem is in the app you were using.
How to Undo the Changes
Every change here is reversible, and none of them touch system files. Use the list below to restore the original behaviour.
- Open Settings System Sound. Click your microphone under Input to reach its Properties page.
- Raise Input volume. Drag the slider back to its earlier position. If you did not note it, 100 is the maximum, and most PCs start near that level.
- Reset Audio enhancements. Change the drop-down back to Off or to Default Device Effects, whichever it showed before.
- Restore the classic settings. In mmsys.cpl, reopen Microphone Properties, go to the Levels tab, and move Microphone Boost back up. On the Enhancements tab, clear Noise Suppression if you added it.
A Windows feature update or a sound driver reinstall can reset the input volume and audio enhancements to defaults. If typing noise returns after an update, repeat the steps above.
What to Do Next
If keystrokes still come through after lowering the input volume and turning on noise suppression, test a different microphone. A headset or USB mic often gives a cleaner result than a laptop’s built-in mic, and it separates the noise from the hardware. If you use the mic in a browser, check its permissions next, starting with the Edge mic and camera guide linked above.
You can also explore the rest of the Windows 11 keyboard options. For example, you can enable or disable the touch keyboard in Windows 11 if its sounds or pop-ups are part of what you hear.
Frequently asked questions
How to get help in 🪟 Windows 11 keyboard sound?
Open Get Help from the Start menu and type your problem, such as 'keyboard sound,' to see guided fixes. For sound problems, go to Settings System Sound and select Troubleshoot under Output or Input. Get Help can also connect you with Microsoft support if the steps don't work.
How to set up the Windows keyboard for 🪟 Windows 11 for english?
Open Settings, select Time & language, then Language & region. Click Add a language, choose English, and select it. Open its Language options and check that a keyboard layout such as US is listed under Keyboards. To switch between languages, press Windows key + Spacebar.
How do I make my keyboard bigger I cannot see it on laptop 🪟 Windows 11 10?
You can't enlarge a laptop's physical keys, but you can make the on-screen keyboard bigger. Press Win+Ctrl+O to open it, then drag its edge to resize. To make everything on screen larger, go to Settings Accessibility Text size or Display Scale.
Still have a question?
Answered by AI from this guide. Good questions may be added to this page — please don't include personal details.
Did this guide fix your problem?

About the Author
Richard
Tech Writer, IT Professional
Richard is a writer at Geek Rewind who turns complex IT tasks into clear, step-by-step guides. He draws on years of hands-on experience in system administration and enterprise IT operations, focusing on Windows, Linux and WordPress: the problems people actually run into, and the fixes that work. His server and WordPress guides come from systems he runs himself. Richard builds and maintains the platform behind Geek Rewind, from its Ubuntu servers and Nginx configuration to its custom WordPress plugins. Many new tutorials start with readers' questions, and he's always glad to answer them in the comments.
No comments yet — be the first to share your thoughts!