How to Update BIOS Firmware on Windows 11

- 29 steps
- Needs administrator rights
- Includes a restart or sign-out
A BIOS update in Windows 11 replaces the firmware (the low-level software on the motherboard chip that starts your PC before Windows loads). Read your current BIOS version in System Information and download the matching update from your PC maker’s support site. Then run it from Windows with the PC plugged in.
Most Windows 11 PCs use UEFI, the modern replacement for the legacy BIOS, but menus and download pages still say “BIOS”. This guide uses both names. The Windows steps match a currently supported Windows 11 version (25H2 or 26H2). The BIOS or UEFI screens themselves differ by manufacturer.
A failed update can leave a PC unable to start. The steps below keep that risk low.
To update BIOS on Windows 11, first press Win+R, type msinfo32, and note the BIOS Version/Date line in System Information. Then download the matching update from your PC maker’s support site, plug in the charger, and run the manufacturer’s Windows update program. Install only if the release notes list a fix for a problem you have.
Should you update your BIOS?
Before you start, decide whether you need the update at all. Update only when you have a reason. A PC that runs well does not need a new BIOS, and a failed BIOS update (a flash that goes wrong) is harder to recover from than a Windows problem.
Good reasons include a fix listed in the release notes for a problem you have, such as sleep failures, USB or Wi-Fi dropouts, or boot errors. Other good reasons are a security fix or support for a new CPU on a desktop motherboard. Manufacturers also publish firmware updates that address security vulnerabilities, so check the support page every so often.
Poor reasons include a higher version number with no listed fix, or a hope of better performance. If the release notes do not mention your problem, skip the update.
What to prepare before a BIOS update on Windows 11
Gather these items before you start. Each item prevents a common cause of a failed or stressful update.
- Power: On a laptop, plug in the charger and make sure the battery has charge. On a desktop, use a UPS (a battery backup) if you have one. A power cut during the flash is the most common way to damage firmware.
- A backup: A BIOS update does not touch your files, but a backup protects you if anything else goes wrong.
- Your BitLocker recovery key: BitLocker (Windows drive encryption) can treat a firmware change as tampering and ask for a 48-digit recovery key at the next start. Sign in at account.microsoft.com/recoverykey to find a key saved to your Microsoft account. Work and school PCs often store the key with your IT department instead.
- Your PC’s exact model: The wrong BIOS file for your model can stop the PC from booting. The steps below show where to read the model.
- A BIOS password, if you set one: Some updates ask for it.
How to update BIOS firmware on Windows 11
These steps cover a full BIOS update on Windows 11, from checking your current version to confirming the new one. The steps assume the manufacturer supplies a Windows-based update program, which most do for laptops and prebuilt PCs.
- Open System Information. Press the Win+R, type
msinfo32, and press Enter. The System Information window opens on System Summary.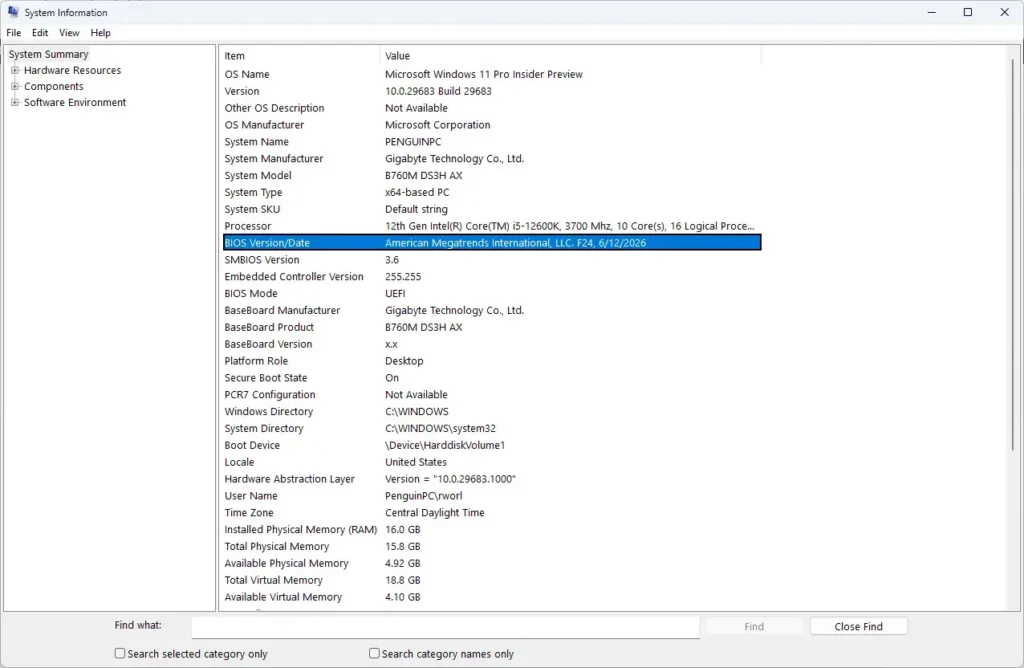
- Read the BIOS Version/Date line. It shows the manufacturer, a version code, and the release date. Write it down exactly. For more ways to read it, see checking your BIOS version with Msinfo32.
- Note the System Manufacturer and System Model lines. These identify a laptop or prebuilt PC. If you built the desktop yourself, note BaseBoard Manufacturer and BaseBoard Product instead, which name the motherboard.
- Check that BIOS Mode says UEFI. A value of Legacy means the PC starts in the older mode. Most Windows 11 PCs show UEFI, because Windows 11 requires UEFI with Secure Boot capability.
- Back up your important files. Copy documents and photos to an external drive or OneDrive.
- Locate your BitLocker recovery key. Open account.microsoft.com/recoverykey and confirm a key is listed for this PC. Keep it available on another device until the update is complete.
- Open your manufacturer’s support website. Use the PC maker’s site for a laptop or prebuilt PC, or the motherboard maker’s site for a custom desktop. Search by model name or serial number.
- Open the Drivers or Downloads page for your model. Choose Windows 11 as the operating system if the site asks.
- Find the BIOS or Firmware section. Look for an entry named BIOS, UEFI, or Firmware. Some sites place it under a category such as System Firmware.
- Compare the listed version with your current one. Use the version string and date you wrote down. If they match, you already have the latest BIOS and can stop here.
- Read the release notes. They list what the update fixes and sometimes warn about steps to follow first, such as updating to an earlier BIOS version before the newest one.
- Download the BIOS update file. Save it to your Downloads folder. If the file arrives as a ZIP archive, right-click it and choose Extract All first.
- Connect the charger or power source. Leave it connected for the whole update. Do not rely on battery power alone.
- Suspend BitLocker (requires administrator privileges). Right-click Start, choose Terminal (Admin), and approve the prompt. Type the command shown under the BitLocker section below and press Enter. Skip this step if BitLocker is off on your PC.
- Save your work and close every app. This includes antivirus tools or other programs that scan files while the update runs.
- Run the BIOS update program as administrator. Right-click the downloaded
.exefile and choose Run as administrator. Approve the User Account Control prompt. The update tool opens and shows the current and new BIOS versions. - Start the update. Click the button the tool offers, usually labeled Update, Flash, or Install. Flashing means writing the new firmware to the chip. The PC then restarts to complete the process.
- Wait until the PC finishes on its own. The screen may stay black, the fans may run loudly, and the PC may restart more than once. Never hold the power button or unplug the PC during this stage. It can take several minutes.
- Sign in to Windows. If a blue screen asks for a BitLocker recovery key, enter the 48-digit key from your Microsoft account.
- Confirm the new version. Open System Information again with
msinfo32and check that the BIOS Version/Date line shows the new version. - Resume BitLocker (requires administrator privileges). Open Terminal (Admin) again and run the enable command shown below. Skip this if you did not suspend it.
- Review your UEFI settings. Some updates reset options to their defaults. Restart into UEFI and check items you changed earlier, such as boot order or virtualization.
Check your BIOS version with PowerShell
PowerShell gives the same version details as System Information, in a format you can copy and paste. This helps when you need to send the details to support or compare them against a download page.
- Right-click Start and choose Terminal.
- Paste the command below and press Enter.
Get-CimInstance -ClassName Win32_BIOS | Select-Object Manufacturer, SMBIOSBIOSVersion, ReleaseDateThe output lists the manufacturer, the version string, and the release date. For another method that reads the version from the firmware screen, see how to check the UEFI BIOS version in Windows 11.
Suspend and resume BitLocker for a BIOS update
Suspending BitLocker lets the PC start after the firmware changes without asking for the recovery key. The protection is off while suspended, so turn it back on as soon as the update finishes.
To see whether BitLocker is active, open Terminal (Admin) and run manage-bde -status. Look at the Protection Status line for the C: drive.
Before the update, suspend protection on the system drive with this command:
manage-bde -protectors -disable C:Resume protection after you confirm the new BIOS version:
manage-bde -protectors -enable C:On Windows 11 Home, drive encryption appears as Device encryption in Settings rather than the full BitLocker tool, and the manage-bde commands may not be available on every Home PC. If the commands fail, make sure your recovery key is saved at account.microsoft.com/recoverykey and continue. Windows Pro includes BitLocker Drive Encryption in Control Panel, where you can also choose Suspend protection.
Update the BIOS from inside UEFI instead
Some PCs, especially custom desktops, update through a flash tool built into the UEFI screen rather than a Windows program. Vendors name these tools differently, for example EZ Flash on ASUS, M-FLASH on MSI, and Q-Flash on Gigabyte boards.
Use these steps on any flash tool:
- Download the BIOS file from the motherboard maker’s support page and read its instructions.
- Format a USB flash drive as FAT32 and copy the extracted BIOS file to it. Some makers require a specific file name, so check the instructions.
- Restart the PC into UEFI. Accessing UEFI in Windows 11 covers the Settings route and the key presses.
- Open the flash tool listed in the UEFI menu and select the file on the USB drive.
- Confirm the update and leave the PC alone until it restarts.
This method avoids Windows entirely, so it removes the risk of an app or driver interfering. Follow the exact wording in your motherboard’s manual, because the menu names vary.
Use the manufacturer’s update tool or Windows Update
Many manufacturers ship an app that checks for BIOS updates for you. Examples include Dell Command Update, Lenovo Vantage, MyASUS, and HP Support Assistant. These tools pick the right file for your exact model, which reduces the chance of a mismatch.
Some firmware also arrives through Windows Update. Open Settings Windows Update Advanced options Optional updates and look for an entry that mentions firmware. Whether an update appears here depends on the manufacturer, so a missing entry does not mean your BIOS is current. Check the maker’s support page to be sure.
Why a BIOS update fails or does not start
These are the problems a reader is most likely to hit, with the usual fix for each.
- The update program says the file does not match this system. The download is for a different model or variant. Go back to the support page and check the exact model name and part number.
- The program refuses to run with a power warning. A laptop needs the charger connected and some battery charge. Connect power and try again.
- The program says the new version is older than the installed one. Many makers block downgrades. If you need an older version, read the release notes for the supported method.
- Nothing happens after you start the update. Close other apps and security tools, then run the file again with Run as administrator.
- A BIOS password prompt appears. Enter the password you set in UEFI. If you do not know it, contact the manufacturer or your IT department before continuing.
- Windows asks for the BitLocker recovery key after the update. Enter the 48-digit key from your Microsoft account or your IT department, then resume protection.
- The PC does not start Windows after the update. Restart once and wait a few minutes, since the first start after a flash takes longer. If it still fails, check the maker’s support page for recovery instructions for your model.
How to undo a BIOS update
Some desktop motherboards have a dual BIOS or a recovery feature that restores a working copy if a flash fails. The motherboard manual explains whether yours has one and how it works.
If the update changed your UEFI settings, you can usually restore a saved profile, or reset to defaults and set options again. Firmware protections such as Secure Boot (a setting that only lets trusted software start the PC) may reset as well, so review the firmware protection settings in Windows 11 afterward.
What to do next
Restart into UEFI and check the settings you changed before the update. If virtualization turned off, enable CPU virtualization in UEFI to restore it. Check the manufacturer’s support page every few months for new BIOS releases, and read the release notes before you install any of them.
Frequently asked questions
How to update to the latest build of Windows 11 preview?
Preview builds of Windows 11 are offered only to people enrolled in the Windows Insider Program. Join the program, pick a channel, and check Windows Update for the new build. Back up your files first, because preview builds can contain bugs that affect daily use.
How to update BIOS?
To update BIOS, first read your current version in System Information by pressing Win+R and typing msinfo32. Download the matching update from your PC maker's support site. Plug in your PC, suspend BitLocker if it is on, and run the update file as administrator. Do not interrupt it.
How to update motherboard BIOS?
To update a motherboard BIOS, find the board's name first. In System Information, check the BaseBoard Manufacturer and BaseBoard Product lines. Then download the matching BIOS file from the motherboard maker's support site and run its update tool, or copy the file to a USB drive and flash it from the UEFI screen.
How do I update my BIOS?
To update your BIOS, check your current version first, then download the matching file from your PC maker's support site. Back up your files, connect the charger, and suspend BitLocker if it is on. Run the file as administrator and wait for the PC to restart on its own.
How to update asus BIOS?
To update an ASUS BIOS, find your exact model on the ASUS support site and download its BIOS file. Run the file as administrator with the charger connected. If the file has no Windows tool, copy it to a FAT32 USB drive and use EZ Flash in the UEFI screen. Follow your board's manual.
How to check BIOS version Windows 11?
To check your BIOS version in Windows 11, press Win+R, type msinfo32, and press Enter. Read the BIOS Version/Date line in System Summary. You can also open Terminal, paste Get-CimInstance -ClassName Win32_BIOS | Select-Object Manufacturer, SMBIOSBIOSVersion, ReleaseDate, and press Enter.
Still have a question?
Answered by AI from this guide. Good questions may be added to this page — please don't include personal details.
Did this guide fix your problem?

About the Author
Richard
Tech Writer, IT Professional
Richard is a writer at Geek Rewind who turns complex IT tasks into clear, step-by-step guides. He draws on years of hands-on experience in system administration and enterprise IT operations, focusing on Windows, Linux and WordPress: the problems people actually run into, and the fixes that work. His server and WordPress guides come from systems he runs himself. Richard builds and maintains the platform behind Geek Rewind, from its Ubuntu servers and Nginx configuration to its custom WordPress plugins. Many new tutorials start with readers' questions, and he's always glad to answer them in the comments.
No comments yet — be the first to share your thoughts!