How to Make Windows 11 Safer with Firmware Protection

Firmware Protection in Windows 11 checks that your device firmware is safe before the operating system starts. It guards the core software that runs your hardware against attacks that happen at boot time, before Windows and your antivirus have loaded.
Most PCs built in the last several years already have the hardware this feature needs, such as UEFI and TPM version 2.0. There is one more requirement. The processor and firmware must also support a secure launch (a DRTM-capable setup). That requirement is why the switch is missing or greyed out on some otherwise modern machines. This guide covers what the feature does, how to turn it on in Windows Security, and what to try if the switch won’t move.
Open Windows Security, go to Device security, click Core isolation details, and turn on the Firmware protection switch. Restart your PC to apply the change. If the switch is greyed out, your hardware lacks secure launch support.
What Is Firmware Protection?
Firmware Protection is a built-in Windows 11 security setting that stops untrusted code from running during the earliest part of startup. Windows checks the core startup instructions of your PC, the firmware, before the main operating system loads. That blocks deep-level malware that tries to take over the machine before Windows has a chance to defend it.
Think of Firmware Protection as a security guard at the door of your PC’s startup. It checks that everything is safe before Windows is allowed to load. This extra layer of protection helps in four ways:
- It stops malware attacks that try to hide deep inside your PC, below the level where Windows normally looks.
- It makes sure only trusted software runs when your PC turns on.
- It keeps your PC’s firmware safe from being changed without permission.
- It gives extra security to special devices called Secured-core PCs.
It costs you nothing to turn on if your hardware supports it, so most people should enable it.
How to Turn On Firmware Protection in 🪟 Windows 11
The easiest way to turn on Firmware Protection is the built-in Windows Security app. You open Windows Security, go to Device security, and open Core isolation details. The switch that locks down your startup code is on that page. You need an administrator account, and the steps are the same on Windows 11 Home and Pro.
- Click the Start button, then open Settings Privacy & security Windows Security, and click Open Windows Security. You should see the Windows Security home screen with its protection areas.
- In the Windows Security window, click Device security. The page that opens lists items such as Core isolation and Security processor.
- Find the section called Core isolation and click Core isolation details. If you don't see a Core isolation section at all, your device or its settings don't expose it, and you can't use this method.
- Find the switch for Firmware protection and turn it On. Approve the User Account Control prompt if one appears. The switch should now show as On.
- If the Firmware protection option is greyed out and you can't change it, or it isn't listed, the usual cause is hardware that doesn't support it. Older firmware, or a CPU without secure launch support, will do this. Otherwise, you may need to adjust a setting in the Windows Registry. (Don't worry, we'll explain that below.)
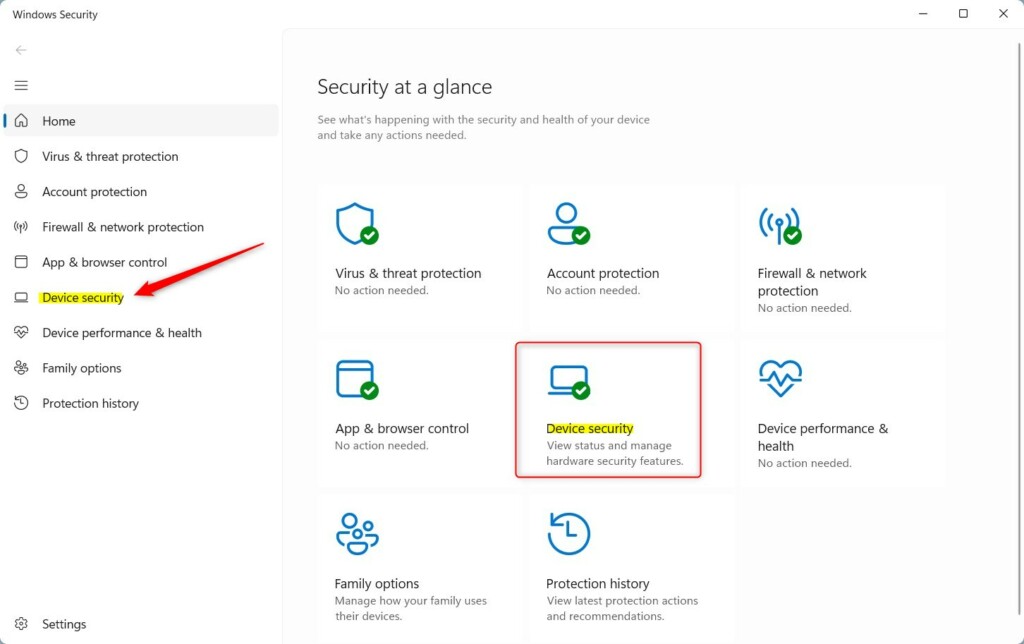
Windows Security app - Device Security section
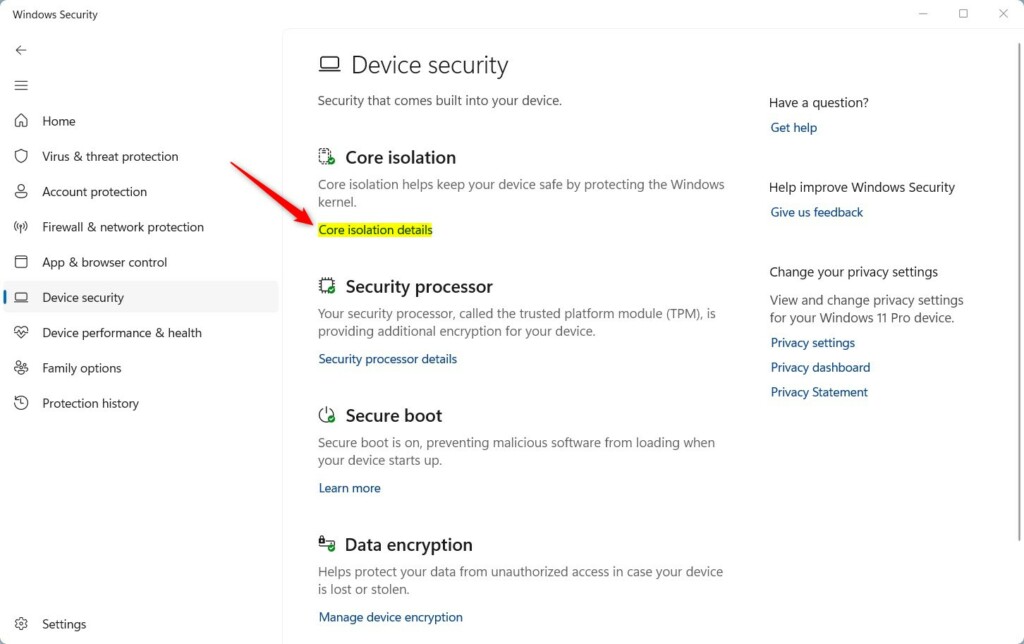
Core isolation details - Firmware Protection switch
- Restart your computer so the change takes effect. Windows Security may show a "Restart your device" notice until you do. To undo the change later, return to the same page, turn Firmware protection Off, and restart again.
How to Enable Firmware Protection Using Windows Registry
If the Windows Security app hides the option or won't let you change it, you can enable Firmware Protection through the Windows Registry instead. You open the Registry Editor from the Run box and go to HKEY_LOCAL_MACHINE\SYSTEM\CurrentControlSet\Control. From there you set the value that forces this security setting on. The Registry Editor is included in both Home and Pro.
Be careful here. A wrong edit in the registry can cause problems, so follow the steps exactly. Also, the registry value only requests the feature. It can't add hardware support, so if your device lacks it, Windows will not protect your firmware even with the value set.
- Press Windows + R to open the Run box. Type
regeditand press Enter to open the Registry Editor. Click Yes if User Account Control asks for permission. - Before you change anything, click File Export and save a backup of the registry. If something goes wrong, you can restore it by double-clicking the saved file.
- Navigate to this key path:
HKEY_LOCAL_MACHINE\SYSTEM\CurrentControlSet\Control\DeviceGuard\Scenarios\SystemGuard. You can expand the folders in the left pane, or paste the path into the address bar at the top of the window. If you can't find it, check the path for typos before going further. - Right-click the SystemGuard folder, then choose New DWORD (32-bit) Value. A new value appears in the right pane with its name ready to edit.
- Name this new value
Enabled. If a value with this name already exists, skip creating it and edit the existing one instead. - Double-click the Enabled value and set its Value data to
1to turn on Firmware Protection. - Click OK and close the Registry Editor.
- Restart your computer to apply the changes. To undo this later, set the Enabled value back to 0 (or delete it) and restart again.
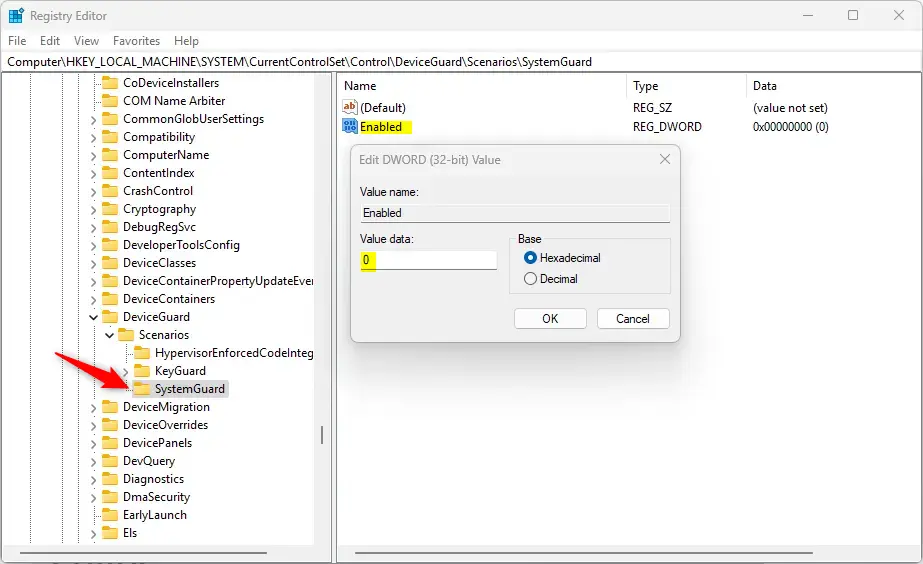
Editing the Registry to enable Firmware Protection
Summary
Firmware Protection keeps your computer safer by stopping malicious software from hijacking your hardware before the operating system loads. Turning it on gives your PC an extra layer of defense against deep-level attacks and helps make sure only trusted code runs during startup. In short, it does the following:
- Stops malware that tries to attack your PC before Windows starts.
- Makes sure your PC only runs trusted software during startup.
- Protects the important firmware that helps your PC start.
- Gives extra security, especially if you have a Secured-core PC.
For more details, you can visit the official Microsoft page on System Guard Secure Launch and SMM Protection.
By following these steps, you help protect your PC from hidden threats and keep your Windows 11 experience safe and smooth. If the setting stays greyed out after a restart, check your PC maker's support page for a firmware (BIOS/UEFI) update, since that is the most common fix.
Was this guide helpful?

About the Author
Richard
Tech Writer, IT Professional
Richard is a writer at Geek Rewind who turns complex IT tasks into clear, step-by-step guides. He draws on years of hands-on experience in system administration and enterprise IT operations, focusing on Windows, Linux and WordPress: the problems people actually run into, and the fixes that work. His server and WordPress guides come from systems he runs himself. Richard builds and maintains the platform behind Geek Rewind, from its Ubuntu servers and Nginx configuration to its custom WordPress plugins. Many new tutorials start with readers' questions, and he's always glad to answer them in the comments.
No comments yet — be the first to share your thoughts!