How to Enable or Disable CPU Virtualization in UEFI BIOS on Windows PC


CPU virtualization in your PC’s UEFI BIOS is a motherboard setting that lets your processor run virtual machines, Android emulators, and tools like Windows Subsystem for Linux. Intel processors call this feature Intel VT-x, while AMD processors call it AMD-V. Without this hardware setting turned on, virtual software cannot run properly on your system. Most modern PCs support it, but on many machines it ships switched off.
Enable CPU virtualization by restarting your PC, opening the UEFI BIOS setup with F2 or Del, and setting Intel (VMX) Virtualization Technology to Enabled on Intel chips or SVM Mode to Enabled on AMD chips. Save with Save Changes & Reset. Check the result afterward in Task Manager under Performance CPU, where Virtualization should read Enabled.
These Windows features and tools depend on it:
- Virtual machines Virtualization-based Security (VBS)
- Windows Sandbox
- Core Isolation Memory Integrity
- Hyper-V
- Windows Hypervisor Platform
- Virtual Machine Platform
- Windows Subsystem for Linux (WSL)
Hyper-V and Windows Sandbox are only available in Windows 11 Pro, Enterprise and Education. Virtual Machine Platform, Windows Hypervisor Platform and WSL work on Home as well, but they still need virtualization turned on in the firmware.
Before you change anything, check whether virtualization is already on:
- Press Ctrl+Shift+Esc to open Task Manager .
- Click Performance in the left pane. If you only see a short list of running apps, click More details first.
- Click CPU. Look at the lower right of the chart, where the Virtualization line shows either Enabled or Disabled.
How to Change CPU Virtualization Settings
If it says Disabled, the setting is off in the firmware, or another hypervisor is controlling it. To change it, restart your computer and open the UEFI BIOS setup screen with your manufacturer’s shortcut key, such as F2 or Del. Find the processor settings menu, locate the virtualization toggle, switch it to your preferred setting, and save your changes before booting back into Windows.
The steps below follow a common layout. Menu names and positions differ between motherboard and laptop makers, so yours may not match exactly.
- Restart your computer and go into the UEFI BIOS settings. This usually involves pressing a specific key (like F2, F10, F12, or DEL) right after you turn on your PC, before Windows starts loading. Your computer screen might tell you which key to press. Tap the key repeatedly rather than pressing it once, because the window is short.
- If the key doesn't work, use Windows instead. Go to Settings System Recovery, click Restart now next to Advanced startup, then choose Troubleshoot Advanced options UEFI Firmware Settings and click Restart. This option only appears on PCs that boot in UEFI mode. Fast Startup can also swallow the key press on a normal boot, so use Restart rather than a full shutdown and power-on.
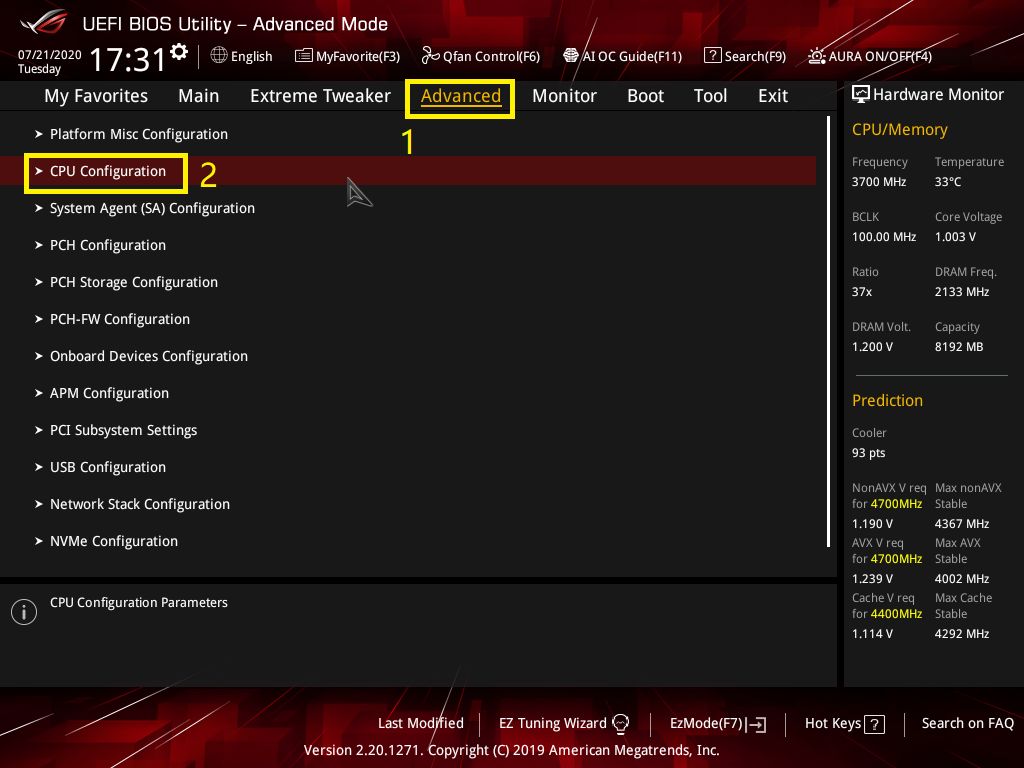
- Look for a tab named Advanced. Once you find it, click on it. Then, find and click on CPU Configuration. You should now see a list of processor options. Some boards put the setting somewhere else, for example under a Security, Overclocking or Tweaker section, so look there if you can't find it.
- Now, you'll need to make a change based on whether your computer has an Intel or AMD processor:
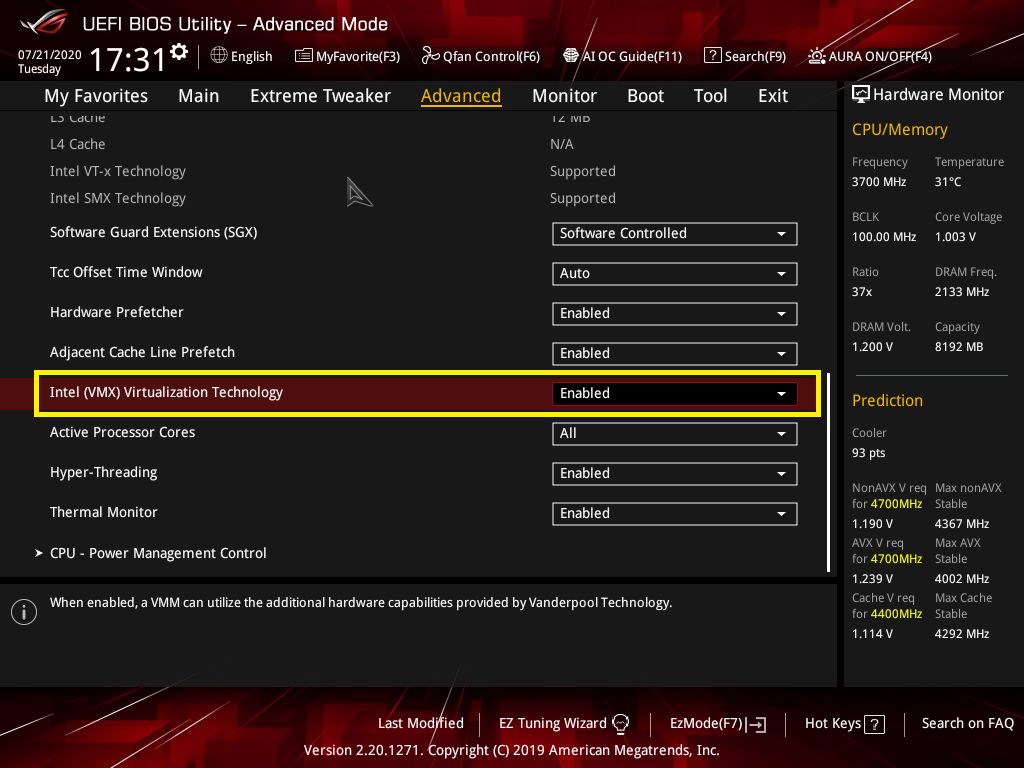
- If you have an Intel CPU: Find the setting called Intel (VMX) Virtualization Technology. Set it to Enabled to turn virtualization on, or Disabled to turn it off.
- If you have an AMD CPU: Find the setting called SVM Mode. Set it to Enabled to turn virtualization on, or Disabled to turn it off.
- Go to the Exit tab. Click on Save Changes & Reset. On some boards, F10 does the same thing.
- A confirmation box will appear. Click OK to save your changes and restart your computer.
- After Windows loads, open Task Manager again and go to Performance CPU The Virtualization line should now match the setting you chose.
If you turn virtualization off, Hyper-V, WSL 2, Windows Sandbox and virtual machines will stop working, and Memory integrity may stop working too. Windows may also report that virtualization is disabled in the firmware. If the option is missing or greyed out, your processor or motherboard may not support it, or the BIOS may be locked by an administrator password. Updating the BIOS from your manufacturer sometimes adds the setting. If Task Manager still shows Disabled after you enabled it, check that you saved the change. If your PC is managed by an organization, that organization may also block it.
References:
https://support.microsoft.com/en-US/Windows/Experience/enable-virtualization-on-windows
Summary
You can quickly enable CPU virtualization by entering your computer's UEFI BIOS menu during startup and locating the processor settings. Look for options labeled Intel VMX or AMD SVM mode, switch the setting on or off based on your needs, and save your changes before exiting the BIOS. Then confirm the result in Task Manager under Performance CPU
Did this guide fix your problem?

About the Author
Richard
Tech Writer, IT Professional
Richard is a writer at Geek Rewind who turns complex IT tasks into clear, step-by-step guides. He draws on years of hands-on experience in system administration and enterprise IT operations, focusing on Windows, Linux and WordPress: the problems people actually run into, and the fixes that work. His server and WordPress guides come from systems he runs himself. Richard builds and maintains the platform behind Geek Rewind, from its Ubuntu servers and Nginx configuration to its custom WordPress plugins. Many new tutorials start with readers' questions, and he's always glad to answer them in the comments.
No comments yet — be the first to share your thoughts!