How to Reset Your Windows 11 PC While Keeping Your Files

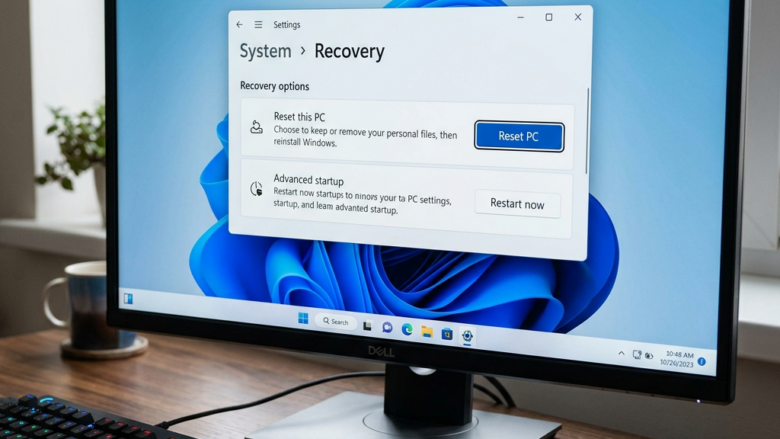
Resetting your Windows 11 PC reinstalls the operating system while keeping your personal files, such as documents, photos, and music, on your drive. It clears out broken settings and problem apps, and it often fixes a slow or unstable computer. The whole process usually takes 30 minutes to a few hours, depending on your hardware.
You can start it in about two minutes from Settings System Recovery It’s a good fix when your PC runs slowly, crashes often, or keeps throwing error messages. The reset works the same on Windows 11 Home and Pro.
Open Settings System Recovery and click Reset PC next to Reset this PC. Choose Keep my files to reinstall Windows 11 while preserving your documents, photos, music, and other personal files. The process takes 30 minutes to a few hours.
Before You Reset: Important Steps
Before You Reset: Important Steps
Do these three things before you start. They take a little time, but they protect your data and save you trouble later.
1Back Up Your Important Files (Just in Case!)
The “Keep my files” option is reliable, but a power cut, a failing drive, or an unexpected error can still wipe your data. A backup means a failed reset costs you time, not files.
- What to back up: Documents, photos, videos, music, and anything else you saved or downloaded. Check Desktop, Documents, Downloads, Pictures, and any folders you created yourself. Don’t forget browser bookmarks and saved game files if you care about them.
- Where to back up: An external hard drive, a USB drive, or online storage such as OneDrive, Google Drive, or Dropbox.
Once the backup finishes, open a few of the copied files from the backup location to confirm they work.
2Get Your App Installers and License Keys Ready
Gather your app installers, license keys, and product codes now. You won't be able to retrieve them from the PC once the reset is done.
A quick way to build your list is to open Settings Apps Installed apps and write down what you use. Paid software, such as office suites and photo editors, is the most important to note. Store apps from the Microsoft Store can be downloaded again later.
3Check Your BitLocker Recovery Key (If You Use It)
Find your BitLocker recovery key (a long numeric safety code that unlocks an encrypted drive) before you reset. If your drive is encrypted and something prompts for the key, you can get locked out of your own computer without it. Many PCs have encryption turned on automatically, so check even if you don't remember setting it up.
Your recovery key is usually saved to your Microsoft account. To find it, use a different device and go to account.microsoft.com/devices/recoverykey. Sign in and look for your PC in the list. You can also print the key or save it somewhere safe, such as a password manager. If you set up encryption through a work or school account, your IT department may hold the key instead.
How to Reset Your PC and Keep Your Files
Now open Windows Settings to start the recovery process. Plug in your laptop first. A reset that runs out of battery partway through can leave Windows damaged.
Step 1Go to Recovery Settings
The Recovery page in Settings holds the tool that resets your PC. Follow these steps to reach it.
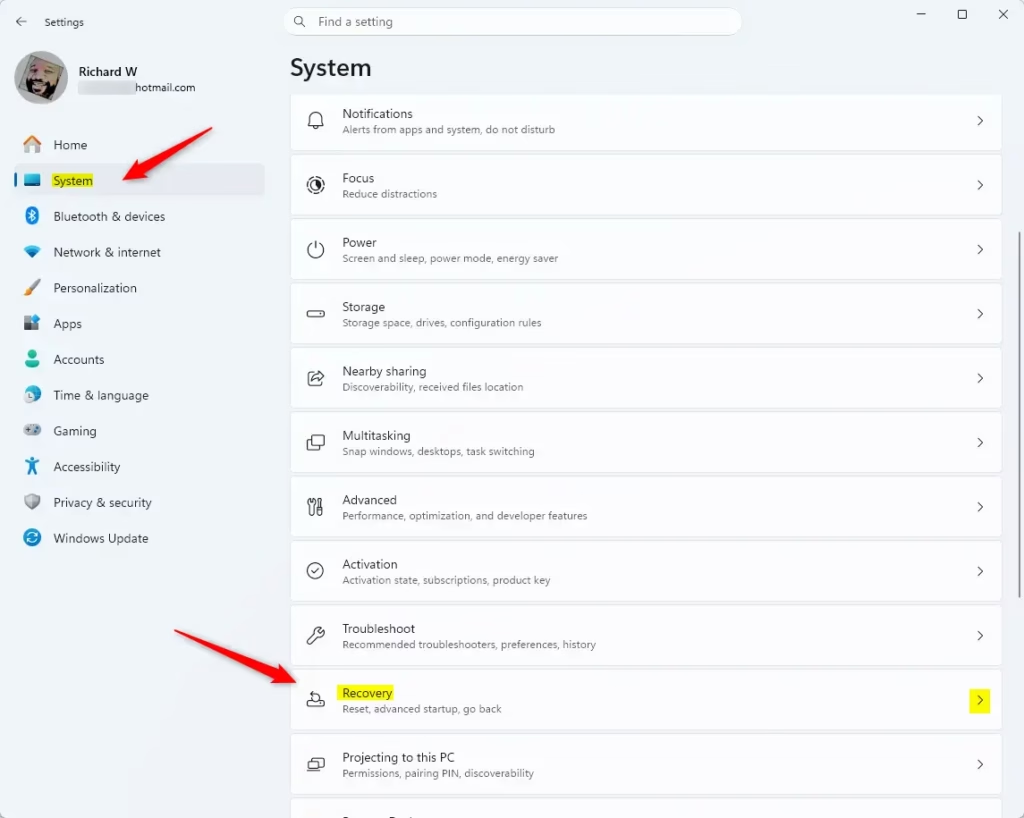
- Click the Start button (the Windows logo) in the bottom-left corner. The Start menu opens.
- Click the Settings icon (it looks like a gear). Or, press
Windows key + Ion your keyboard. The Settings window opens. - In the Settings window, click System.
- Scroll down the menu on the left and click Recovery. You should now see a list of recovery options, including Reset this PC.
Step 2Start the Reset
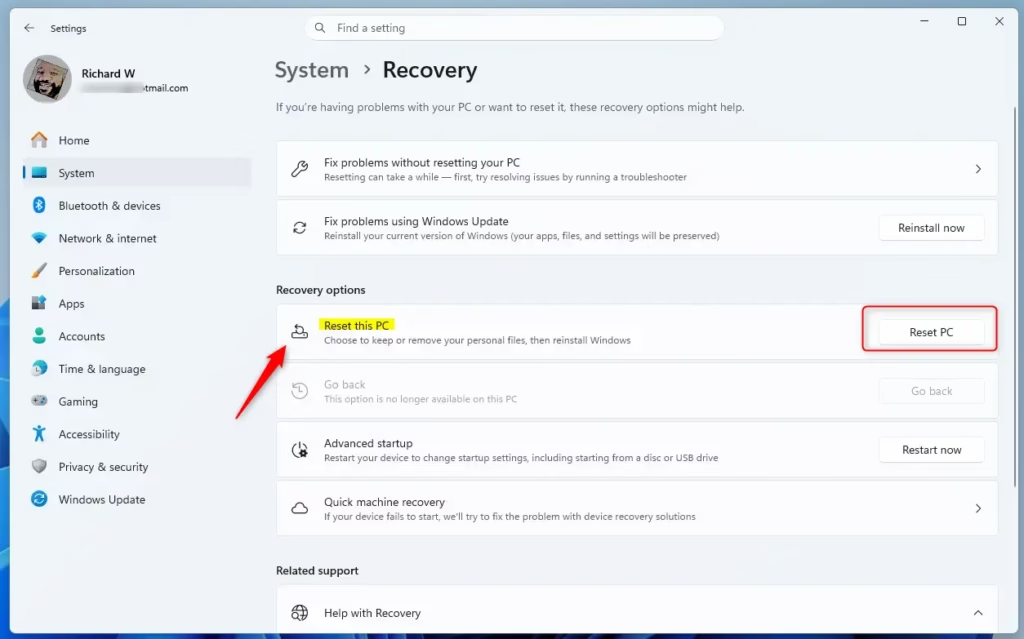
On the Recovery page, find the Reset this PC option. Next to it is a button labeled Reset PC (some builds label it Get started). Clicking it starts the reset process.
- Click Reset PC (or Get started) next to Reset this PC. A window opens asking how you want to reset.
If the button is greyed out or nothing happens, restart the PC and try again. If it still fails, Windows may be missing its recovery files. In that case, you can reinstall Windows with installation media from Microsoft.
Step 3Choose "Keep my files"
The first choice in the window is what to do with your files. "Keep my files" reinstalls Windows and deletes your installed apps and settings, but leaves your personal documents and photos alone. Pick it if you want a clean system without losing your data.
- Keep my files: Reinstalls Windows. It removes apps and settings but keeps your personal files. This is the one you want.
- Remove everything: Reinstalls Windows and removes all your files, apps, and settings. Use this if you want a completely fresh start or are giving your PC away.
- Click Keep my files. The next screen asks how you want to reinstall Windows.
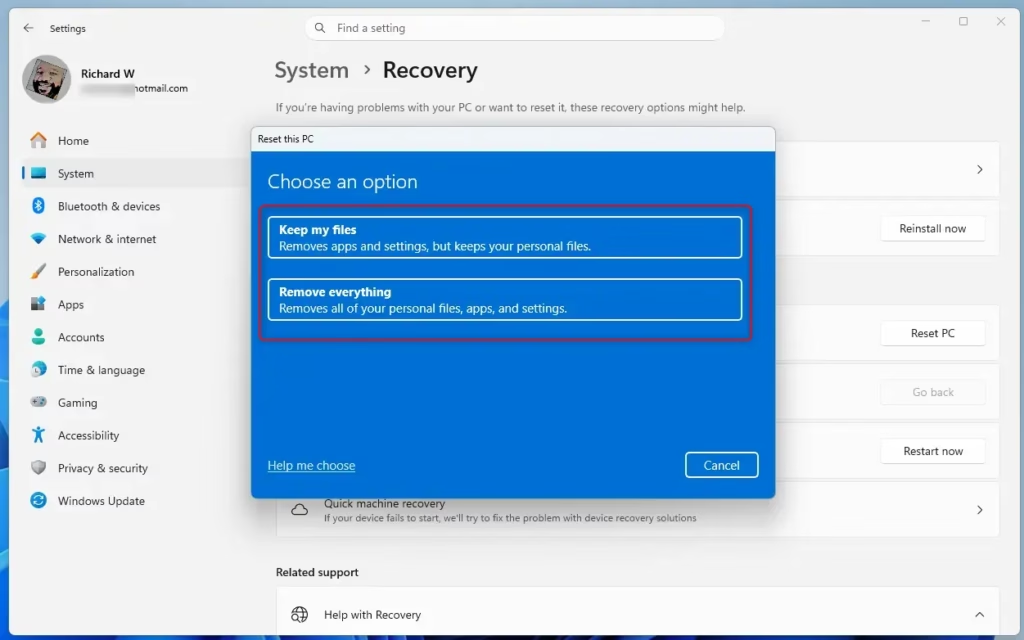
Why: Choosing "Keep my files" tells Windows to keep your documents, pictures, music, videos, and other personal files, found in folders like Desktop, Documents, and Downloads. All installed apps, like games or other software, will be removed. Files stored outside your user folders may not be kept, which is another reason to back up first.
Step 4Choose How to Reinstall Windows
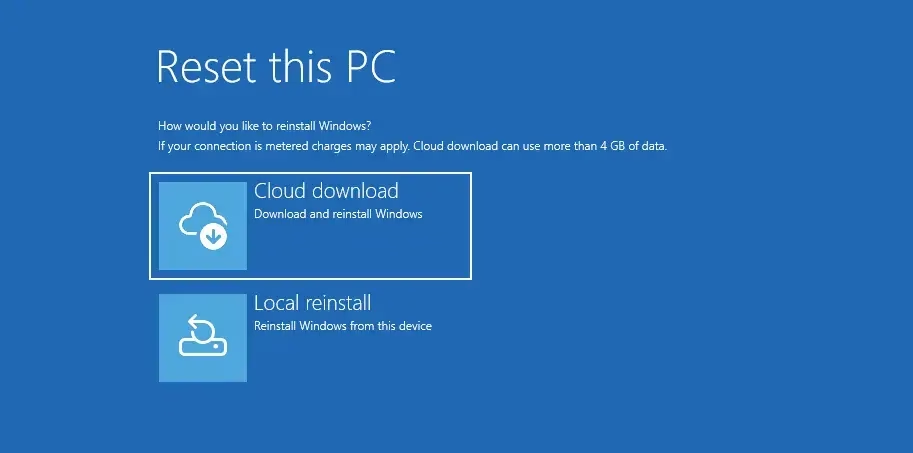
Next you choose where Windows gets the fresh system files. Cloud download pulls new installation files from Microsoft and takes longer. Local reinstall uses copies already on your drive and is usually faster.
- Cloud download: Downloads a new copy of Windows from Microsoft's servers. It's usually the best choice because you get the latest version with its updates. It needs a good internet connection and a few gigabytes of data. It can also work when the local Windows files are damaged.
- Local reinstall: Uses the Windows files already on your computer. It's usually faster if your internet is slow, but it might not include the newest updates. If those local files are damaged, it can fail.
- Click the option that suits your connection. If you have good internet, choose Cloud download.
A metered or very slow connection is the main reason to pick Local reinstall. Windows will download any missing updates after the reset anyway.
Step 5Check Extra Settings
The next screen is the extra settings screen. Review it to confirm what will be removed and whether the PC's pre-installed manufacturer apps come back. This is where you check that your choices match what you want.
- Read the summary of your choices on the screen.
- Click Change settings if the link appears. You may see options such as whether to restore pre-installed apps (apps added by the PC maker) or whether to download Windows.
- Check that your personal files will be kept and that you haven't picked an option that erases all data. Options for cleaning data belong to Remove everything and aren't what you want here.
- Click Confirm to save any changes and go back.
The options you see depend on your PC and Windows version. If there's no Change settings link, the defaults apply, and you can move on.
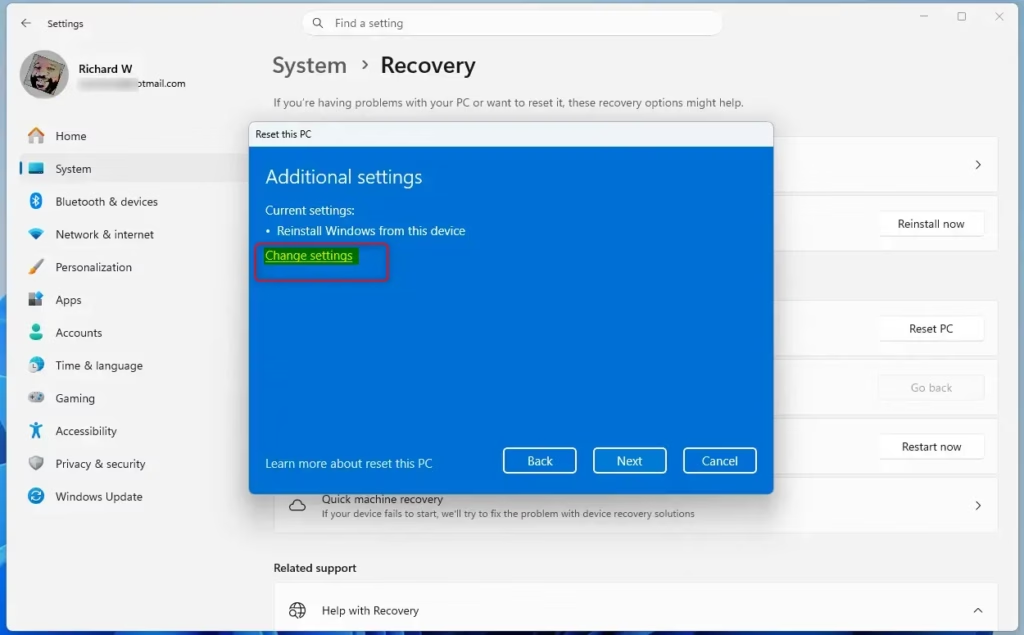
- Click Confirm or Next to continue. Windows may take a short moment to get ready, and then the final summary appears.
Why: This screen is your last chance to review the details. Look carefully to make sure you haven't accidentally chosen an option that would delete your personal files.
Step 6Confirm and Start the Reset
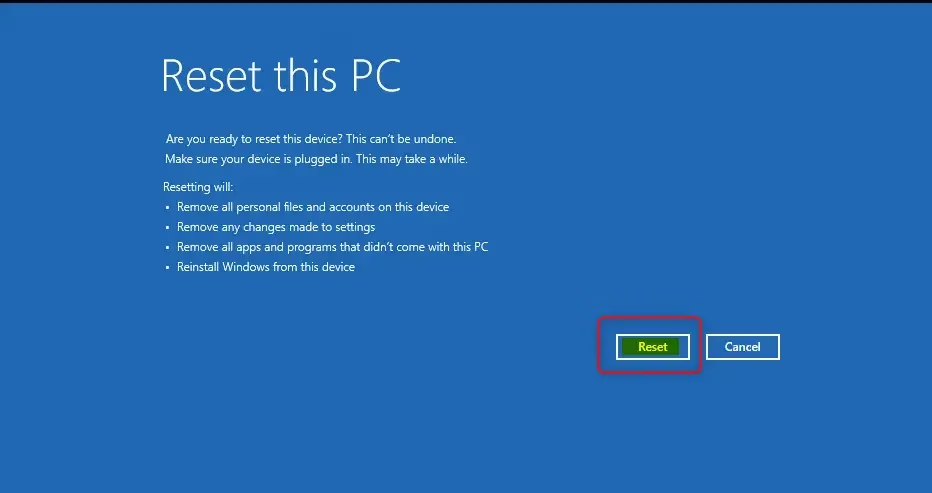
You're almost done. Windows now shows a final summary and asks if you're ready to start.
- Read the summary screen carefully. It says again that Windows will be reinstalled and that apps and settings will be removed, but your personal files will be kept.
- If you want to see which apps will go, click View apps to be removed if it's shown. Make sure you have installers for the ones you need.
- Click the Reset button. The PC begins preparing and will restart.
Once the reset begins, you can't easily undo it. If you have doubts, close the window or click Cancel now, and nothing changes.
Step 7Wait for the Reset to Finish
The reset usually takes between 30 minutes and a few hours, depending on your hardware speed and, if you chose cloud download, your internet speed. The PC restarts several times, so don't be alarmed.
The screen may turn black for up to 15 minutes or more during the process. That's normal. Keep the PC plugged in, and do not force it to shut down or restart it during this time. Interrupting the reset can cause data loss or system damage.
You will eventually see a progress screen with a percentage showing how far along it is. The percentage can sit at the same number for a long time, so be patient.
Step 8First Setup After Reset
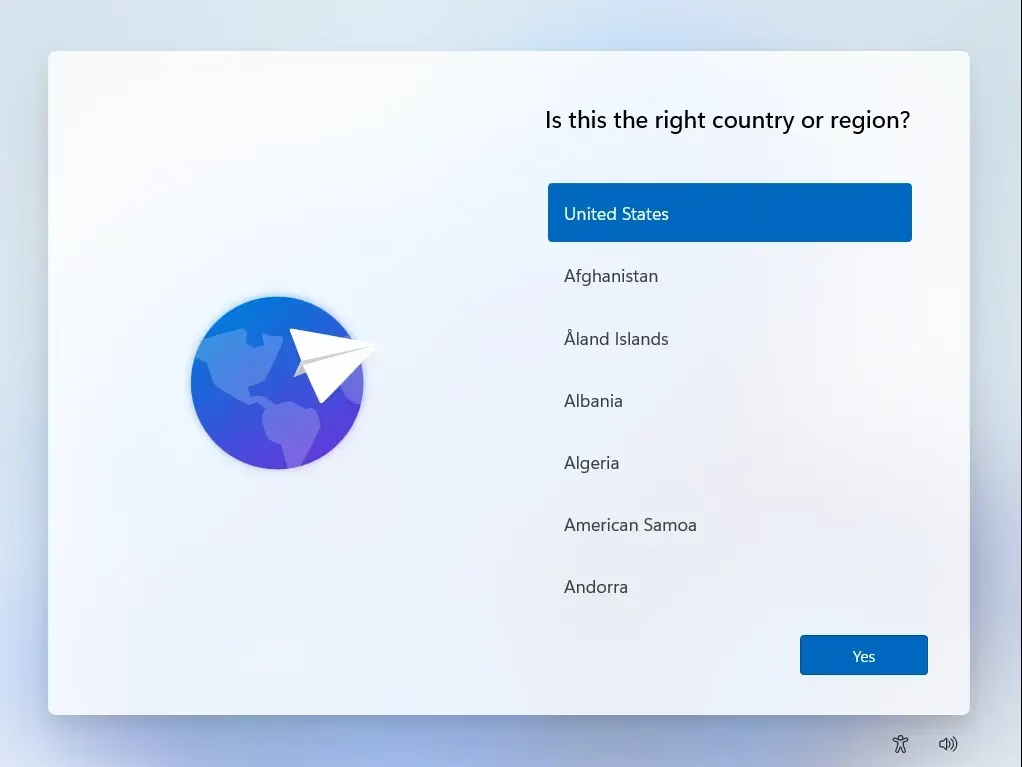
When the reset finishes, you go through a short setup and then land on your desktop with your personal files in place. Here's what to expect.
- You'll be asked to choose your region and keyboard layout, and to connect to Wi-Fi.
- You'll probably need to sign in with your Microsoft account again. If a recovery key prompt appears, use the BitLocker key you found earlier.
- Windows will then install updates and get your desktop ready. This can take a while, and the PC may restart again.
After you reach the desktop, check that your files are in Documents, Pictures, and the other folders. Then reinstall the apps you need using the installers and license keys you gathered, and run Windows Update to catch anything that's still missing.
Reference:
https://support.microsoft.com/en-us/windows/reset-your-pc-0ef73740-b927-549b-b7c9-e6f2b48d275e
Summary
Resetting your Windows 11 PC while keeping your files is a good way to fix problems or refresh your system without losing data. Back up your files, gather your app installers and keys, find your BitLocker recovery key, and choose Keep my files in Settings. Then you can reinstall Windows with little risk.
Have a question about this guide?
Answered by AI from this guide. Good questions may be added to this page — please don't include personal details.
Did this guide fix your problem?

About the Author
Richard
Tech Writer, IT Professional
Richard is a writer at Geek Rewind who turns complex IT tasks into clear, step-by-step guides. He draws on years of hands-on experience in system administration and enterprise IT operations, focusing on Windows, Linux and WordPress: the problems people actually run into, and the fixes that work. His server and WordPress guides come from systems he runs himself. Richard builds and maintains the platform behind Geek Rewind, from its Ubuntu servers and Nginx configuration to its custom WordPress plugins. Many new tutorials start with readers' questions, and he's always glad to answer them in the comments.
No comments yet — be the first to share your thoughts!