
Microsoft Edge privacy settings give you direct control over how websites and advertisers track your browsing habits across the web. These built-in controls let you block harmful trackers, clear your browsing history, and limit how much personal data you share.
Edge turns on balanced tracking prevention by default. It blocks most unknown trackers without breaking your favorite websites. You can switch to strict mode to block more trackers, or change your preferences at any time to share less data while you browse.
The settings below apply to current versions of Edge on Windows 11. Edge updates itself often, so a menu label may differ slightly on your PC. If a setting is greyed out and says “managed by your organization”, a work or school policy controls it, and you will need your administrator to change it.
Microsoft Edge’s tracking prevention blocks online trackers through three levels: Basic, Balanced (the default), and Strict. Access these settings by clicking the three-dot menu, selecting Settings, then Privacy, search, and services. Balanced blocks most trackers while keeping websites functional; Strict offers stronger protection but may break some sites.
Understanding Online Tracking
Online tracking uses small data files called trackers or cookies to follow your activity across different websites. Companies use these files to remember items in your shopping cart, save your login details, and build a profile of your interests so they can show you targeted advertisements while you browse.
Not all tracking is sinister. Sites use it for three main reasons:
- To remember you: Like keeping items in your online shopping cart or remembering your login details.
- To show you ads: They track what you look at to show you ads they think you’ll be interested in.
- To analyze website use: Websites use this data to see which pages are popular and how people use their site.
The first and third uses are usually harmless. The second is the one most people want to limit, and it is what Edge’s tracking prevention is built for.
Edge lets you choose how much tracking to allow, with three settings: Basic, Balanced, and Strict. The Strict setting blocks 80% of known trackers. The more you block, the more likely a site is to behave oddly, so the right choice is a trade-off between privacy and convenience.
How to Access Microsoft Edge Privacy Settings
You reach all of Edge's privacy options through the main browser menu. It takes just a few clicks.
- Open Microsoft Edge on your computer.
- Click the three dots (Settings and more) in the top-right corner of the browser window. A drop-down menu appears.
- Select Settings from the menu. The Settings page opens in a new tab.
- In the list on the left side, click Privacy, search, and services.
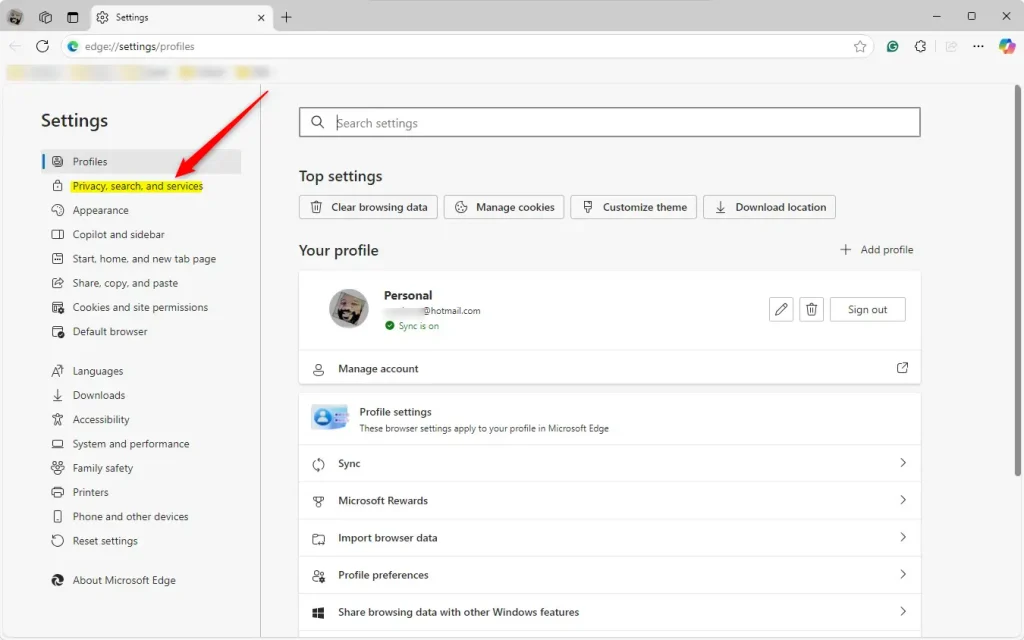
This opens the main area where you can manage all your privacy preferences. Most of the sections in this guide are on this page, so you will come back to it often. If you can't see the left-hand list, the window may be too narrow. Widen the window or click the menu icon at the top left of the Settings page.
Tracking Prevention: Your First Line of Defense
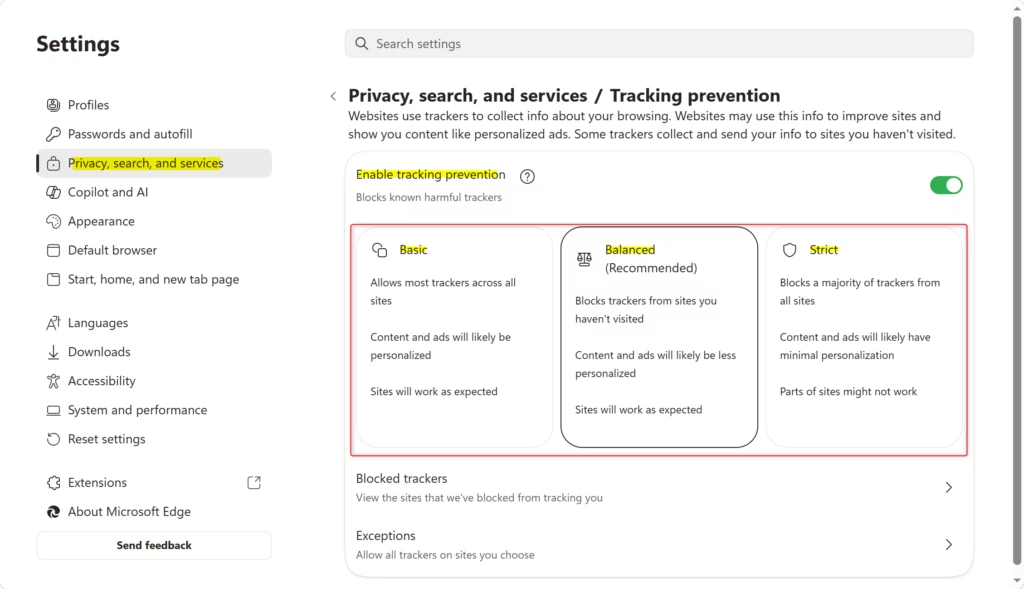
Tracking prevention is your main tool in Edge for blocking unwanted online trackers and protecting your personal data. It has three levels, and each one controls how aggressively Edge blocks trackers from sites you visit and from third parties.
- Basic: This is the least strict level. It blocks trackers that are known to be harmful or that are from websites you haven't visited. It's a good starting point if you don't want to change how websites load or work too much.
- Balanced: This is the default setting for most people. It blocks more trackers than Basic but is designed so most websites still work correctly. It blocks trackers from websites you haven't visited and also blocks some trackers from websites you have visited, depending on what they are tracking. This offers a good balance between protection and website function.
- Strict: This is the most protective setting. It blocks most trackers, even from websites you have visited. While this offers the strongest privacy, it might cause some websites to not work correctly or load properly. You might need to turn off Strict for certain sites if they don't work as expected.
If you are not sure which to pick, stay on Balanced. Try Strict for a week and see whether anything you use breaks. If one site misbehaves, you can allow it individually instead of lowering the level for everything. Look for the Exceptions option on the tracking prevention card.
How to Adjust Tracking Prevention:
To change the level:
- Go to Settings Privacy, search, and services.
- Find the Tracking prevention section near the top of the page. Make sure the Tracking prevention switch is on, or the levels will not apply.
- Click the circle next to the level you prefer: Basic, Balanced, or Strict. The selected circle fills in.
The change applies right away. Reload any open pages to see the new level take effect. No restart of Edge is needed.
To undo the change, return to the same page and select your previous level. Nothing is lost by switching back and forth, so you can experiment safely.
Managing Cookies and Site Data
Cookies are small files that websites store on your computer to remember your logins and preferences. Edge lets you block third-party cookies, which are set by external websites rather than the one you are visiting. Blocking them stops companies from tracking your habits across different pages.
- Block third-party cookies: These are cookies set by websites other than the one you are currently visiting. Blocking them is a good step to prevent tracking across different websites. A few sites, such as some embedded login or payment forms, may stop working when you block them.
- Clear cookies and site data when you close Microsoft Edge: You can set Edge to automatically delete cookies and other site data every time you close the browser. This means you'll be logged out of most sites when you reopen Edge, but it offers a high level of privacy.
How to Manage Cookies and Site Data:
To open the cookie settings:
- Go to Settings Privacy, search, and services.
- Scroll down to the Cookies and site permissions section. In some Edge versions this is its own item in the left-hand list, so you can click it there instead of scrolling.
- Click Cookies and site data. The page with your cookie blocking rules and stored data opens.
Once you are there, choose your settings:
- Turn on Block third-party cookies.
- Turn on Clear cookies and site data when you close Microsoft Edge. You can also click Clear to remove them right away.
To undo either one, switch it back off. Cookies already deleted cannot be restored, so you will need to sign in to those sites again.
You can also manage the data of specific websites. Under "Cookies and site data", select "See all cookies and site data" to view, search, and delete cookies from individual websites. You can also add specific websites to a list to always clear their data or never clear their data. The "never clear" list is handy for sites where you want to stay signed in even with automatic clearing turned on.
Search and Address Bar Settings
Search and address bar settings control what information Edge shares as you type queries into the top bar. Edge sends the characters you type to your default search engine, such as Bing, so it can offer faster suggestions. You can turn this off to keep your typed searches private.
- Send suggestions for search engine: When this is on, Edge sends characters you type in the address bar to your default search engine to get suggestions. You can turn this off if you prefer not to send this information.
- Address bar and search: This section lets you manage how Edge handles search queries and suggestions. You can choose your preferred search engine and control whether Edge sends information about your searches.
Turning off suggestions means you lose the live suggestion list while you type. Searches still work normally when you press Enter.
How to Adjust Address Bar and Search Settings:
- Go to Settings Privacy, search, and services.
- Scroll down to the Address bar and search section, which is near the bottom of the page. Click it if it opens as a separate page.
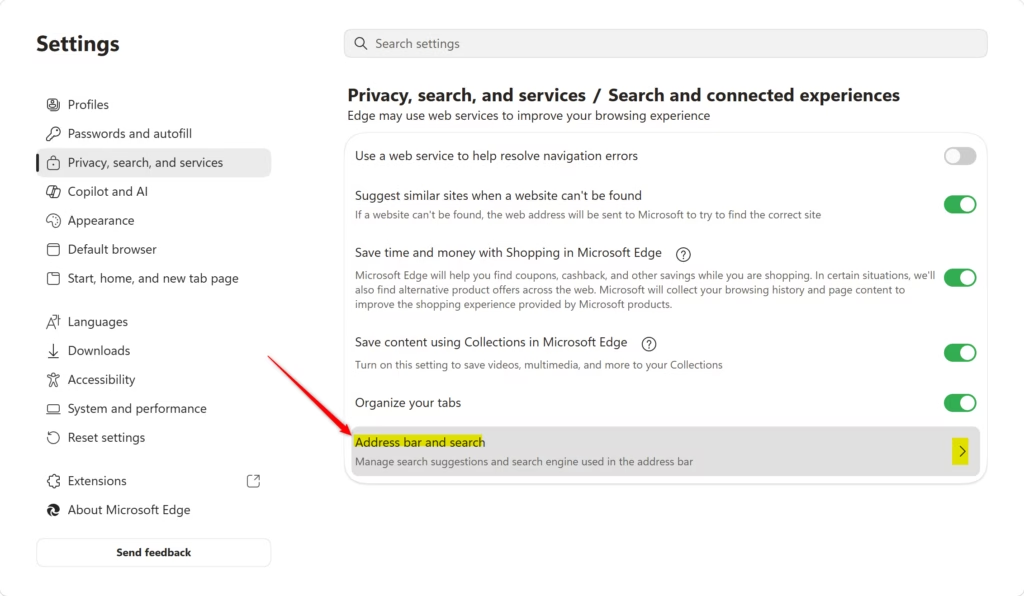
Adjusting these settings stops Edge from sending your typed characters to the search engine. The exact wording of the options can vary a little between Edge versions.
- Choose your Search engine used in the address bar from the dropdown menu.
- Turn off Show me suggestions and site info from Microsoft Edge using what I type in the address bar if you don't want Edge to send typed characters for suggestions.
The change is immediate. Type something in the address bar to confirm that suggestions behave the way you expect. To reverse it, turn the switch back on.
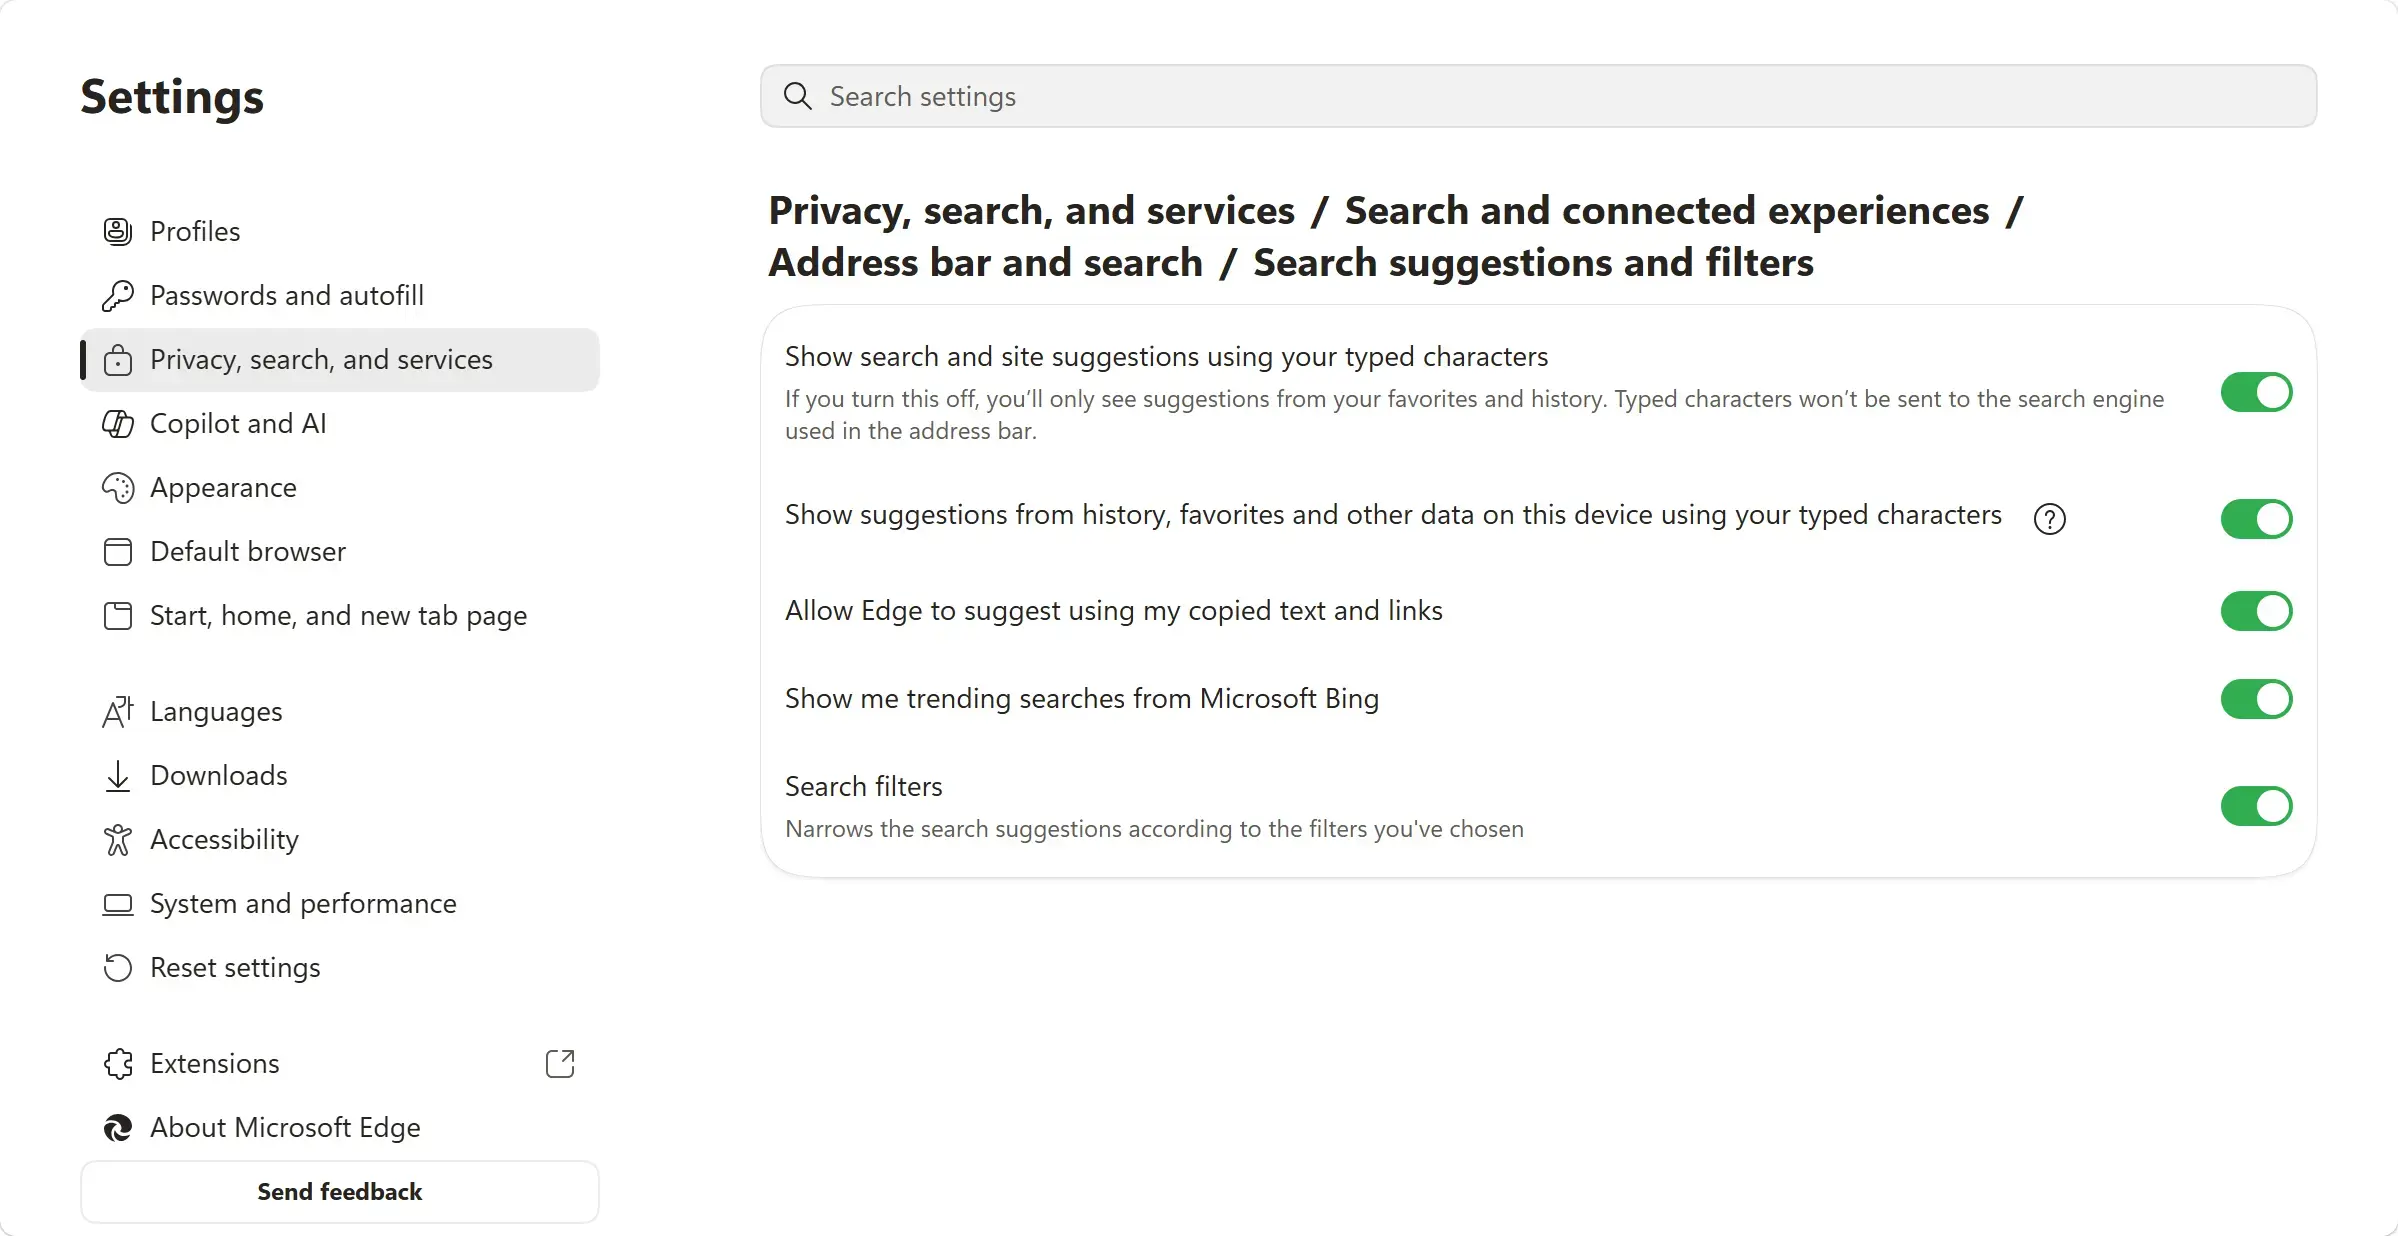
You can also manage search-related data from the same area, such as the history of searches you have made. Review it from time to time, and clear what you don't want kept using the steps in the next section.
Clearing Your Browsing Data
Clearing your browsing data protects your privacy by permanently deleting stored information such as your browsing history, cookies, cached images, and download logs. Anyone else using your computer then cannot see the websites you have visited or the files you have downloaded. You can pick which of these types of data to delete:
- Browsing history: A list of websites you've visited.
- Cookies and other site data: Information websites store on your device.
- Cached images and files: Copies of website content stored to make pages load faster.
- Download history: A list of files you've downloaded. Clearing this does not delete the files themselves.
- Passwords: If you let Edge save your passwords.
- Autofill form data: Information like your name, address, and credit card details.
If you clear saved passwords and don't have them stored elsewhere, you will have to reset them.
How to Clear Browsing Data:
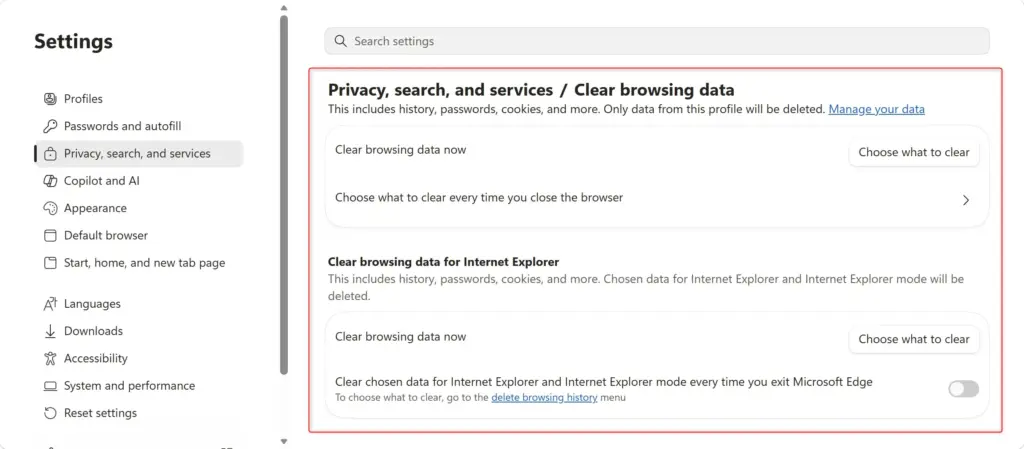
- Go to Settings Privacy, search, and services.
- Scroll down to the Clear browsing data section.
- Click Choose what to clear. A dialog box opens.
- Select a Time range, for example Last hour, Last 24 hours, or All time.
- Check the boxes next to the types of data you want to delete. If a box is not visible, click the option to show more types.
- Click Clear now. Edge deletes the selected data and closes the dialog.
If you sync your history across devices, clearing it may also remove it from your other signed-in devices. As a quicker route, press Ctrl + Shift + Delete in Edge to open the same dialog.
InPrivate Browsing: For Temporary Privacy
InPrivate browsing provides temporary privacy. When you close the window, Edge does not keep your browsing history, cookies, or form data. It acts like a clean slate on your local device, and nothing from the session is left behind for the next person who uses the PC.
InPrivate browsing does not make you anonymous online. Your internet provider, your employer (if you are using a work computer), and the websites you visit can still see your activity. It mainly prevents your local computer from storing browsing data.
How to Start an InPrivate Window:
- Open Microsoft Edge.
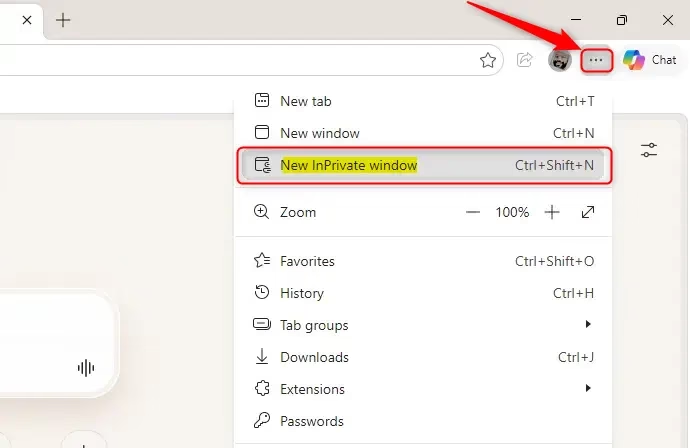
- Click the three dots (Settings and more) in the top-right corner.
- Select New InPrivate window.
A new window will open with an InPrivate icon (often a blue circle with a mask) in the top-left corner, showing you are in private browsing mode. You can also press Ctrl + Shift + N to open one. Close the InPrivate window when you are done, since that is when the session data is discarded. Extensions are usually off in InPrivate windows unless you allow them.
Permissions for Websites
Website permissions control which sites can use sensitive features on your device, such as your camera, microphone, or physical location. The site permissions menu lets you review these access requests and override them, so only pages you trust can use those features.
- Site permissions: This section lets you manage what websites can do. You can review and change permissions for location, camera, microphone, notifications, and more.
Review this list occasionally. Over time you may have granted access to sites you no longer use.
How to Manage Site Permissions:
- Go to Settings Privacy, search, and services.
- Scroll down to the Cookies and site permissions section.
- Click Site permissions. A list of permission types and sites appears.
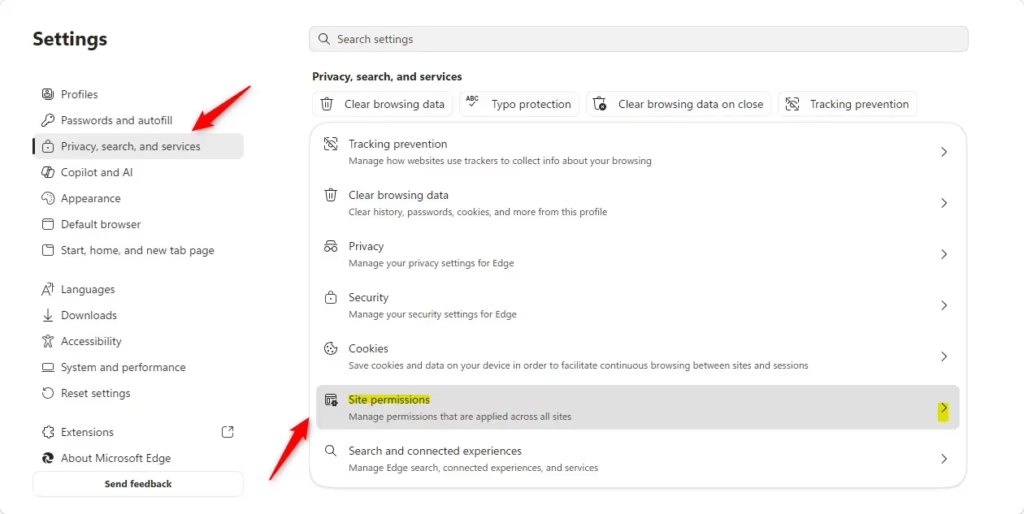
From this list, open a permission such as location or camera to see which sites are allowed or blocked. You can remove a site from the allowed list or change a setting to ask first, so Edge asks before a site can use that feature. Edge also asks you when a site requests access for the first time, and you can say no at that point.
If a camera or microphone does not work in Edge, check here first. The site may be blocked. Windows also has its own privacy settings for these devices, and they can block Edge as well.
Advanced Privacy Controls: Beyond the Basics
Edge includes a few less obvious settings that can further improve your privacy. They are often missed but can make a difference.
SmartScreen: Protecting You from Threats
Microsoft Defender SmartScreen is a built-in security feature that protects you from dangerous websites, phishing scams, and malicious file downloads. It checks the sites and files you try to open against a constantly updated cloud list of online threats, and blocks harmful content before it loads.
- Reputation-based protection: This is the main SmartScreen setting. It includes checks for phishing (trying to steal your information), malware (harmful software), unwanted applications, and suspicious websites.
I recommend leaving SmartScreen on. It protects you from real threats, and it does not affect your tracking settings.
How to Manage SmartScreen:
- Go to Settings Privacy, search, and services.
- Scroll down to the Security section.
- Find Microsoft Defender SmartScreen. Use the switch to turn it on or off.
- Click Reputation-based protection for more detailed control over what types of threats are checked.
Personalized Advertising and Data Sending
Personalized advertising and data-sending settings control what diagnostic information and usage habits Edge shares with Microsoft. You can change these options to turn off optional diagnostic logs and tailored advertising experiences that rely on your browsing history. They are found on the Privacy, search, and services page and under the Privacy section.
- Optional diagnostic data: This is data about how you use Edge, reports when Edge crashes, and how websites perform. You can choose to send only the essential data or more detailed optional data.
- Tailored experiences: This setting allows Microsoft to use your diagnostic data and browsing history to provide personalized suggestions and ads. Turning this off can limit personalized advertising.
Turning these off does not remove ads. It only makes them less personalized. On a managed work PC, your organization may control these settings.
How to Manage Diagnostic Data and Advertising:
Managing diagnostic data and advertising preferences in Microsoft Edge stops the browser from sending your usage habits to Microsoft. Open Settings, select Privacy, search, and services, find the Optional diagnostic data section to turn off reporting, and scroll down to disable tailored experiences.Syncing Your Data Across Devices
If you use Edge on multiple devices, such as a PC and a phone, you can sync your settings, history, passwords, and favorite websites. This is convenient, but it means your data is stored on Microsoft's servers. You can choose what gets synced, so share only what you need.
How to Manage Sync Settings:
- Go to Settings Profiles on the left side.
- Click Sync. If you are not signed in to Edge with a Microsoft account, you will see a sign-in option instead of the sync switches.
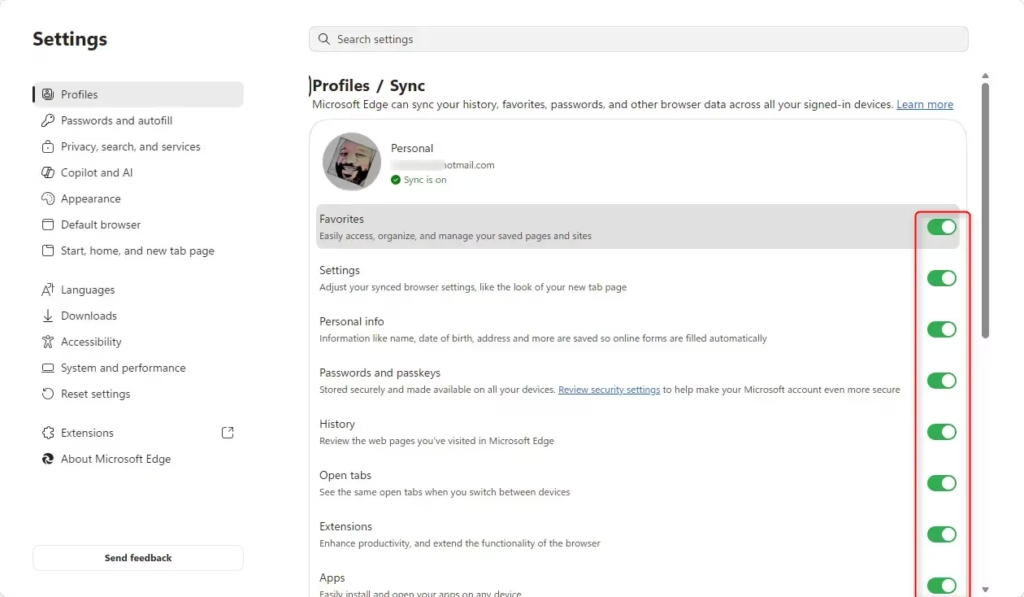
From the Sync page you can turn specific items on or off, such as passwords, favorites, history, and settings, to choose exactly what is shared between your computers and phones. You can also turn sync off completely. Turning off an item stops it from syncing going forward, so check your other devices if you want data removed from them as well.
Summary
Microsoft Edge offers many tools to control your online privacy, including tracking prevention, cookie management, and site permissions. Clearing browsing data regularly, using InPrivate browsing, and adjusting the settings for diagnostic data, advertising, and syncing help you tailor your privacy to what you need.
A sensible starting point is to keep tracking prevention on Balanced or Strict, block third-party cookies, review site permissions now and then, and leave SmartScreen on. Revisit these settings after major Edge updates, since options can move or change.
Was this guide helpful?

About the Author
Richard
Tech Writer, IT Professional
Richard is a writer at Geek Rewind who turns complex IT tasks into clear, step-by-step guides. He draws on years of hands-on experience in system administration and enterprise IT operations, focusing on Windows, Linux and WordPress: the problems people actually run into, and the fixes that work. His server and WordPress guides come from systems he runs himself. Richard builds and maintains the platform behind Geek Rewind, from its Ubuntu servers and Nginx configuration to its custom WordPress plugins. Many new tutorials start with readers' questions, and he's always glad to answer them in the comments.


No comments yet — be the first to share your thoughts!