Migrate Drupal to Google Cloud: A Step-by-Step Guide


Migrating Drupal to Google Cloud moves your website files to Google’s servers so the site loads faster and handles big traffic spikes without slowing down. Google Compute Engine provides the virtual server space, while Google Cloud SQL runs your website database.
Moving a site involves backing up your current files, setting up a new server instance, and pointing your domain name to the new location. You can complete the whole process over a weekend to give your site a stable, fast-loading home.
Taking inventory of a Linux server before migration
Taking inventory of a Linux server before your Drupal migration to Google Cloud involves checking your current software versions, PHP settings, and database details. Knowing what your old server uses helps ensure your new Google Cloud server has everything needed for a smooth Drupal migration without unexpected errors.
Here’s what you’ll need to gather from your current server:
- Web server and version number
- Database server and version number
- PHP and related modules
- Other servers and services and how they’re configured
If you’re running an Apache web server, use the commands below to see which version is installed on Ubuntu Linux.
apache2 -v
For more detailed version checks and steps to install a specific Apache version, read the post below:
How to check and install specific Apache versions on Ubuntu Linux
If running an Nginx web server, use the commands below to see which version is installed on Ubuntu Linux.
nginx -v
For more detailed version checks and steps to install a specific Nginx version, read the post below:
How to check and install specific Nginx versions on Ubuntu Linux
To check your PHP version and how to install a specific one on Ubuntu Linux, read the post below:
How to check and install specific PHP versions on Ubuntu Linux
Whether you're running MySQL or MariaDB, the post below shows you how to find out which version runs on Ubuntu Linux.
How to find what version of MySQL or MariaDB runs on Ubuntu Linux
How to set up and connect to your Google Cloud server
Setting up and connecting to your Google Cloud server for a Drupal migration happens through the Compute Engine console using an interactive browser-based SSH terminal. This connection lets you manage your virtual machine instance directly in your browser without needing extra FTP or SSH client software installed on your computer.
Google Cloud's Compute Engine lets you connect to a virtual machine (VM) instance using SSH directly from the browser window within the Google Cloud Console.
SSH from the browser supports these web browsers:
- Web browsers
- The latest version of Google Chrome
- Firefox
- Microsoft Edge
- Microsoft Internet Explorer 11 and later
- Safari 8 and later. Note that Safari is not supported in private browser mode.
- Virtual machine configurations
- All Linux VM images are natively available in Google Cloud.
No extra software or browser extensions are needed. Log in to the Google Cloud Console and go to Menu ==> Compute Engine ==> VM instances.
In the list of virtual machine instances, click SSH in the row of the instance you want to connect to.

Alternatively, you can open an SSH connection to an instance by clicking its name and then clicking SSH from the instance details page.
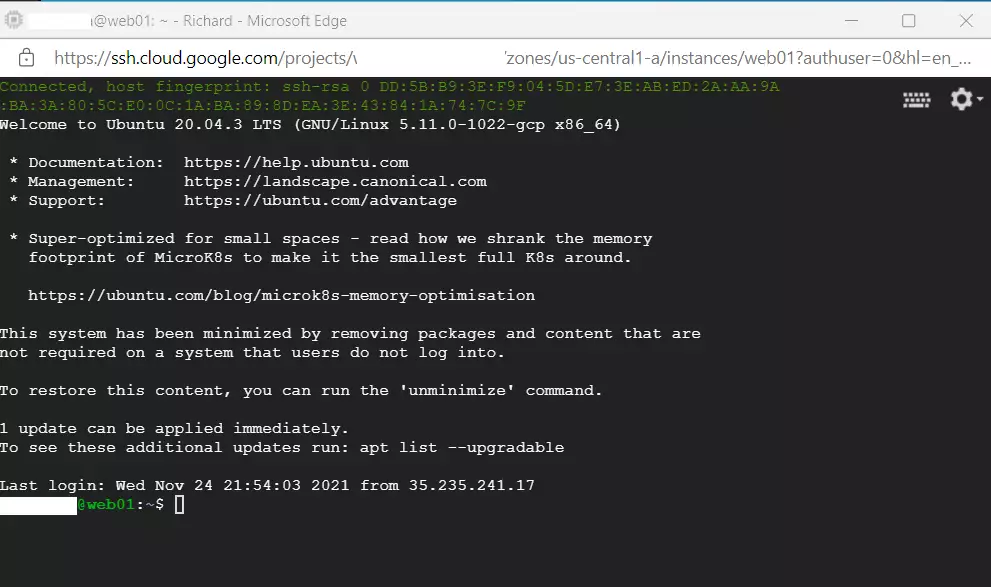
An SSH terminal window will open, connecting you to the Ubuntu Linux instance you created in the series's second post.
You should now be able to run commands in the Ubuntu Linux environment you set up on the Google Cloud server.
Install LAMP or LEMP on the new server before migration
Installing a LAMP or LEMP stack on your new server prepares the underlying software required to run your Drupal site on Google Cloud. Matching the exact software packages and versions you gathered during your initial server audit prevents unexpected errors and broken features after the Drupal migration.
Matching your old server environment prevents unexpected errors down the line. Install the same software packages you gathered during your initial audit.
You might also want to check out some other posts when installing LAMP or LEMP on Ubuntu Linux.
- How to install Apache on a Google Cloud server (alternative to Nginx)
- How to install Nginx on a Google Cloud server (alternative to Apache)
- How to install PHP on a Google Cloud server
- How to install MySQL or MariaDB database server
You can use the posts above to install the same servers and packages you have on your current server. Make sure to install specific packages on your new server by following the identical posts mentioned above.
Once all the packages are installed, you can transfer content from your current server to the new one.
Configure your new Google server similar to your current server
Configuring your new Google Cloud server to match your current server requires copying Apache or Nginx web server settings, PHP extensions, and directory structures. Matching these settings before your Drupal migration ensures your website functions correctly and prevents broken links or missing modules on the new host.
Ensure the web server (Apache or Nginx) settings match on both the old and new servers. This includes the same directory structure and Virtual Host or Server block content.
- Apache directory: /etc/apache2/
- Nginx directory: /etc/nginx/
Your PHP configuration should also be identical to your current server's PHP settings. Use the post above to install a specific PHP version and all the necessary modules from your current server.
- PHP directory: /etc/php/
Your MySQL or MariaDB configurations should also mimic your current server. Check each file, directory, and other data to make sure your new server matches your current one before migrating.
- MySQL / MariaDB directory: /etc/mysql/
Once you've completed that, you can continue with the migration process.
Back up current server data and database before migration
Backing up your current server data and database before a Drupal migration creates a complete snapshot of your website files and MySQL database. Stopping all changes to your live site before running the backup safeguards against data loss and ensures your Google Cloud server receives the most up-to-date content.
Capturing a complete snapshot of both your file directory and your database safeguards against data loss before any files move.
Before backing up your current server, stop all changes. This prevents new content from being added after the backup is complete.
To back up Drupal content, log on to your server via SSH. Once you're on your current server's SSH console, run the commands below to back up your Drupal content, usually located at /var/www/html/. This will create a backup file named current-server-backup.tar with your Drupal content.
Database content backup requires using the root account or an account with full access to the database you wish to back up.
To back up all databases on the server, run the commands below:
The all_databases_backup.sql file, a complete copy of your website's database, must be created in the current working directory. This backup ensures data integrity before you proceed with the migration process to Google Cloud.
You should now have two files: current-server-backup.tar and all_databases_backup.sql.
Copy the current server's content to the Google Cloud server
You should now be ready to copy the current server's content over to your new server. There are several ways to transfer the tar and SQL data files to the new server.
You can use the rsync command from the new server. SSH into it and use a command similar to the one shown below (remember to change the host names as needed).
While connected to your Google Cloud console, run the commands below to connect to your current server and copy over the backed-up content.
rsync -avz user@old-server.com:/home/<username>/all_database_backup.sql
rsync -avz user@old-server.com:/home/<username>/current-server-backup.tar
You could also use SCP to copy your files securely; here's how the syntax looks:
scp user@old-server.com:/home/<username>/all_database_backup.sql /home/username/
scp user@old-server.com:/home/<username>/current-server-backup.tar /home/username/
If you can't get the files using SSH, you can use the wget command to download them to your new Google Cloud server.
You must copy the files to the current server's web server root directory to use the commands below.
cd ~
wget http://old-web-site.com/all_database_backup.sql
wget http://old-web-site.com/current-server-backup.tar
Once the files are copied to your new server, proceed to extract them below and import the database content into your database server.
Restore the current server's content to the Google Cloud server
Restoring your current server content to the Google Cloud server involves extracting your website file archive and importing your database backup using command-line tools. Running these specific commands transfers your site files to the web root and populates your new database to complete the Drupal migration.
tar -xvf current-server-content.tar
sudo cp -rf /var/www/html/ /var/www/html/
Next, run the commands below to import the database content to your servers.
sudo mysql -u root -p < all_database_backup.sql
At this point, your Google server should have the content from your current server and its database. Next, run the commands below to set up the correct permissions to match the server.
Validate that all configurations on your current server match your new Google Cloud server. Once everything is validated, restart your web server.
sudo systemctl restart nginx
sudo systemctl restart apache2
If you encounter an error, be sure to resolve it.
Update your DNS and point your domain to your new Google server IP address
Updating your DNS to point your domain to your new Google Cloud server IP address makes your migrated site live for all visitors. Testing the connection locally first ensures everything works properly before you log in to your DNS provider and update your public A record.
Once your local test is successful, log in to your DNS provider portal and update the DNS A record to point to your new server IP address.
If everything works, you can continue fine-tuning your new server to ensure all configurations are correct.
That should do it!
Conclusion:
Migrating your Drupal website to Google Cloud without downtime is achievable by following these key steps for a smooth transition. This process ensures that your Drupal website remains available to visitors throughout the migration.
- Take inventory of your current server's configurations and versions.
- Please set up your Google Cloud server and ensure it's properly connected.
- Install the necessary LAMP or LEMP stack on your new server.
- Configure your new server to replicate your current server's environment.
- Back up your current website content and database.
- Transfer your content and database to the new server.
- Restore the backup and set the correct permissions on the new server.
- Update your DNS records to point to the new server's IP address.
- Test your website thoroughly before finalizing the migration.
Following these Drupal migration steps ensures a smooth transition to Google Cloud with minimal disruptions to your website's availability for visitors.
Was this guide helpful?

About the Author
Richard
Tech Writer, IT Professional
Richard is a writer at Geek Rewind who turns complex IT tasks into clear, step-by-step guides. He draws on years of hands-on experience in system administration and enterprise IT operations, focusing on Windows, Linux and WordPress: the problems people actually run into, and the fixes that work. His server and WordPress guides come from systems he runs himself. Richard builds and maintains the platform behind Geek Rewind, from its Ubuntu servers and Nginx configuration to its custom WordPress plugins. Many new tutorials start with readers' questions, and he's always glad to answer them in the comments.



No comments yet — be the first to share your thoughts!