Check PHP Version and Install on Ubuntu 24.04

Checking the PHP version on Ubuntu 24.04 takes one quick command in your terminal. PHP is a server-side programming language. It powers websites and platforms like WordPress, and those sites only work properly when the right PHP version is behind them.
Type php -v to see your exact version instantly. Knowing the version helps you avoid errors when software needs a specific release, such as PHP 8.2 or 8.3. A plugin or application built for one version can fail with warnings or a blank page on another.
Run php -v in your Ubuntu 24.04 terminal to see your PHP version. Type php –version if you prefer the long form; both print the active version and build date. If the terminal replies “command not found”, PHP is not installed yet. A fresh Ubuntu 24.04 install ships PHP 8.3 from its default repository.
Find out what version of PHP is installed
To check your PHP version on Ubuntu 24.04, open your terminal and run php -v or php –version. Both commands do the same thing. They print the currently active PHP version, build details and the build date, so you can confirm your setup in seconds.
Run the commands below in your Ubuntu terminal to check the PHP version. If the terminal answers that the command is not found, PHP is not installed on the machine yet. The install section later in this tutorial covers that case.
php -v
# OR
php --version
Once you run the command above, you should see output similar to this. The first line holds the version number, and the exact numbers on your system will differ from the sample:
The sample shows PHP version 7.4.3, which is the version Ubuntu 20.04 ships. A fresh Ubuntu 24.04 install offers PHP 8.3 from its default repository. Being in the repository does not mean the absolute latest PHP release is available to you. Newer versions often need extra system updates, a third-party repository or a manual build before they will install on Ubuntu 24.04.
You can get more detail about the installed PHP version by running the commands below. They show the configuration and loaded components rather than just the version string:
apt info php
When you run the commands above, you should see output similar to this:
Package: php
Version: 2:8.3+93ubuntu2
Priority: optional
Section: php
Source: php-defaults (93ubuntu2)
Origin: Ubuntu
Maintainer: Ubuntu Developers <ubuntu-devel-discuss@lists.ubuntu.com>
Original-Maintainer: Debian PHP Maintainers <team+pkg-php@tracker.debian.org>
Bugs: https://bugs.launchpad.net/ubuntu/+filebug
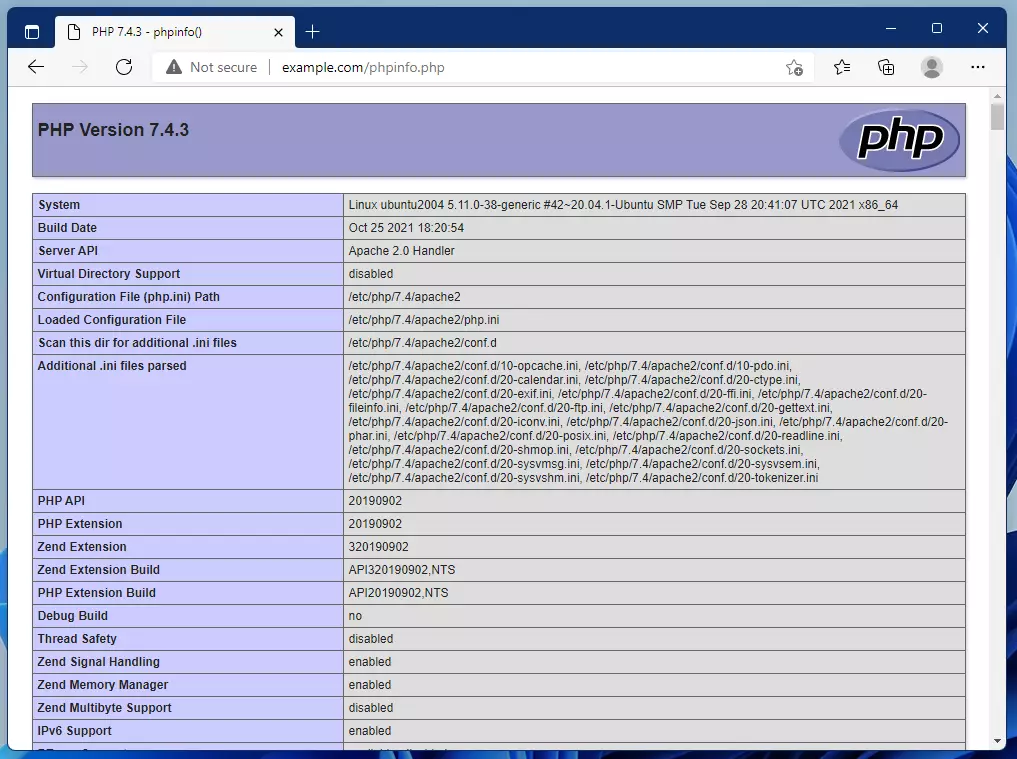
The terminal reports the PHP command-line version. The version your web server uses can be different, especially if more than one PHP version is installed. The most reliable way to find the version a specific website runs on is the phpinfo() function. It prints detailed information about the PHP server, including its version.
To use this method, create a file named phpinfo.php in your web server's root directory. That is the main folder holding your website files. It is typically located here:
sudo nano /var/www/html/phpinfo.php
Writing to that folder usually needs administrator rights, so open the file with an account that has them. Then follow these steps:
- Create a new file named phpinfo.php in the web root.
- Copy and paste the line below into the file.
- Save the file and close it.
<?php phpinfo( ); ?>
Next, open your browser and go to localhost/phpinfo.php, or use your domain name (example.com/phpinfo.php). A page appears with the PHP version at the top, followed by tables of settings and loaded modules:
Find out what PHP modules are installed
The page exposes details about your server that you do not want visitors to see.
To check installed PHP modules on Ubuntu 24.04, run the command dpkg --get-selections | grep -i php in your terminal. It lists every PHP package currently present on your system, so you can see which extensions and modules are installed.
dpkg --get-selections | grep -i php
After you run the command above, you should see output that resembles the lines below. Each line holds a package name and its status, which should read install:
libapache2-mod-php8.3				install
php-common					install
php-fpm						install
php8.3						install
php8.3-cli					install
php8.3-common					install
php8.3-opcache					install
php8.3-readline					install
The length of this list varies with your environment. A server running WordPress will show more packages than a bare PHP command-line install.
To list the modules compiled into PHP, run the commands below. This shows what the running PHP can actually use, which is not always the same as the package list above:
Ubuntu 24.04 installs PHP 8.3 from its default repositories. A project that requires a different release needs a third-party software source added first. This is common when you need an older PHP version or a very new one.
Only add sources you trust, because packages from them can replace system packages.
Adding a repository in Ubuntu lets you install specific software versions, such as PHP 8.2. The commands below add this repository. You need administrator (sudo) privileges and a working internet connection.
First, install the helper packages that let Ubuntu add and manage extra repositories:
sudo apt update
sudo apt install software-properties-common
Next, run the commands below to add the repository. The package list refreshes afterwards, so Ubuntu can see the new versions.
sudo add-apt-repository ppa:ondrej/php
sudo apt-get update
After that, you can search for the PHP versions now on offer and pick the one you need.
apt-cache showpkg php
Install a specific version using the command format below:
sudo apt-get install php8.x=<complete version name>Replace 'x' with the PHP minor version number (for example, 2 for 8.2). Replace '<complete version number>' with the full version number available for Ubuntu. If the install fails with a "package not found" message, the repository was not added or the package list was not refreshed.
Here is an example:
sudo apt install php8.3=<complete version name>
Now check the version again with php -v. The new version should show as below. If it still shows the old one, more than one PHP version is installed and the old one is still the default.
PHP 8.1.0 (cli) (built: Nov 25 2021 20:22:03) (NTS)
Copyright (c) The PHP Group
Zend Engine v4.1.0, Copyright (c) Zend Technologies
    with Zend OPcache v8.1.0, Copyright (c), by Zend Technologies
That should do it! You can now check, inspect and change the PHP version on Ubuntu 24.04.
Keeping track of active PHP versions is crucial for security and application compatibility. Old releases stop receiving security fixes, and new applications often drop support for them.
- Understanding the PHP version running on your system is crucial for compatibility and security.
- PHP installation on Ubuntu is straightforward and can be tailored to specific versions using third-party repositories.
- The
phpinfo()function is a helpful tool for verifying PHP configuration and installed modules. - Regularly checking for updates and managing PHP versions ensures optimal performance for your web applications.
- Knowing how to list installed PHP modules enhances your ability to troubleshoot and manage your server environment effectively.
Have a question about this guide?
Answered by AI from this guide. Good questions may be added to this page — please don't include personal details.
Did this guide fix your problem?

About the Author
Richard
Tech Writer, IT Professional
Richard is a writer at Geek Rewind who turns complex IT tasks into clear, step-by-step guides. He draws on years of hands-on experience in system administration and enterprise IT operations, focusing on Windows, Linux and WordPress: the problems people actually run into, and the fixes that work. His server and WordPress guides come from systems he runs himself. Richard builds and maintains the platform behind Geek Rewind, from its Ubuntu servers and Nginx configuration to its custom WordPress plugins. Many new tutorials start with readers' questions, and he's always glad to answer them in the comments.
No comments yet — be the first to share your thoughts!