How to Fix Color Management Profile Errors in Windows 11

Color management profile errors in Windows 11 happen when your system fails to match the color data in your files with the actual output of your monitor or printer. The result is washed-out images or wrong colors on screen. These profiles use .icc or .icm file extensions to define how a device displays color.
When Windows loses track of these profile files or loads a broken one, apps cannot translate colors correctly. You can fix this by clearing bad profile links or setting a default sRGB display profile in the Color Management tool. This guide covers opening the tool, installing a manufacturer profile, calibrating with the built-in wizard, and checking the Advanced tab. It also explains why colors differ between apps and how to handle a second monitor.
Open Color Management by pressing the Win, typing Color Management, and pressing Enter. On the Devices tab, select your monitor from the Device drop-down, click Add, choose the manufacturer’s.icc.icm file, then click Set as Default Profile. The fix applies immediately, and the screen may flicker while the profile loads.
Accessing the Color Management Tool
Color Management is a built-in Windows utility that lets you view, add, or change color profiles for your displays and devices. It is the first place to look when colors are inaccurate. It works the same on Windows 11 Home and Pro. These steps get you into the tool and pointed at the right display.
- Press the Win, type
Color Management, and press Enter. The Color Management window opens.
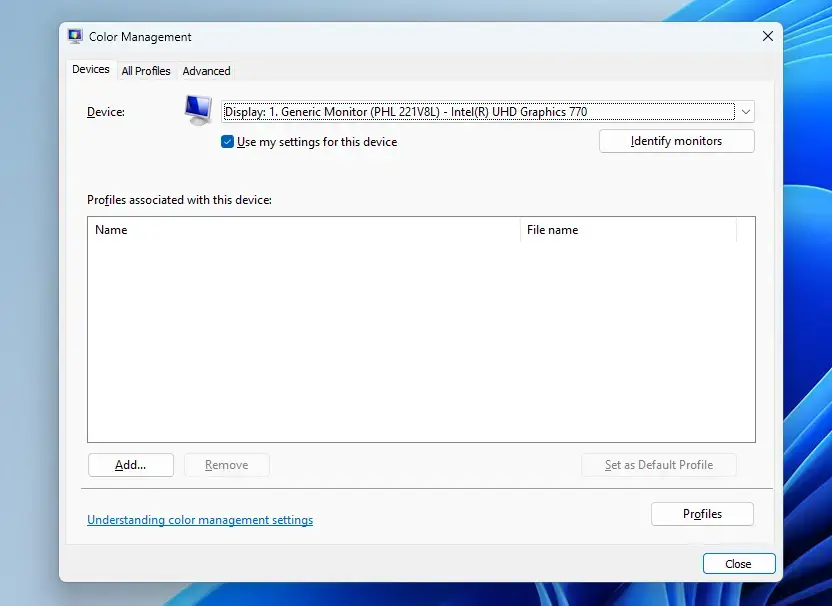
- Stay on the Devices tab. This is the tab the window opens on, and it is the one you need for display profiles.
- Select your primary display from the Device drop-down menu at the top. The list below the drop-down now shows the profiles linked to that display.
- Check the Use my settings for this device box. This lets you override the default profile for this display. If the box is greyed out, the display you selected may not be a monitor Windows can profile, so check the Device drop-down again.
If you have more than one screen and are not sure which one you selected, click the Identify monitors button on the same tab. It briefly shows a number on each screen, and you can match that number to the entry in the drop-down.
Installing and Assigning a Monitor Color Profile
Download the profile from the manufacturer’s support page for your exact model first. Some come as a driver package, and others as a bare .icc or .icm file. Save the file somewhere you can find it, such as your Downloads folder.
This process requires administrator privileges. If you are signed in with a standard account, Windows will ask for an administrator password. The steps below take you from opening the tool to a working default profile, and they fix color management profile errors on Windows 11 by replacing a broken or missing profile.
- Open Color Management. Follow the steps in the previous section if you need to find it.
- Select your monitor in the Device drop-down. Stay on the Devices tab and confirm the right display is shown.
- Click the Add button. The Associate Color Profile dialog box opens.
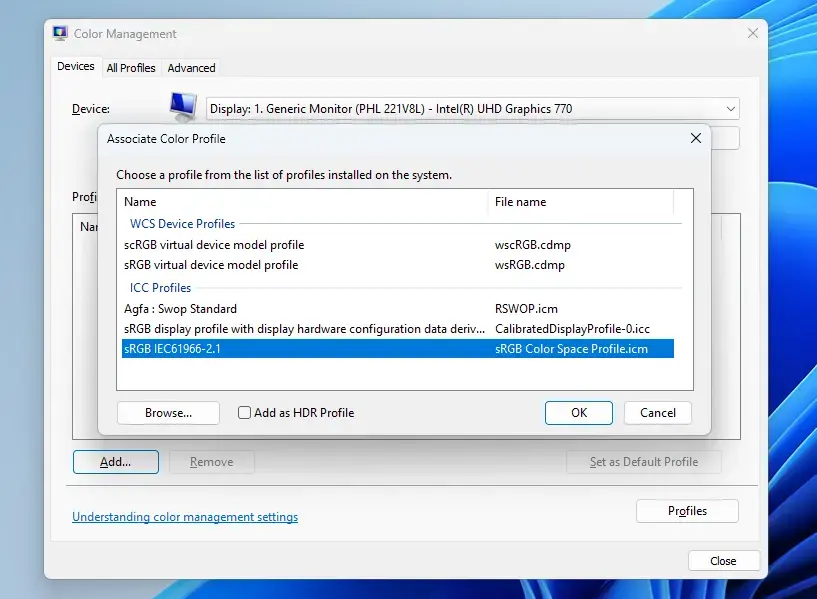
- Click Browse. A file window opens so you can find the profile you downloaded.
- Select the downloaded ICC or ICM profile file. Choose it on your hard drive and confirm the file name is the one for your model.
- Click Add. This installs the profile into the system repository, and it now appears in the list of profiles associated with this device.
- Highlight the newly added profile. Click it once in the list so it is selected.
- Click the Set as Default Profile button. The profile name should now show as the default.
- Click Close. The window closes and the profile stays applied.
The screen may flicker briefly as the new profile loads. You do not need to restart. To undo the change, open the same window, select the profile, and click Remove. Then set your previous profile, or the sRGB one, as the default.
Calibrating Your Display
The built-in Windows display calibration wizard lets you adjust gamma, brightness, contrast, and color balance by eye, with no extra hardware. It is not as accurate as a hardware colorimeter. It does help with washed-out or dark images. When you finish, it saves its result as a new color profile for your display.
- Press the Windows Key, type
Calibrate display color, and press Enter. The display color calibration wizard opens. - Click Next on the introductory screen. Read it first, since it explains what the wizard will change.
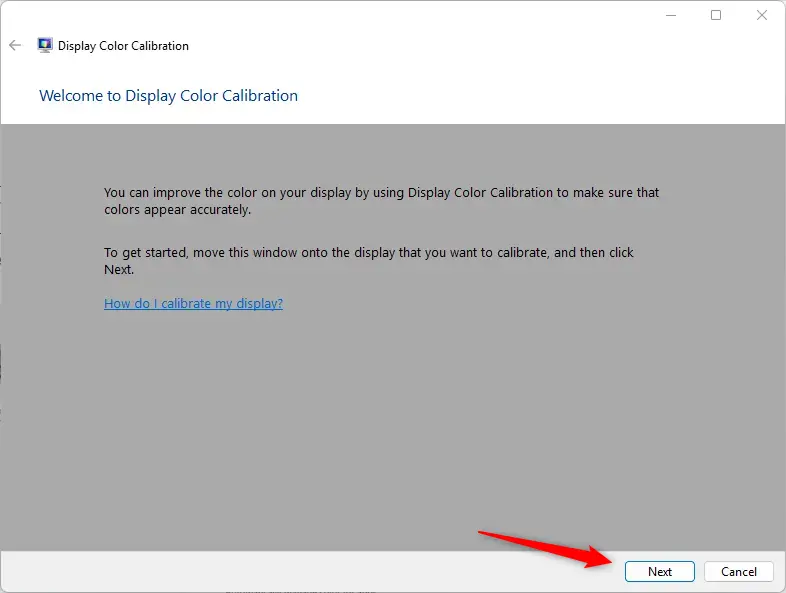
- Move the gamma slider until the small center dot is barely visible. Click Next when it looks right.
- Adjust the brightness and contrast controls on your physical monitor. Follow the on-screen guidance, then click Next. Most laptops have no separate contrast control. If yours lacks one, skip that part of the screen.
- Move the color balance sliders until the neutral gray bars show no color tint. Click Next once the bars look neutral.
- Click between Previous calibration and Current calibration to compare the two. Look at both and decide which looks better.
- Click Finish if the new calibration looks better. This saves your settings. If it looks worse, click Cancel and your old settings stay in place.
The last screen may offer to start the ClearType Tuner. Clear that option if you only wanted to fix color.
Troubleshooting Inconsistent Colors Across Applications
Inconsistent colors across applications happen because different programs handle color profiles in different ways. For example, web browsers like Google Chrome and Microsoft Edge automatically convert tagged images to the sRGB color space. Older apps and basic image viewers ignore embedded profiles completely. A photo can therefore look right in a browser and slightly off in an older viewer, even with a good monitor profile.
If you notice differences between programs, work through these checks:
- Verify that your monitor profile is set as the system default, not just listed as an associated profile. In Color Management, the default profile is the one marked as such in the list for your display.
- Check your app's own color settings. Photo editors often let you choose a working color space or turn on color management.
- Check that your graphics card control panel software is not overriding Windows color management with forced enhancements or custom gamma curves.
Advanced Color Settings and Advanced Tab Configuration
The Advanced tab in the Color Management window controls system-wide rendering intents, default profiles for display, printing, and proofing, and Windows Color System (WCS) settings. Use it to check that your device profile matches your active monitor and to choose whether Windows applies display calibration.
- Open Color Management. Use the steps from the first section if the window is not already open.
- Click the Advanced tab. The system-wide color settings appear.
- Review the Device profile drop-down. Confirm it matches your active monitor profile.
- Check or clear Use Windows display calibration. Check it if you want your calibration curves loaded at startup by the Windows calibration loader. Clear it if another tool loads its own curves.
- Click Change system defaults if you need to change settings for all user accounts on the machine. Windows asks for administrator approval, and a separate window opens with the same tabs.
Changes here take effect right away. If something looks worse afterward, reverse the setting you changed.
Checking Profiles Across Multiple Monitors
Multi-monitor setups need individual attention because each screen has its own panel characteristics and ages differently. Suppose you drag an image from your main display to a secondary monitor and the saturation shifts sharply. The secondary screen most likely lacks a proper custom profile. Fix it by giving that monitor its own profile.
- Open Color Management. The window opens on the Devices tab.
- Select your secondary monitor from the Device drop-down menu. It sits at the top of the Devices tab. Use Identify monitors if you are unsure which entry is which.
- Check the Use my settings for this device box. The profile list for that monitor can now be changed.
- Add and set the correct ICC profile for that exact monitor model. Repeat the installation steps you used for your primary display.
It will not correct the second panel and may make it look worse.
What to do next
You should now see consistent color reproduction across your compatible applications and displays. To improve your viewing setup further, try adjusting your display refresh rate or setting up Night light to reduce eye strain during evening work sessions.
Frequently asked questions
What is the best Color profile for 🪟 Windows 11?
sRGB is the standard color profile for Windows 11 displays. It works with most monitors and ensures consistent colors across different devices and applications. Set it as your default in Color Management if your monitor supports it.
How do I turn off ACM?
Open Color Management, select your device from the Device drop-down, click the Advanced tab, then uncheck 'Use Windows Display Color Management' to turn off ACM (Automatic Color Management). This disables Windows color correction for that device.
How to change computer color scheme?
Open Settings, go to Personalization Colors, then choose your preferred color scheme from the options. Select Light, Dark, or Custom to change how Windows displays its interface colors throughout the system.
How to color correct a PC monitor?
Open Color Management, select your monitor from the Device drop-down, check 'Use my settings for this device', select a standard profile like sRGB, then click Set as Default Profile. Adjust brightness and contrast on your monitor's physical controls for fine-tuning.
Still have a question?
Answered by AI from this guide. Good questions may be added to this page — please don't include personal details.
Did this guide fix your problem?

About the Author
Richard
Tech Writer, IT Professional
Richard is a writer at Geek Rewind who turns complex IT tasks into clear, step-by-step guides. He draws on years of hands-on experience in system administration and enterprise IT operations, focusing on Windows, Linux and WordPress: the problems people actually run into, and the fixes that work. His server and WordPress guides come from systems he runs himself. Richard builds and maintains the platform behind Geek Rewind, from its Ubuntu servers and Nginx configuration to its custom WordPress plugins. Many new tutorials start with readers' questions, and he's always glad to answer them in the comments.
No comments yet — be the first to share your thoughts!