How to Enable Passkey Access for Apps on Windows 11

Passkeys let you sign into apps on Windows 11 without typing a password. You use your fingerprint, face scan, or PIN instead. A passkey is a digital credential stored on your PC, and it is much harder to guess, steal, or phish than a password.
Microsoft added built-in passkey support in Windows 11 version 23H2. It is available on both Home and Pro. You manage it from the Windows Settings app, so you don’t need extra software. This guide shows how to turn passkey access for apps on or off, what to check if the option is missing, and how to undo the change.
Open Settings, navigate to Privacy & security, then select Passkey. Use the toggle switch under Passkey access to turn this feature on or off for apps on your Windows 11 device.
What Are Passkeys?
A passkey replaces a password when you sign into an app or website. Instead of typing anything, you prove it’s you with your face, fingerprint, or PIN. Windows 11 stores these credentials through Windows Hello, the built-in sign-in system on your computer. Because there is no password to type, there is nothing for an attacker to steal in a data leak or capture on a fake login page.
Related reading:
Windows Hello makes sign-in faster and also tightens security. Apps can create and use passkeys by default, but you decide which software is allowed to do so. Passkeys depend on Windows Hello, so you need at least one Hello method set up (face, fingerprint, or PIN). If you haven’t done that, open Settings Accounts Sign-in options first
How to Turn Passkey Access On or Off for Apps
You can turn passkey access for apps on or off in the Privacy & security section of Windows Settings . This controls which programs on your PC may use your saved passkeys to sign you in. Keeping this under control means only apps you trust can request your Windows Hello sign-in. The steps below take about a minute.
- Open Settings. Click the Start button (the Windows icon on the taskbar) and select Settings. Or press
Windows key + Ion your keyboard to open it directly. The Settings window should appear with a list of categories on the left. - Select Privacy & security. In the left-hand list, click Privacy & security. The right side now shows the privacy and permission options for your PC.
- Open the Passkey section. On the right, find Passkey and click it. A page with the passkey options opens. The path is Settings Privacy & security Passkey
- Set the toggle. Find Passkey access and click the switch to set it to On or Off. The switch should change position and its label should update right away.
If you don't see the Passkey section, the likely cause is an out-of-date Windows. Run Windows Update and check again, since passkey support starts with version 23H2. Also, if the toggle is greyed out on a work or school PC, your organization may control it through policy, and you'll need to ask your administrator. To see or remove passkeys you've already saved, look in Settings Accounts Passkeys on current builds.
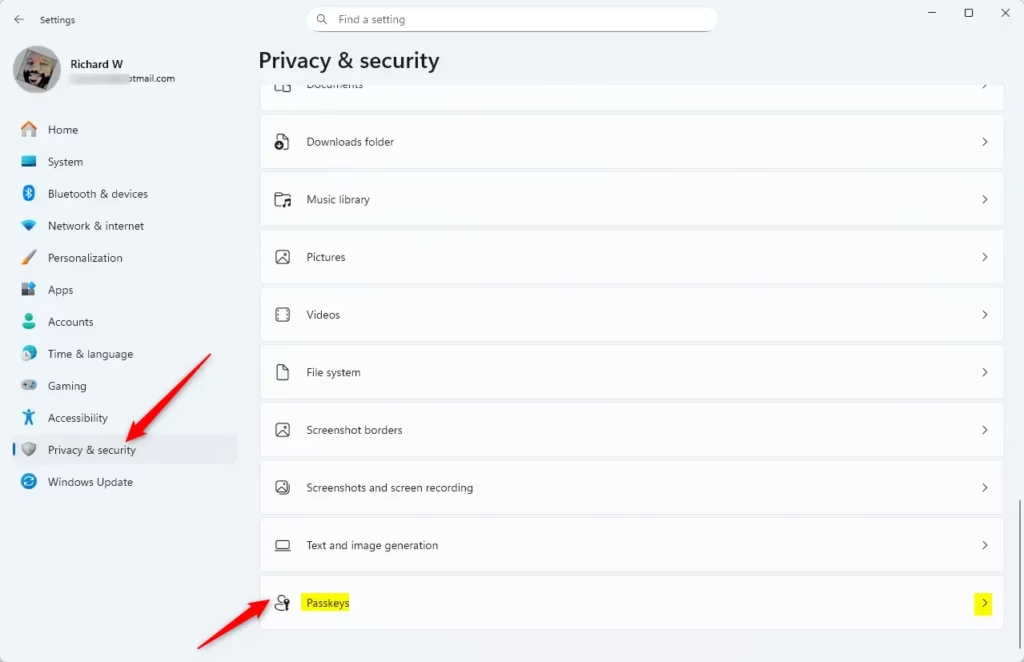
Passkey option inside Privacy & security settings
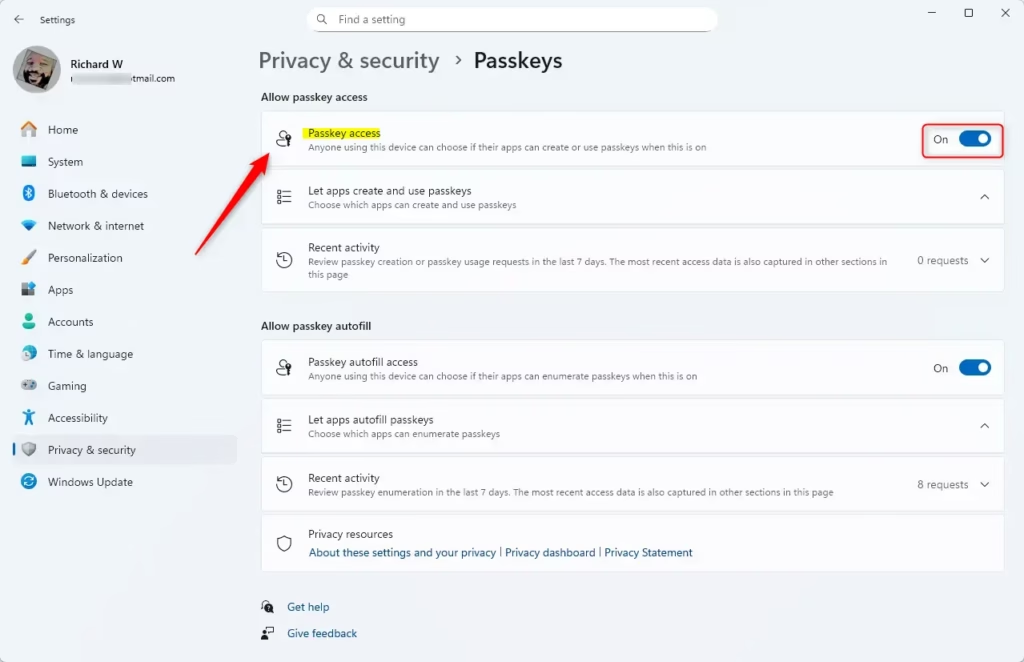
Passkey access turned ON
That completes the configuration. App permissions for passkeys are now active on your Windows 11 device. The change normally applies straight away and doesn't need a restart. If an app still behaves as before, close it and reopen it. To undo the change, go back to the same page and flip Passkey access to the opposite position.
Why Use Passkeys?
Using passkeys on Windows 11 gives you stronger security than standard passwords while making your daily sign-ins much faster. Since you log in with your face, fingerprint, or a PIN, nobody can guess your login details or steal them in a website data breach. You also keep full control over which apps can use your credentials.- They keep your apps and PC more secure than just using passwords.
- Signing in is faster and easier with your face, fingerprint, or PIN.
- You have full control over which apps can use passkeys.
- It's a simple setting to manage in Windows 11.
- Checking app permissions regularly helps keep your PC safe.
Learn More
You can learn more about passkey access and security features by exploring official guides on Windows Hello. These resources cover how to set up facial recognition, configure a secure PIN, and manage your sign-in options on Windows 11. Reviewing these guides helps you get the most out of your computer's built-in security tools.
Summary
Passkeys offer a modern, secure, and fast method to log into applications on Windows 11, utilizing a face, fingerprint, or PIN instead of passwords.
Have a question about this guide?
Answered by AI from this guide. Good questions may be added to this page — please don't include personal details.
Did this guide fix your problem?

About the Author
Richard
Tech Writer, IT Professional
Richard is a writer at Geek Rewind who turns complex IT tasks into clear, step-by-step guides. He draws on years of hands-on experience in system administration and enterprise IT operations, focusing on Windows, Linux and WordPress: the problems people actually run into, and the fixes that work. His server and WordPress guides come from systems he runs himself. Richard builds and maintains the platform behind Geek Rewind, from its Ubuntu servers and Nginx configuration to its custom WordPress plugins. Many new tutorials start with readers' questions, and he's always glad to answer them in the comments.
No comments yet — be the first to share your thoughts!