Passkeys in Windows 11 are digital login keys. They let you sign into websites and apps with your face, fingerprint, or PIN instead of a typed password. You can remove saved passkeys from the Windows 11 Settings app ⚙️ in less than 60 seconds, which is handy when you want to clear out old accounts from your PC.
Advertisement
This guide covers where passkeys are stored, how to delete them in Settings, what to do if a passkey isn’t listed there, and what to check first so you don’t lock yourself out.
⚡ Quick Answer
Go to Settings›Accounts›Passkeys to manage your saved passkeys. Find the passkey you want to remove, click the three dots next to it, and select Delete. Deleted passkeys cannot be recovered, so ensure you have an alternative sign-in method available.
Advertisement
Where Are Passkeys Stored?
Passkeys are stored in two main places: your Windows system or your web browser. Knowing which one holds the passkey you want to remove saves you a lot of hunting.
Passkeys saved on the PC itself use Windows Hello, which is your face, fingerprint, or PIN. These are the ones that show up in the Windows Settings ⚙️ app. Passkeys saved by a browser or a password manager are managed inside that program, and Windows Settings ⚙️ won’t list them.
How to Delete Passkeys in 🪟 Windows 11
You can delete passkeys in Windows 11 through the Settings ⚙️ app whenever you want to remove old or unused sign-in details from your PC. Open Settings, go to Accounts, and select Passkeys to see everything saved on your device. Pick the login you want to remove and delete it. It will then stop appearing when you sign into that website or app.
The Passkeys page is part of recent Windows 11 releases. If you don’t see it, run Windows Update 🔃 and check again. Windows may also ask you to confirm with Windows Hello before it lets you make changes.
Advertisement
Open the Settings app by pressing Windows key + I. The Settings window opens with the list of categories on the left.
Click Accounts on the left sidebar. The account options for your PC appear on the right.
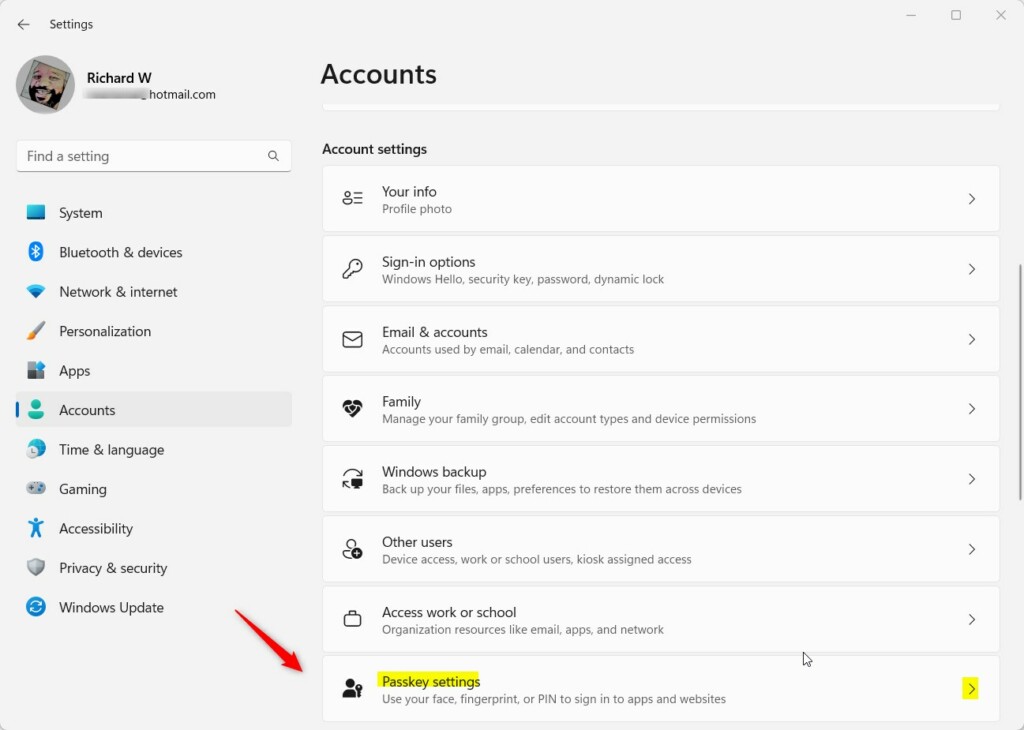
Select Passkeys (or Sign-in options›Passkeys, depending on your Windows 11 version). You can navigate directly via this path: Windows Settings > Accounts > Passkeys. You should now see a list of the passkeys saved on this PC. If the list is empty, no passkeys are stored in Windows, so check your browser instead.
Windows 11 Accounts settings pane showing the Passkey settings tile.
Find the website or app in the list. If you have many entries, look at the site name and the account name shown with it, so you remove the right one.
Click the three dots (More options) next to the entry. A small menu opens.
Select Delete. Confirm the prompt if Windows asks, and verify with Windows Hello if requested. The entry should disappear from the list. No restart is needed.
⚠️WarningDeleting a passkey removes your ability to sign in using that specific method.
You must have your password or another recovery method ready to access your account again.
Before you delete, make sure you know the account's password, or that you can get a reset link or code by email or phone. Deleting a passkey in Windows doesn't always remove it from the website's side. If you also want the site to forget it, check the security or sign-in settings of that account.
Browser-Specific Passkey Management
If a passkey isn't in your Windows settings, it might be saved directly in your web browser, and you'll need to manage it there.
Open your browser's settings and look for its password or passkey manager. Find the site, then remove the passkey from that list. The same applies if you use a third-party password manager: delete the entry inside that app. The exact menu names differ between browsers and change from time to time, so look for a section named Passwords or Passkeys.
Advertisement
Disabling Persistent Passkey Prompts
You can stop seeing persistent passkey prompts by declining them on the website itself, as Windows doesn't control these specific requests.
The prompt comes from the site asking you to create a passkey, not from a setting in Windows. Choose the option to skip it, such as "Not now" or "Use password instead," whichever the site offers. Some sites also let you turn off passkey sign-in in their account settings.
Syncing and Backup Management
Once you delete a passkey, it's gone for good and you can't recover it, so always have a backup sign-in method ready.
There is no undo button. If you delete one by mistake, sign in with your password or another recovery method, then create a new passkey from that account's security settings.
Summary
Passkeys offer a secure, password-free sign-in method, stored either in Windows or your browser. To delete one stored in Windows, go to Settings›Accounts›Passkeys, open the three-dot menu next to the entry, and select Delete. For passkeys saved in a browser, remove them there instead. Deleted passkeys can't be recovered, so keep a password or other backup method ready before you remove one.
Was this guide helpful?
📬 Get new Windows tips in your inbox
One email when we publish something worth your time. No spam, unsubscribe anytime.
Richard is a writer at Geek Rewind who turns complex IT tasks into clear, step-by-step guides. He draws on years of hands-on experience in system administration and enterprise IT operations, focusing on Windows, Linux and WordPress: the problems people actually run into, and the fixes that work.
His server and WordPress guides come from systems he runs himself. Richard builds and maintains the platform behind Geek Rewind, from its Ubuntu servers and Nginx configuration to its custom WordPress plugins.
Many new tutorials start with readers' questions, and he's always glad to answer them in the comments.
[…] A passkey is a security mechanism restricting access to a system or device. Passkeys are commonly used to secure computers, smartphones, and other electronic devices and protect sensitive data and information. […]
[…] has added a new feature called on-device encryption. This turns your phone, tablet, or passkey into a digital key. This key locks your passwords before they are saved to your […]
One email when we publish a guide worth your time — new Windows features, the fixes that actually
work, and a heads-up when Microsoft breaks something. Unsubscribe in one click.
📬 Get new Windows tips in your inbox
One email when we publish something worth your time. No spam, unsubscribe anytime.






[…] passkey is a security mechanism restricting access to a system or device. Passkeys are commonly used to […]
[…] A passkey is a security mechanism restricting access to a system or device. Passkeys are commonly used to secure computers, smartphones, and other electronic devices and protect sensitive data and information. […]
[…] secure way to sign into Windows using a PIN, facial recognition, fingerprint, passkey, and […]
[…] and secure way to sign into Windows using a PIN, facial recognition, fingerprint, passkey, and […]
[…] more personal and secure way to sign into Windows using a PIN, facial recognition, fingerprint, passkey, and […]
[…] Passkey […]
[…] a more personal and secure way to sign into Windows using a PIN, facial recognition, fingerprint, passkey, and […]
[…] How to Use Passkeys […]
[…] has added a new feature called on-device encryption. This turns your phone, tablet, or passkey into a digital key. This key locks your passwords before they are saved to your […]