How to Change Your Wi-Fi Settings in Windows 11

Wi-Fi settings in Windows 11 control the password, security type, and connection behavior for every wireless network your PC has saved. You can change these details in under a minute from the Settings app, and you don’t have to delete the saved network profile first.
Most sudden connection errors on a PC that worked yesterday come from a saved password that no longer matches the router’s current one. Fixing that mismatch usually gets you back online right away.
Go to Settings Network & internet Wi-Fi Manage known networks. Select the network you want to change, then click Edit to update the password, security type, or connection preferences.
What is Wi-Fi?
Wi-Fi connects your computer to the Internet over radio waves instead of a cable. The first time you join a network, Windows saves its name (the SSID), its password, and other connection details as a profile. That profile is what lets your PC reconnect on its own the next time the network is in range.
Everything in this guide edits that saved profile. It doesn’t touch your router.
Why Change Wi-Fi Settings?
Editing the saved profile is faster and cleaner than deleting the network and setting it up again. Here are the common reasons to do it:
- You changed the Wi-Fi password on your router, and Windows keeps failing to connect with the old one.
- You want a newer security type, such as WPA3 instead of WPA2. Your router must support it, and it should be set to the same type.
- You want to control whether your PC joins a network automatically, for example a neighbor’s network or a public hotspot you only use now and then.
In all three cases you can update the existing profile and keep everything else as it is.
How to Change Wi-Fi Network Settings
These steps are for current Windows 11 builds. On older builds the Edit button described below may not exist. If you don’t see it, jump to the tip after the steps.
- Press Win + I on your keyboard to open Settings .
- Click Network & internet in the left menu, then click Wi-Fi on the right. You should see the Wi-Fi page with your available networks and its related options.
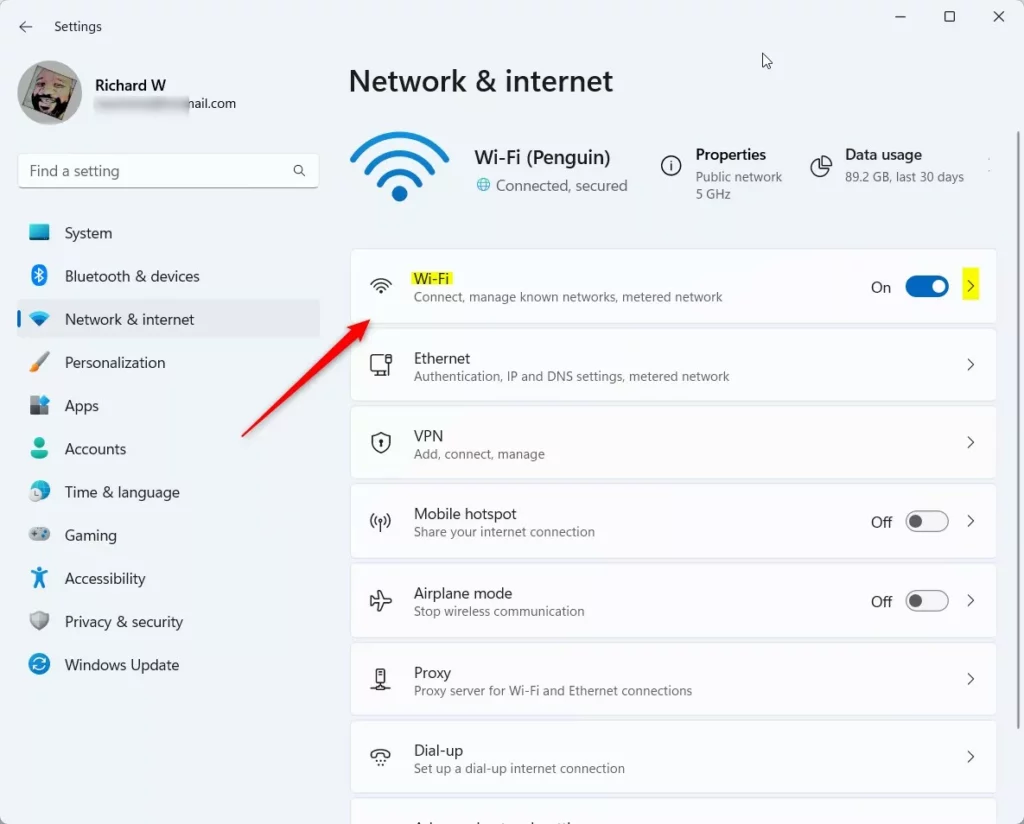
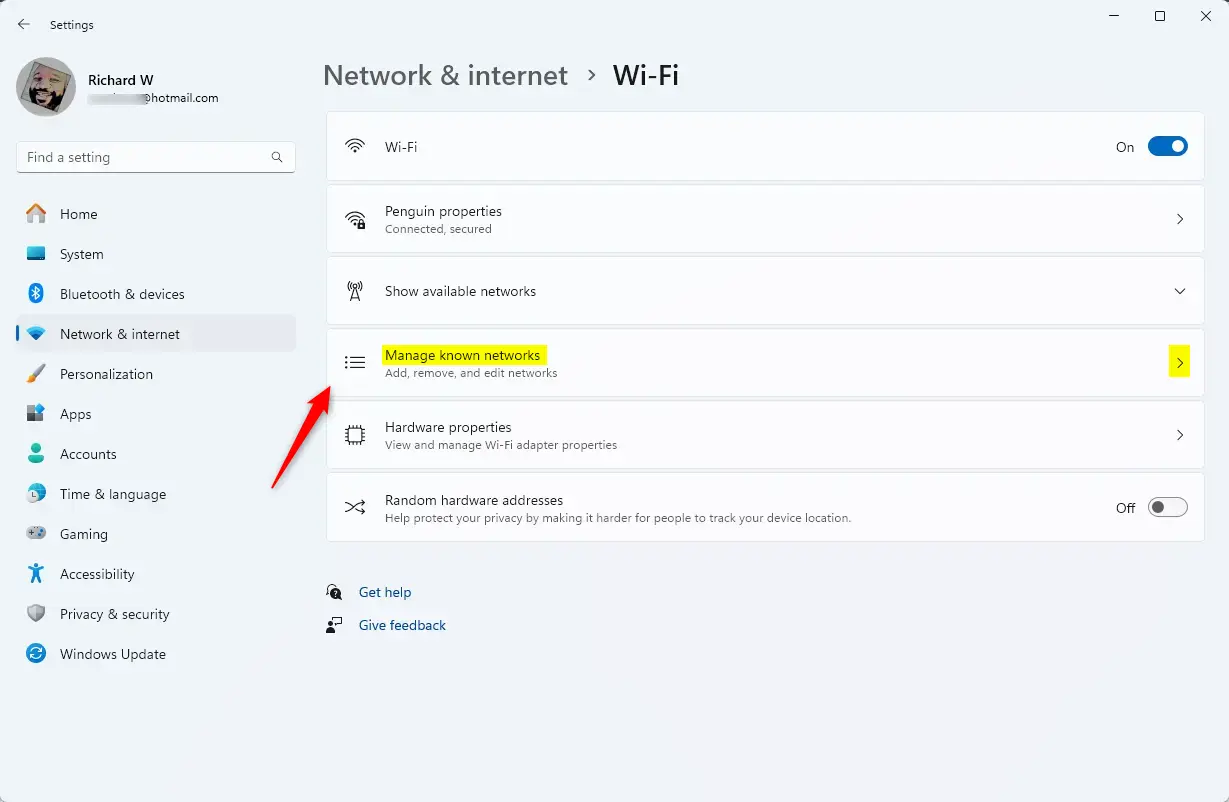
Windows 11 Settings app showing Wi-Fi network tile option - Click Manage known networks. A list of every network your PC has saved appears.
- As a shortcut, you can open this page directly with this link instead: Open Manage Known Networks
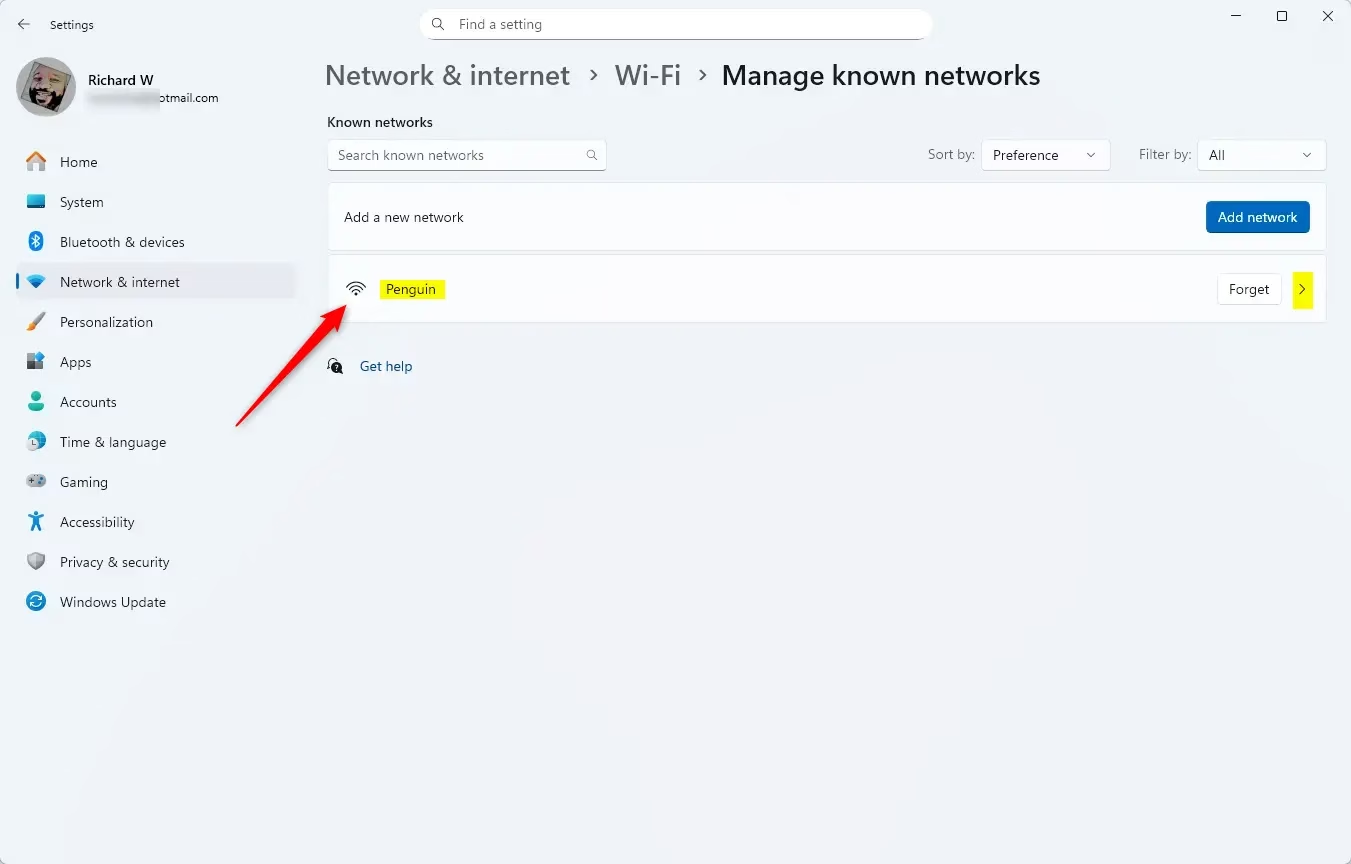
manage known wifi networks - Find the Wi-Fi network you want to change (for example, “Penguin”) and click it. Its properties page opens.
WiFi profile in Windows 11 - Click the Edit button under Advanced Wi-Fi network properties. A properties window opens with a connection section and a security section.
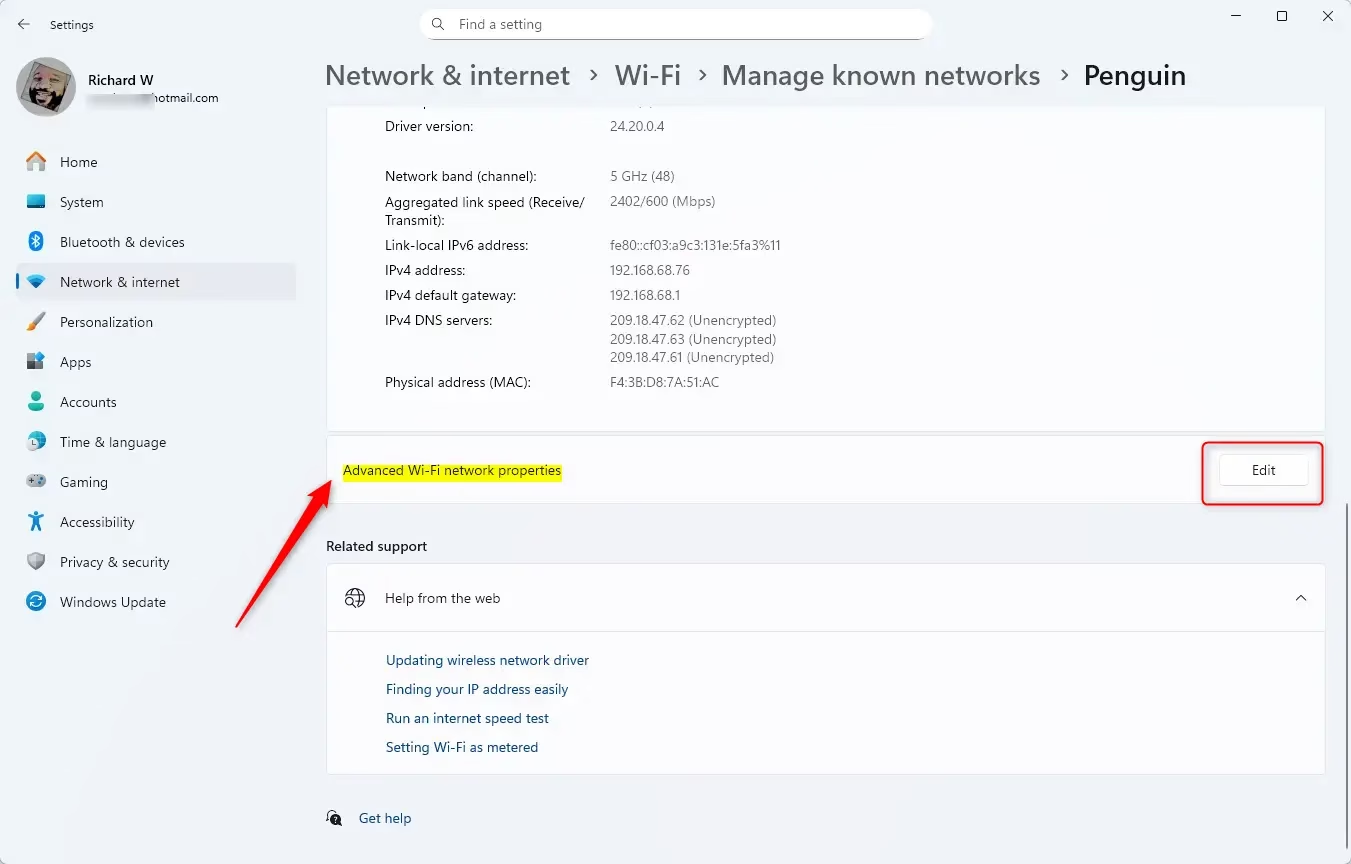
WiFi profile in Windows 11 edit - Change the connection settings as needed:
- Choose whether your PC should connect automatically when the network is in range. Turn this off for networks you only want to join by hand.
- Decide whether your PC should look for other Wi-Fi networks while it is connected to this one.
- Allow the connection even if the network name (SSID) is hidden. Hidden networks don’t show up in the normal list, so Windows has to be told to try them.
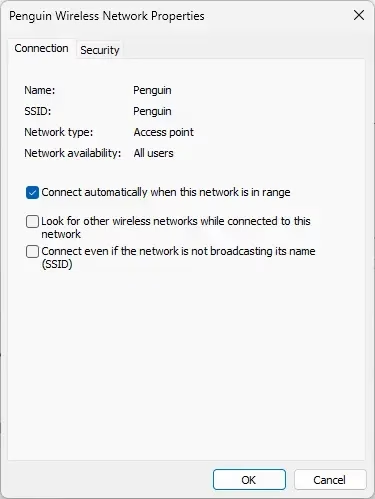
WiFi profile in Windows 11 connection tab
- Change the security settings as needed:
- Select the Security type from the dropdown (like WPA2 or WPA3). It must match what your router is using, or the connection will fail.
- Pick the Encryption type if the option is available.
- Type the new Network security key, which is your Wi-Fi password. Enter it exactly as set on the router, because it is case-sensitive.
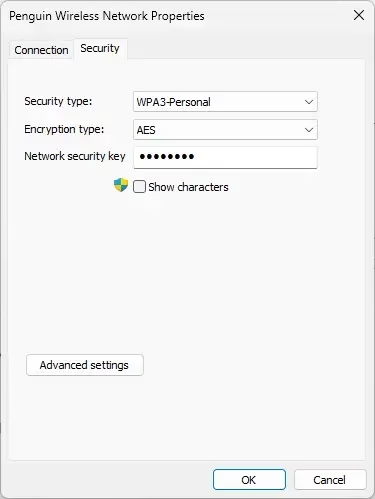
WiFi profile in Windows 11 security tab
- Save your changes, then close the Settings window if you want. Windows will try to reconnect using the updated profile.
In short, you open Manage known networks, pick the saved network, and edit its properties. You can update the password, security type, and connection preferences this way.
If something doesn't work: The network only appears in the list if your PC has saved it before. If the Edit button is missing, your Windows 11 build may be older, so run Windows Update and check again. You can also click Forget on the network's page, then reconnect and enter the password fresh. To undo a change, open the same page and set the old values back. No restart is needed.
Summary
- You can change Wi-Fi settings in Windows 11 without deleting the saved network.
- You can update the password, security type, and connection preferences from Manage known networks.
- Keeping the saved profile in line with your router's settings keeps the connection safe and reliable.
Your Windows 11 PC will now connect using the updated Wi-Fi settings.
Frequently asked questions
How to change Wi-Fi settings?
Open Settings, select Network & internet, then choose Wi-Fi. Select Manage known networks and pick the network you want to change. Windows shows that network's saved details, so you can edit them without deleting the profile first. Your PC uses the new details the next time it connects.
How to change network settings?
Open Settings and select Network & internet. This section holds your Wi-Fi, Ethernet, and VPN settings, along with adapter options and proxy settings. Choose the connection you want to change, then pick the setting you need. Changes apply only to that connection, so your other networks stay the same.
How to encrypt my Wi-Fi password in 🪟 Windows 11 Wi-Fi settings?
You cannot turn on Wi-Fi encryption from Windows 11 settings. Encryption is set on your router, where you choose WPA2 or WPA3 for the network. After you change it there, open Settings, go to Network & internet, then Wi-Fi, and reconnect with the password your router now uses.
What are good setting for Wi-Fi PC 🪟 Windows 11?
On most home PCs, keep Connect automatically turned on so the PC rejoins your network after a restart. Set your router to WPA2 or WPA3 and avoid WEP, which is outdated. Keep Random hardware addresses on for public networks, and turn on Metered connection only if your data plan is limited.
How do I change the security type on Wi-Fi on 🪟 Windows 11?
The security type is set on your router, not in Windows 11 Settings. Log in to the router's admin page, change the security type to WPA2-Personal or WPA3-Personal, and save. Then open Settings, go to Network & internet, then Wi-Fi, and reconnect. Enter the password again if Windows asks for it.
How to change password in Wi-Fi settings 🪟 Windows 11?
Open Settings, select Network & internet, then Wi-Fi, and choose Manage known networks. Select the network and check its saved details. If Windows keeps failing with the old password, select Forget. This removes the saved profile, so Windows asks for the new password when you reconnect.
Still have a question?
Answered by AI from this guide. Good questions may be added to this page — please don't include personal details.
Did this guide fix your problem?

About the Author
Richard
Tech Writer, IT Professional
Richard is a writer at Geek Rewind who turns complex IT tasks into clear, step-by-step guides. He draws on years of hands-on experience in system administration and enterprise IT operations, focusing on Windows, Linux and WordPress: the problems people actually run into, and the fixes that work. His server and WordPress guides come from systems he runs himself. Richard builds and maintains the platform behind Geek Rewind, from its Ubuntu servers and Nginx configuration to its custom WordPress plugins. Many new tutorials start with readers' questions, and he's always glad to answer them in the comments.
No comments yet — be the first to share your thoughts!