How to Find Wi-Fi Security Key in Windows 11


Need to connect a new phone or share access with a guest? You can recover a forgotten Wi-Fi password in Windows 11 in a couple of minutes, as long as the PC is already connected to that network (or has connected to it before). This guide covers the Settings app , Command Prompt, and a way to export your saved network details to a file.
Open Settings Network & internet Wi-Fi , click Properties next to your connected network, scroll down and click View next to Wi-Fi security key, then confirm with your PIN or password. Your network password appears in the window that opens.
Why You Might Need Your Wi-Fi Password
Windows 11 calls the Wi-Fi password the network security key. It is a string of letters and numbers that every new device must enter to join the local network. Windows stores it for networks you have joined, which is why you can read it back from a PC that is already connected.
Is the Wi-Fi Security Key the Same as the Router Admin Password?
Don’t confuse the Wi-Fi security key with the router admin password. They do different jobs:
- The Wi-Fi security key connects your devices to the network and the internet.
- The router admin password lets you change the router’s settings, usually through a web browser. An example would be "admin12345".
The two are typically different unless you set them to be the same. The methods below show only the Wi-Fi key. They will not reveal the router admin password.
Check Your Modem First
The quickest check is the router itself. Most Wi-Fi routers have a sticker on the back or bottom. It lists the SSID, which is your network name, and the security key, which is your password.
The printed key is the default password from your internet provider. If you have changed the password since you received the router, the sticker is out of date and won’t match the current password. In that case, use one of the methods below on a PC that is already connected.
Method 1Use the Settings App
The Settings app is the easiest method and needs no typing. Open Settings and go to the properties of your current network to reveal the password.
- Press Windows key + I to open Settings. You should see the Settings home page.
- Go to Settings Network & internet Wi-Fi You should see your wireless options and the network you are connected to.
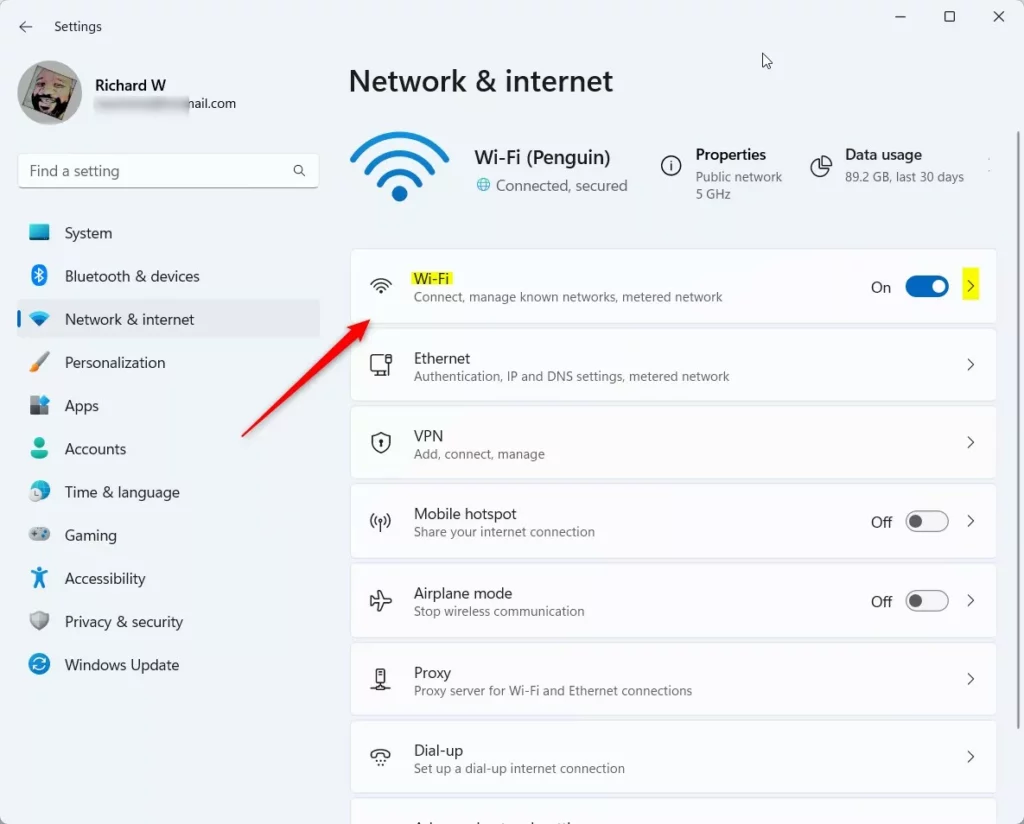
- Click Properties next to your active connection. Scroll down to find View Wi-Fi security key. You should see the properties page for that network.
If you don't see the View Wi-Fi security key option, your build of Windows 11 may be older and doesn't include it in Settings. Install the latest Windows updates, or use the Command Prompt method later in this guide, which works on every version.
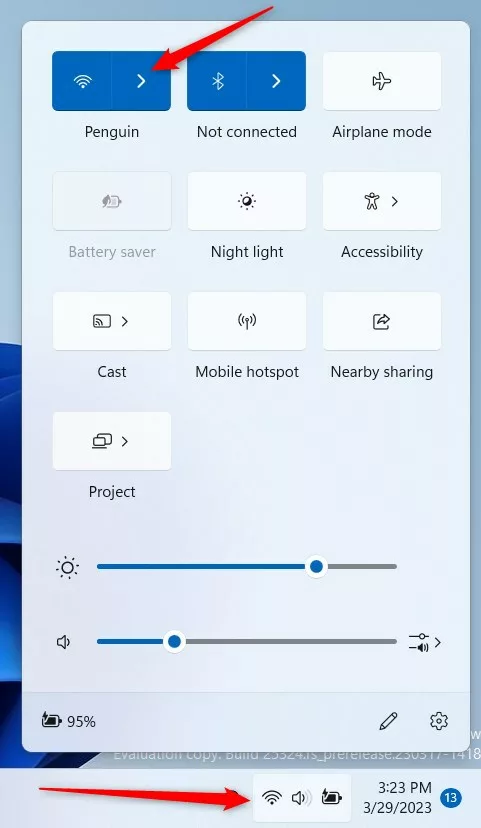
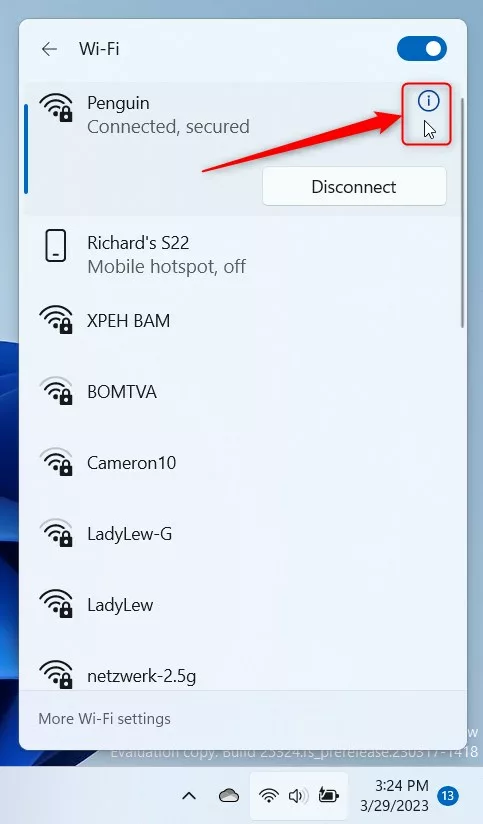
- Scroll down to View Wi-Fi security key and click the View button. Windows may ask you to confirm it's you, for example with your PIN or account password. If so, approve the prompt.
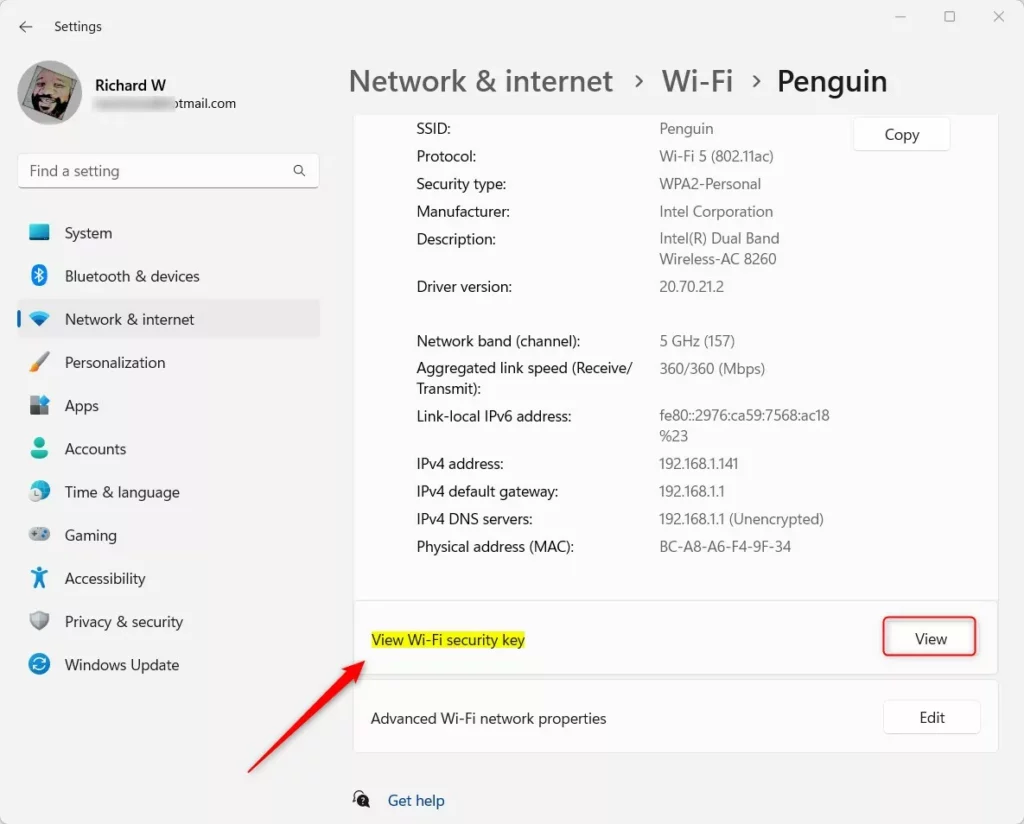
- Read the password in the window that appears. Copy it or note it down exactly, since the key is case-sensitive.
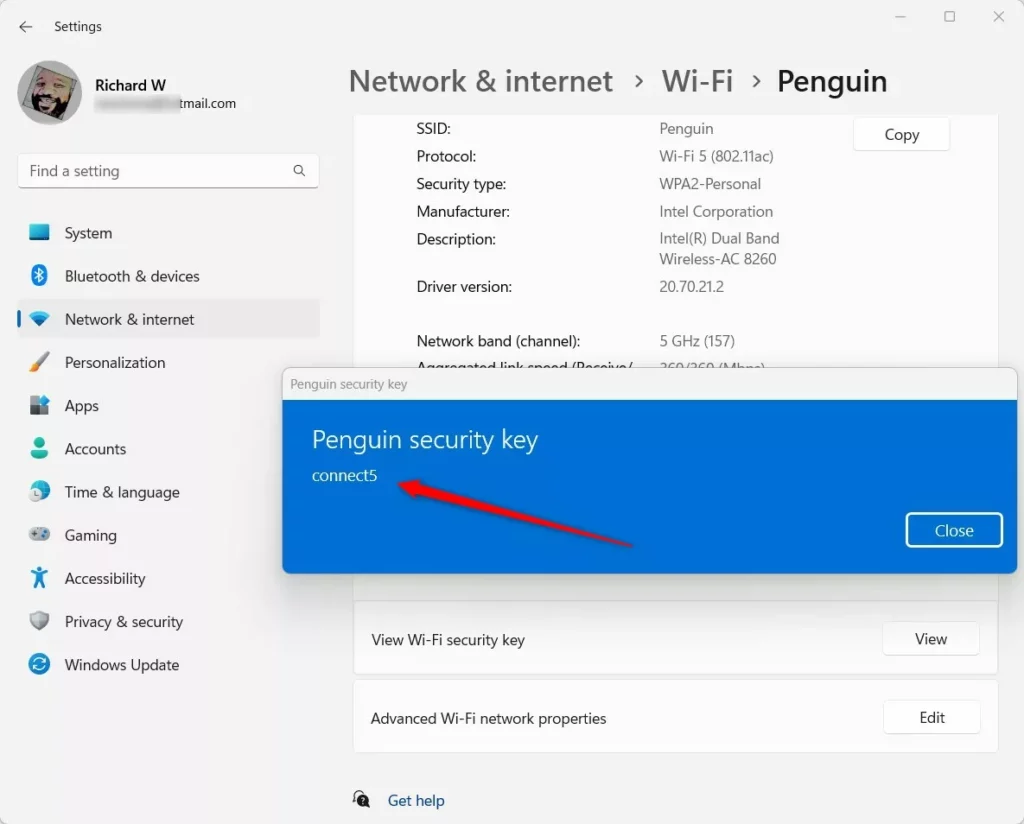
- Close the app when you're finished, so the password isn't left on screen.
Method 2Use the Command Prompt
Use Command Prompt if you prefer working with text commands, or if Settings doesn't show the View option. You open Command Prompt as an administrator, which means it runs with elevated permissions. Then you run a single command, replacing a placeholder with your network's name. This works for any saved network, not just the one you are connected to right now.
- (Admin required) Click Start, type cmd, right-click Command Prompt in the results, and select Run as administrator. If a User Account Control prompt appears, click Yes. You should see a Command Prompt window with "Administrator" in the title bar.
- Type the following command and press Enter:
netsh wlan show profile name="YourNetworkName" key=clear
- Replace YourNetworkName with your actual network name, exactly as it appears in your Wi-Fi list, including capital letters and spaces. Then run the command.
- Look for the Key Content line in the output. That's your password. It sits under the Security settings section.
If the output says the profile isn't found, the name doesn't match what Windows has saved, so check the spelling. If there is no Key Content line, the network may be open (no password), or you may not have opened Command Prompt as administrator.
Troubleshooting and Advanced Tips
The Network and Sharing Center is another way to view the key if the methods above don't work for you. Open Control Panel Network and Internet Network and Sharing Center, click your Wi-Fi connection, then choose Wireless Properties. On the Security tab, tick Show characters to display the key. You need administrator rights for this one.
Doing so allows them to use your internet and potentially access your private files. If you think the key has already gotten out, change the Wi-Fi password in your router's settings, then reconnect your devices.
Exporting Your Network Profile
You can also save your network settings to a file. This is handy for keeping a record before you reset or reinstall a PC. (Admin required) Open Command Prompt as administrator, as described above, and type:
netsh wlan export profile name="YourNetworkName" folder=C:\Users\Public key=clear
Open the Public folder in File Explorer to find it. The file can include your Wi-Fi password, so treat it like the password itself. Don't email it or leave it on a shared PC, and delete it when you no longer need it.
Summary
You can find your Wi-Fi security key in Windows 11 using either the Settings app or Command Prompt. Settings is quicker if your build shows the View button. Command Prompt works on any version and for any saved network. Whichever you use, keep the password private and write it down somewhere safe once you've found it.
Was this guide helpful?

About the Author
Richard
Tech Writer, IT Professional
Richard is a writer at Geek Rewind who turns complex IT tasks into clear, step-by-step guides. He draws on years of hands-on experience in system administration and enterprise IT operations, focusing on Windows, Linux and WordPress: the problems people actually run into, and the fixes that work. His server and WordPress guides come from systems he runs himself. Richard builds and maintains the platform behind Geek Rewind, from its Ubuntu servers and Nginx configuration to its custom WordPress plugins. Many new tutorials start with readers' questions, and he's always glad to answer them in the comments.

[…] network profile includes the security key, SSID, and other information, which can be used to reconnect to the Wi-Fi […]
[…] you want to learn how to connect to Wi-Fi networks or find your Wi-Fi password, check out these helpful […]