Here’s How to Manually Change Your Windows 11 Display Brightness

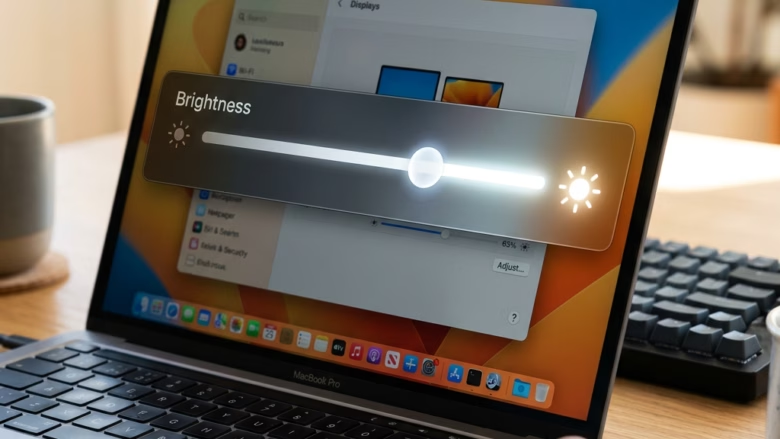
- 14 steps
- Needs administrator rights
Changing your Windows 11 display brightness lets you match the screen to your room or save laptop battery power. It takes about ten seconds, and you can use either the Quick Settings panel or the Settings app.
The short version: press Win+A to open Quick Settings, then drag the brightness slider left or right. You can also open Settings, select System, then Display, and use the same slider there. That page also has other display options, such as color settings.
To change Windows 11 brightness, press Win+A to open Quick Settings, then drag the brightness slider left to dim or right to brighten. Alternatively, open Settings, select System, then Display, and adjust the slider there.
Why Change Screen Brightness?
Screen brightness has a direct effect on how your eyes feel. A bright screen in a dark room is harsh and tiring. A dim screen in a bright room makes you squint, and that causes eye strain too.
A good rule is to match the screen to the room. Turn it down in the evening or in a dim space, and turn it up in daylight so the text stays readable.
What Happens When You Change Brightness?
The brightness slider controls how much light the screen gives off. Moving it up makes the screen output more light. Moving it down reduces that output. Room lighting and your own preference decide the right setting, so there is no single correct level.
The backlight is one of the biggest power draws, so dimming the screen can noticeably extend your time away from the charger.
Quick Way: Adjust Brightness from the Taskbar
Laptops benefit most from this taskbar shortcut. You can change brightness in a couple of clicks without opening Settings. Many laptops also have dedicated brightness keys on the keyboard, often on the function row. You may need to hold Fn while pressing them.
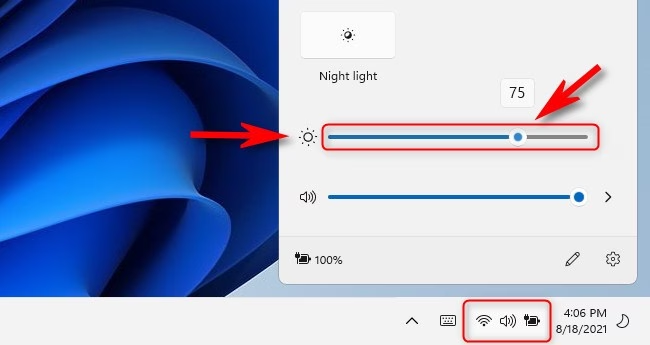
Step 1Open Quick Settings
Follow these steps to open the Quick Settings panel:
- Look at the right side of the taskbar , near the clock.
- Click the Wi-Fi , sound, or battery icons. They sit together, and clicking any of them opens the panel. You can also press Win+A.
- Check that a panel with tiles and sliders has appeared above the taskbar .
You do not need administrator rights for this. A standard user account can change display brightness. If the slider is missing, the cause is almost always your hardware, not your account type.

Step 2Find the Brightness Slider
Look for the brightness slider in the Quick Settings panel. It usually has a sun icon next to it, and it sits just above or beside the volume slider.
If you do not see it, check the following:
- Desktop computers with external monitors often have no brightness slider. Windows cannot control most external monitors from the taskbar, so use the Settings app or the monitor’s own buttons.
- The panel may be showing only a few tiles. If you see a pencil icon, click it to check whether the brightness control was removed from the panel. You can add it back from there.
Step 3Adjust the Brightness
- Click the circular control (the handle) on the brightness slider and hold the mouse button down.
- Drag it left to dim the screen, or right to brighten it.
- Release the mouse button when the display looks right.
The screen should change as you drag. To undo the change, drag the slider back to where it was. Nothing is saved permanently, so you can adjust it again whenever you like.
Detailed Way: Adjust Brightness in Windows Settings
If the taskbar slider is missing, use the Windows Settings app instead. Even there, an external monitor on a desktop PC may not show a slider. That is covered further down.
Step 1Open Windows Settings
- Click the Start button (the Windows logo) on the taskbar .
- Select the gear icon for Settings.
- Check that the Settings window opens.
The faster way is to press Win+I on the keyboard. That opens Settings straight away.
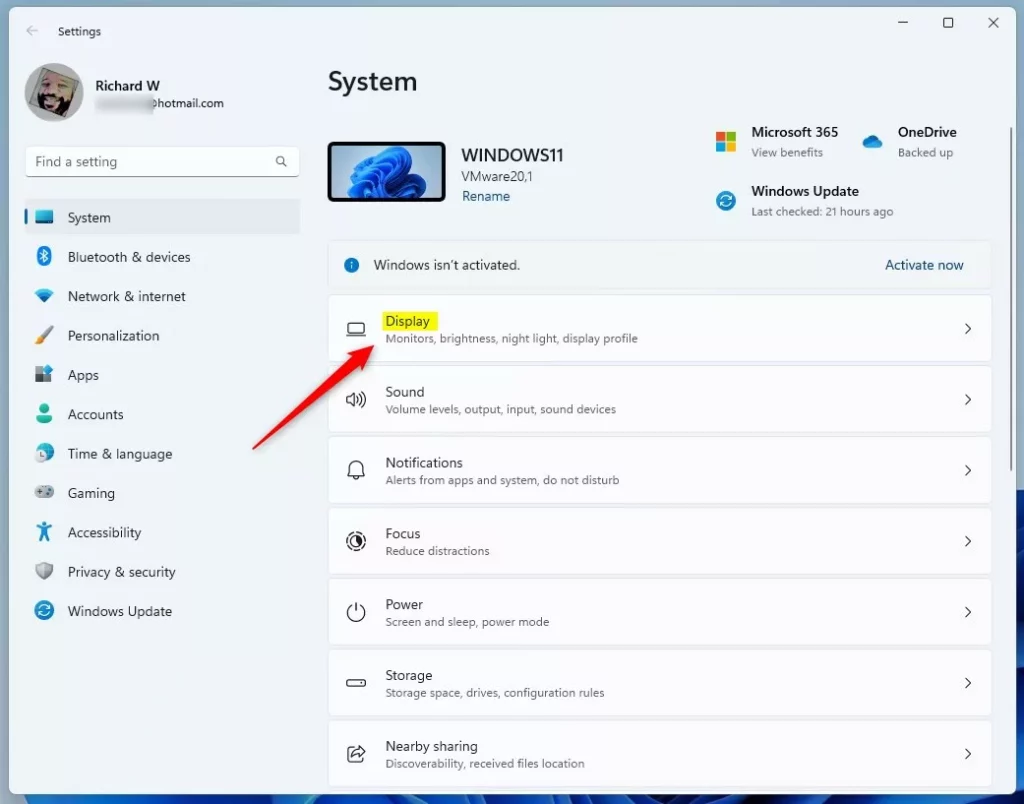
Step 2Go to Display Settings
- Choose System from the left-hand menu in the Settings app.
- Click Display.
The Display page should now open on the right. Brightness and color options are near the top.
Step 3Find the Brightness Slider
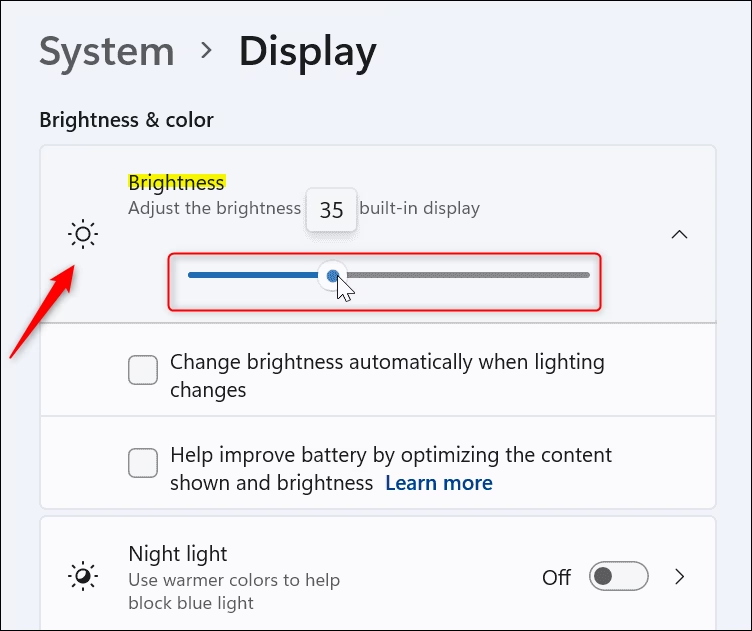
The brightness slider in the Settings app works the same way as the one on the taskbar. If it is missing from your taskbar, you can find it here. Open the Start menu, open Settings, then click System followed by Display.
If you use a desktop computer with an external monitor, you will probably not see this slider. Desktop screens use physical buttons on the monitor instead. Windows normally controls brightness only on built-in displays, such as laptop screens and some all-in-one PCs.
Use the buttons or on-screen menu built into the monitor. Look for a menu or a sun icon on the front, side, or back of the screen.
Step 4Adjust the Brightness
- Click the display slider and drag it left or right with your mouse.
- Drag it left to make the screen dimmer, or right to make it brighter.
- Release the mouse button when it looks comfortable.
If your desktop PC lacks this slider because you use an external screen, use the physical buttons on your monitor to change the light level instead.
Adjusting brightness on such setups requires the physical buttons located on the monitor itself.
Reference:
Summary
You can change Windows 11 screen brightness from the Quick Settings panel on the taskbar or from the Windows Settings app. Setting the display to suit the room reduces eye strain and makes the screen more comfortable to use. On a laptop it also helps your battery last longer. If you have a desktop with an external monitor, use the buttons on the monitor.
Frequently asked questions
How to change brightness settings?
Open Quick Settings by pressing Windows key + A, then drag the brightness slider left to dim the screen or right to brighten it. For more control, open Settings, select System, then Display, and use the Brightness slider there. Laptops may also have brightness keys on the keyboard.
How to I change the brightness on my 🪟 Windows 11?
Press Windows key + A to open Quick Settings, then drag the brightness slider. You can also open Settings, go to System, then Display, and move the slider there. On a laptop, the brightness keys on the keyboard work too, often marked with a sun icon.
How can I change the screen brightness?
To change screen brightness, open Quick Settings with Windows key + A and drag the brightness slider. For more options, open Settings, select System, then Display, and use the slider there. Many laptop keyboards have sun-shaped brightness keys that adjust the screen instantly.
How to control screen brightness?
Control brightness with the slider in Quick Settings, which opens with Windows key + A. The same slider is under System, then Display, in Settings. If the brightness keeps changing on its own, Windows may be using automatic brightness, which you can turn off on the Display page.
Can you manually adjust?
Yes. You can adjust brightness manually at any time with the slider in Quick Settings (Windows key + A) or in Settings under System, then Display. If the slider moves by itself, clear the option to change brightness automatically when lighting changes, found on the same Display page.
How to change monitor brightness 🪟 Windows 11?
For an external monitor, press the buttons on the monitor itself. They usually open an on-screen menu with a Brightness option. You can also try the Brightness slider in Settings under System, then Display, but many external monitors do not respond to it.
The screenshot in this guide doesn't match my screen. What should I do?
Asked by a reader
Windows 11 updates can change how the Quick Settings panel looks, so your tiles and layout may differ from the screenshot. The steps still apply. Press Windows key + A to open Quick Settings and look for a brightness slider with a sun icon. If it isn't there, click the pencil icon, if you see one, to check whether the control was removed. You can also press Windows key + I, then choose System and Display. Drag the slider to adjust brightness.
Still have a question?
Answered by AI from this guide. Good questions may be added to this page — please don't include personal details.
Did this guide fix your problem?

About the Author
Richard
Tech Writer, IT Professional
Richard is a writer at Geek Rewind who turns complex IT tasks into clear, step-by-step guides. He draws on years of hands-on experience in system administration and enterprise IT operations, focusing on Windows, Linux and WordPress: the problems people actually run into, and the fixes that work. His server and WordPress guides come from systems he runs himself. Richard builds and maintains the platform behind Geek Rewind, from its Ubuntu servers and Nginx configuration to its custom WordPress plugins. Many new tutorials start with readers' questions, and he's always glad to answer them in the comments.
No comments yet — be the first to share your thoughts!