Enable Modern Standby Network Connectivity in Windows 11

Modern Standby keeps your Windows 11 PC connected to the internet while it sleeps, so email, messages and app updates arrive without you waking the machine. It works much like a phone: the screen is off and the hardware is in a low-power state, but the system can still run light background work. This state uses about 5 to 10 percent more battery per day than traditional sleep mode, but it wakes the computer in less than two seconds.
You enable Modern Standby network connectivity by navigating to Control Panel , then Hardware and Sound, and finally Power Options. From there, change your active plan settings and adjust “Network connectivity in Standby” under advanced power settings. You can choose to enable, disable, or let Windows manage the connection.
You can change how Modern Standby handles internet access. That lets you save battery when you unplug your laptop, or keep full network activity running while the screen is off. The right choice depends on how you use the PC.
Before you start, keep these points in mind:
- Hardware support varies. Modern Standby only exists on PCs whose hardware and firmware are built for it, which is mostly newer laptops and tablets. Older machines use traditional sleep, which cuts the network connection. If your PC does not support Modern Standby, network options for it will not apply or may not appear.
- Battery drain is the trade-off. Staying connected is what costs the extra battery. If the laptop sits in a bag for a day or two, a connected sleep state can leave you with a noticeably lower charge than you expected.
- Plugged in or on battery. Many people keep full connectivity while on AC power, where battery use does not matter, and reduce it on battery. Treat these as two separate settings.
- Everything is reversible. Nothing here changes your files or apps. If battery life or notifications are not what you wanted, you can go back to the previous option and test again.
Choose full network activity if you rely on instant notifications, scheduled syncing or incoming calls and messages while the PC is idle. Choose reduced connectivity if you want the laptop to last longer between charges and do not mind waiting for mail and updates until you wake it. After you make a change, put the PC to sleep for a while, wake it, and compare the battery level. That tells you whether the setting suits your routine.
What is Modern Standby Network Connectivity?
Modern standby network connectivity is a Windows 11 power feature that controls whether your computer stays connected to the internet while it sleeps. It lets you choose between a connected state for instant email and app notifications, a disconnected state to save battery life, or letting Windows manage the connection automatically based on your current power source.- Connected state: Your device stays connected to WiFi or other networks during sleep, so you get updates and notifications instantly.
- Disconnected state: Your device turns off network connections during sleep, which can save battery but means no updates until you wake it up.
- Managed by Windows: Windows decides when to keep the network on or off to balance notifications and battery life.
How to Change Modern Standby Network Settings in 🪟 Windows 11
Before starting, make sure the hardware supports Modern Standby.
Step 1Open Control Panel
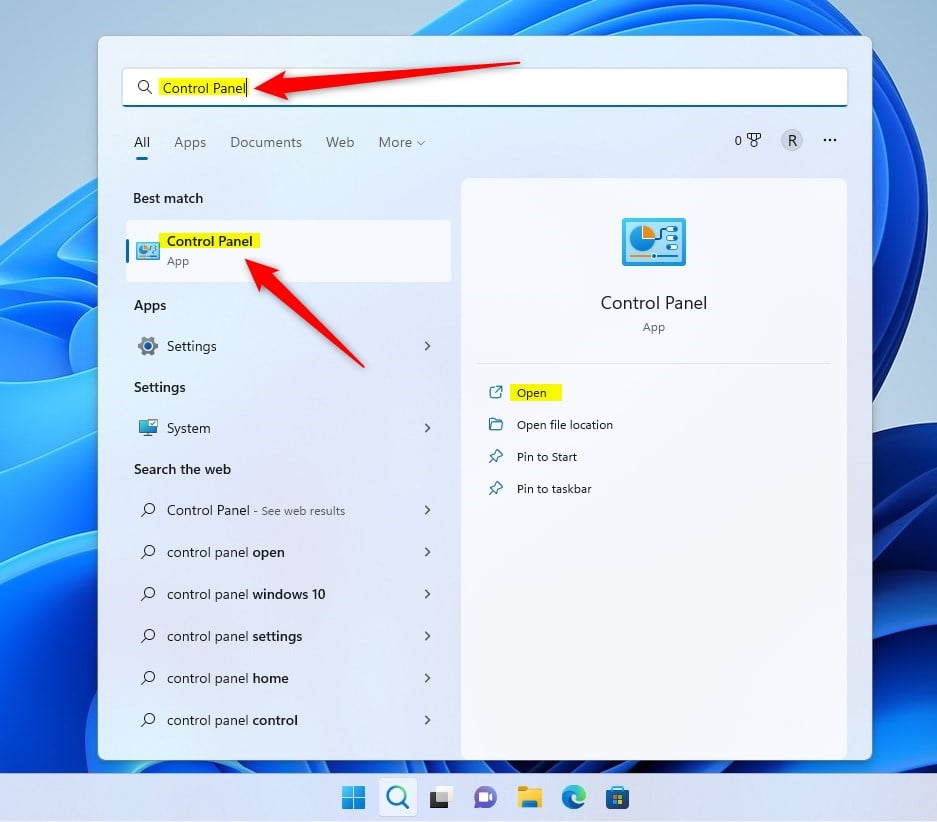
1. Click the Start menu (the Windows icon in the bottom-left corner).
2. Type Control Panel in the search box.
3. Select the Control Panel app from the search results.
Step 2Go to Power Options
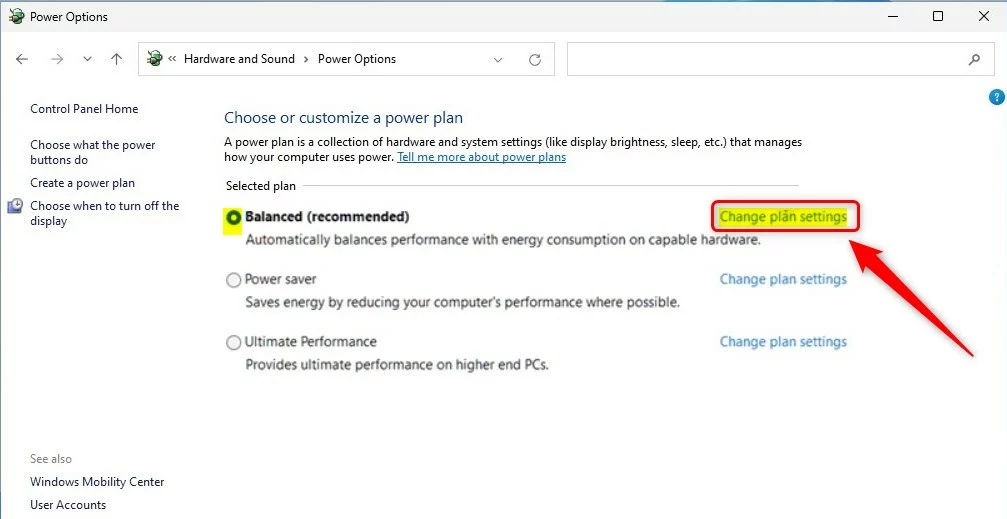
Open Hardware and Sound inside Control Panel, then select Power Options.
Control Panel > Hardware and Sound > Power Options
Step 3Change Power Plan Settings
Locate the active power plan and click Change plan settings next to it.
Step 4Open Advanced Power Settings
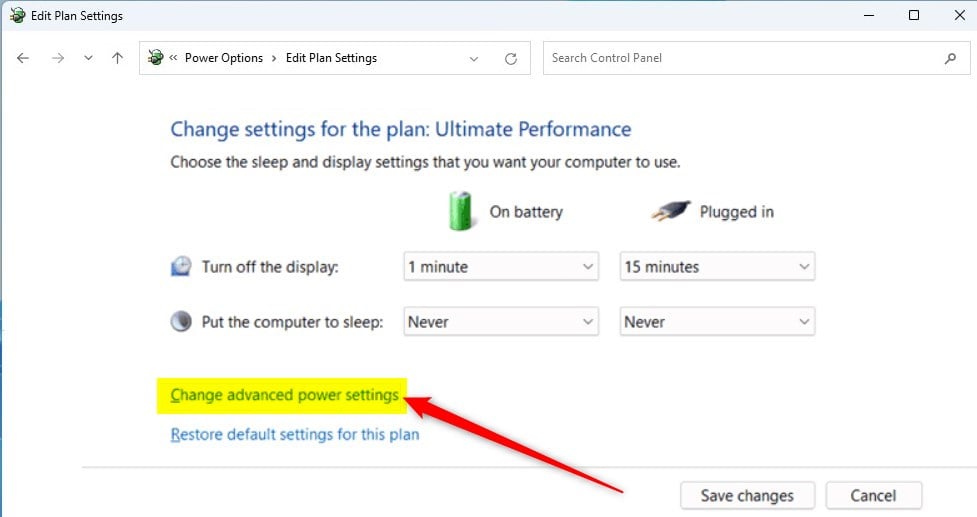
Click Change advanced power settings.
Step 5Adjust Network Connectivity in Standby
To adjust network connectivity in standby, open your power settings and change how your computer handles internet access while sleeping. You can set separate rules for when your laptop runs on battery power and when it is plugged into a wall outlet, choosing whether to enable, disable, or let Windows manage your network connection.
- On battery: choose Disable, Enable, or Managed by Windows.
- Plugged in: choose Disable, Enable, or Managed by Windows.
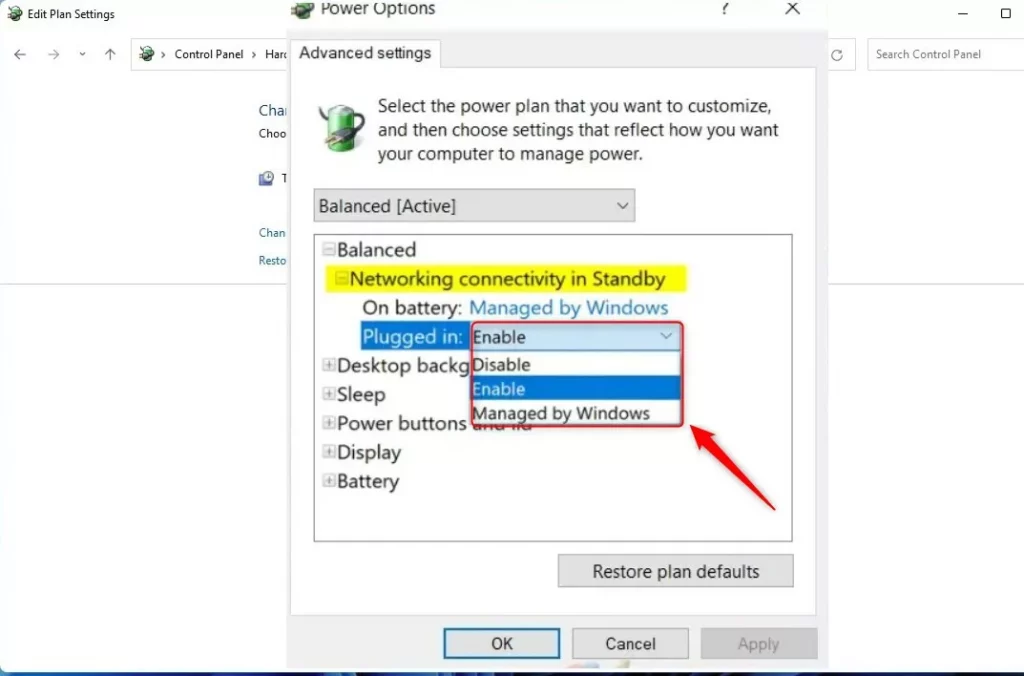
Choose the state that matches workflow requirements:
- Enable: Stay connected during sleep.
- Disable: Disconnect to save battery.
- Managed by Windows: Let Windows decide what’s best.
Click OK to save the configuration.
Alternative: Use Local Group Policy Editor
The Local Group Policy Editor provides an alternative method for managing these options. This built-in Windows tool suits administrative tasks well.
Step 1Open Local Group Policy Editor
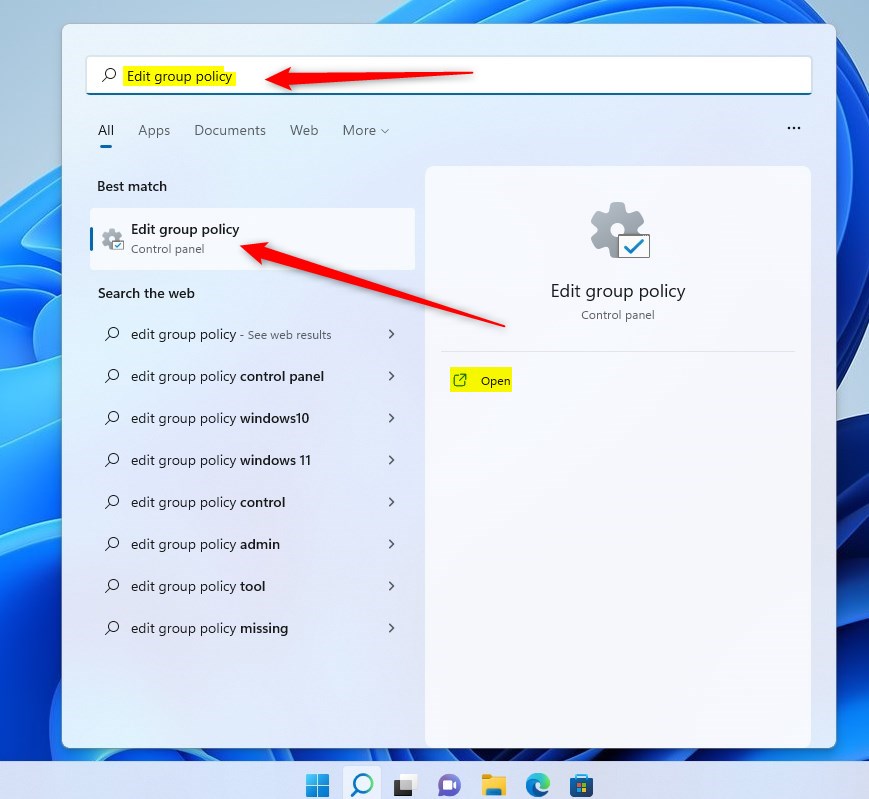
1. Click the Start menu.
2. Type Edit group policy.
3. Select Edit group policy from the results.
Step 2Go to Sleep Settings
Go to Computer Configuration Administrative Templates System Power Management Sleep Settings in the left panel.
Computer Configuration > Administrative Templates > System > Power Management > Sleep Settings
Step 3Change Connectivity Settings
You can change connectivity settings for Modern Standby using the Local Group Policy Editor on Windows 11 Pro. Finding the right policies allows you to force your computer to stay connected to the internet during sleep or turn off network access entirely to save battery life while your screen is off.
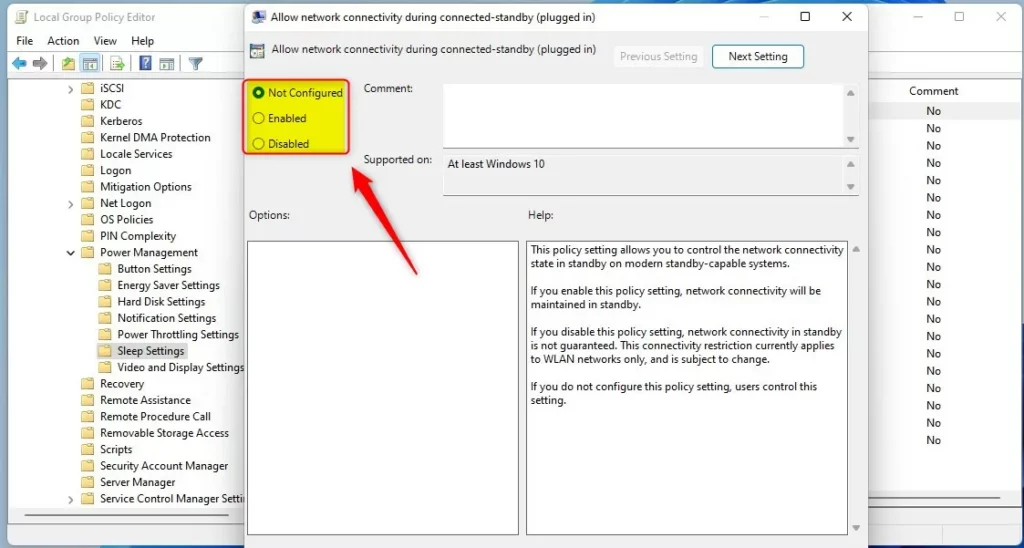
- Allow network connectivity during connected-standby (plugged in)
- Allow network connectivity during connected-standby (on battery)
Double-click each policy and choose:
- Not Configured (default)
- Enabled – Keep network connected during standby.
- Disabled – Network may disconnect during standby.
Click Apply and then OK to confirm each change.
Summary
- Modern Standby lets your PC stay connected to networks while sleeping.
- You can choose to keep the connection on, turn it off, or let Windows decide.
- Adjust these settings via Control Panel or Local Group Policy Editor.
- Changing these can help balance getting notifications and saving battery power.
Modern standby network connectivity gives you full control over how your Windows 11 computer handles internet access during sleep mode. By adjusting these settings through the Group Policy Editor or your power options, you can easily balance getting instant notifications with saving battery power while your device is locked and resting.
Was this guide helpful?

About the Author
Richard
Tech Writer, IT Professional
Richard is a writer at Geek Rewind who turns complex IT tasks into clear, step-by-step guides. He draws on years of hands-on experience in system administration and enterprise IT operations, focusing on Windows, Linux and WordPress: the problems people actually run into, and the fixes that work. His server and WordPress guides come from systems he runs himself. Richard builds and maintains the platform behind Geek Rewind, from its Ubuntu servers and Nginx configuration to its custom WordPress plugins. Many new tutorials start with readers' questions, and he's always glad to answer them in the comments.



No comments yet — be the first to share your thoughts!