Switch On Hardware-Enforced Stack Protection in Windows 11

- 13 steps
- Needs administrator rights
- Includes a restart or sign-out
Hardware-enforced Stack Protection in Windows 11 uses a feature built into your processor to stop attackers from hijacking the path a program follows through the Windows kernel. The setting is called Kernel-mode Hardware-enforced Stack Protection, and you switch it on in Windows Security under Core isolation details.
You need Windows 11 version 22H2 or later and a processor that supports shadow stacks (protected copies of return addresses). It also needs Memory integrity (a setting that stops incompatible drivers from loading into the kernel) turned on. A restart finishes the change.
To switch on Hardware-enforced Stack Protection in Windows 11, open Windows Security, select Device security, then Core isolation details, and turn on Kernel-mode Hardware-enforced Stack Protection. You need Windows 11 version 22H2 or later, a processor with shadow stack support, and Memory integrity turned on. Restart the PC to finish.
What Hardware-Enforced Stack Protection Does
Every running program keeps a stack, an area of memory that records where to return after each function call. Attackers try to overwrite those return addresses so the program jumps to code they chose. This family of attacks, called return-oriented programming, reuses small pieces of existing code to take control of a program.
Hardware-enforced Stack Protection counters this with a shadow stack, a second, protected copy of the return addresses that the processor maintains. When a function returns, the CPU compares the two copies. If they differ, it stops the program instead of letting the jump happen. The processor feature behind this is Control-flow Enforcement Technology (a chip feature that guards the path a program follows), usually called CET on Intel chips.
The setting in Windows Security covers kernel mode, the privileged core of Windows where drivers run. A separate, per-app version covers programs that run in user mode. That version is covered later in this post.
What You Need Before You Start
Three things must be true for the toggle to appear and work: a recent Windows 11 build, a supported processor, and Memory integrity enabled. Check the first two now to avoid hunting for a setting that your PC cannot show.
Check your 🪟 Windows 11 version
Press Win+R, type winver, and press Enter. The dialog shows the version number. You need 22H2 or later.
If you have an earlier version, run Windows Update first. The steps below use the Windows Security layout from current Windows 11 releases.
Check your processor
Open Settings System About and read the Processor line under Device specifications. Shadow stack support generally starts with Intel 11th Gen Core processors and AMD Zen 3 processors (Ryzen 5000 series), and continues in newer chips. Confirm your exact model on the manufacturer’s specification page, because support also depends on firmware.
If your processor is older, Windows Security does not offer the toggle. No setting or download adds the feature to unsupported hardware.
Know what changes
How to Switch On Hardware-Enforced Stack Protection
Open Windows Security, find Core isolation details, and switch on Kernel-mode Hardware-enforced Stack Protection. Restart the PC to finish. Administrator rights are required: if you use a standard account, Windows asks for an administrator’s credentials at the confirmation prompt.
- Open Windows Security. Select Start, type Windows Security, and press Enter. The Windows Security home page opens with tiles for each protection area.
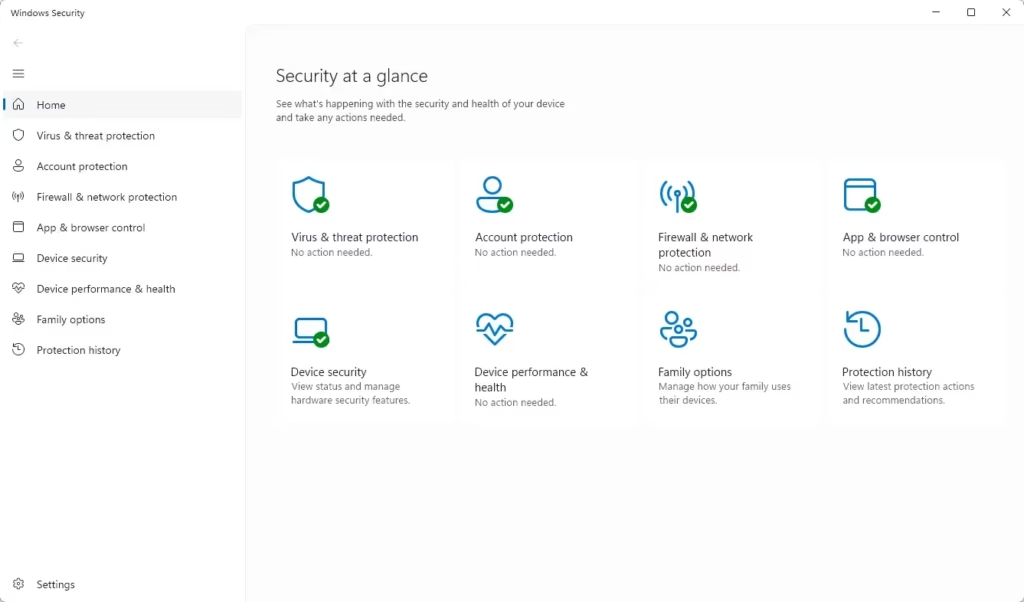
Windows Security dashboard showing an overview of PC protection status. - Select Device security. It is in the left pane. If your PC is managed by an organisation, some options on this page may be locked.
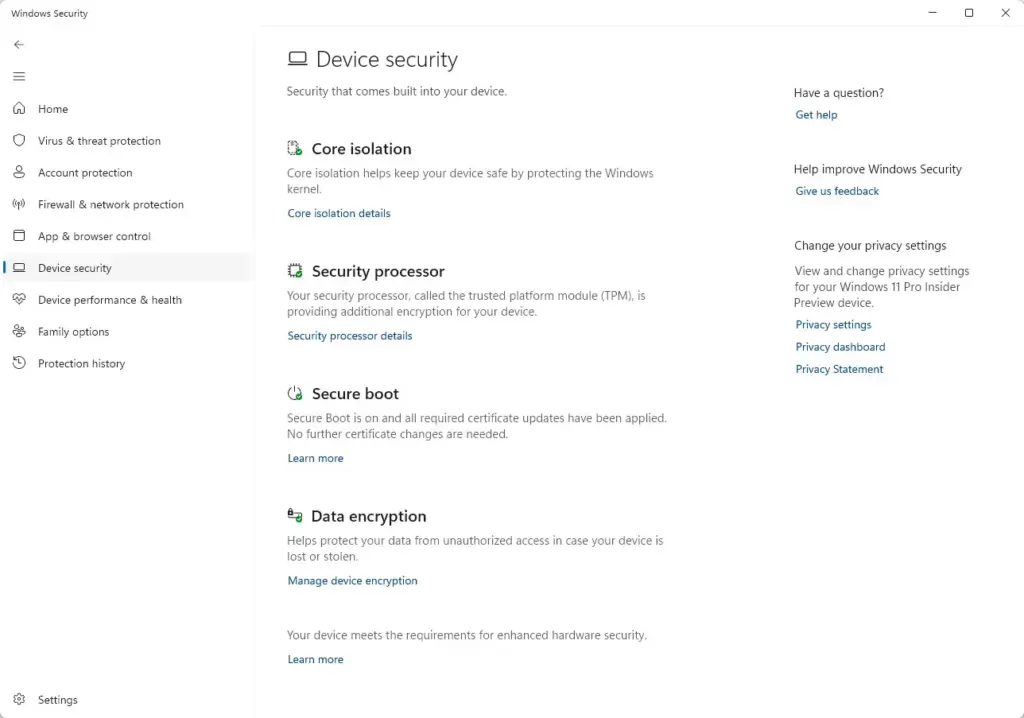
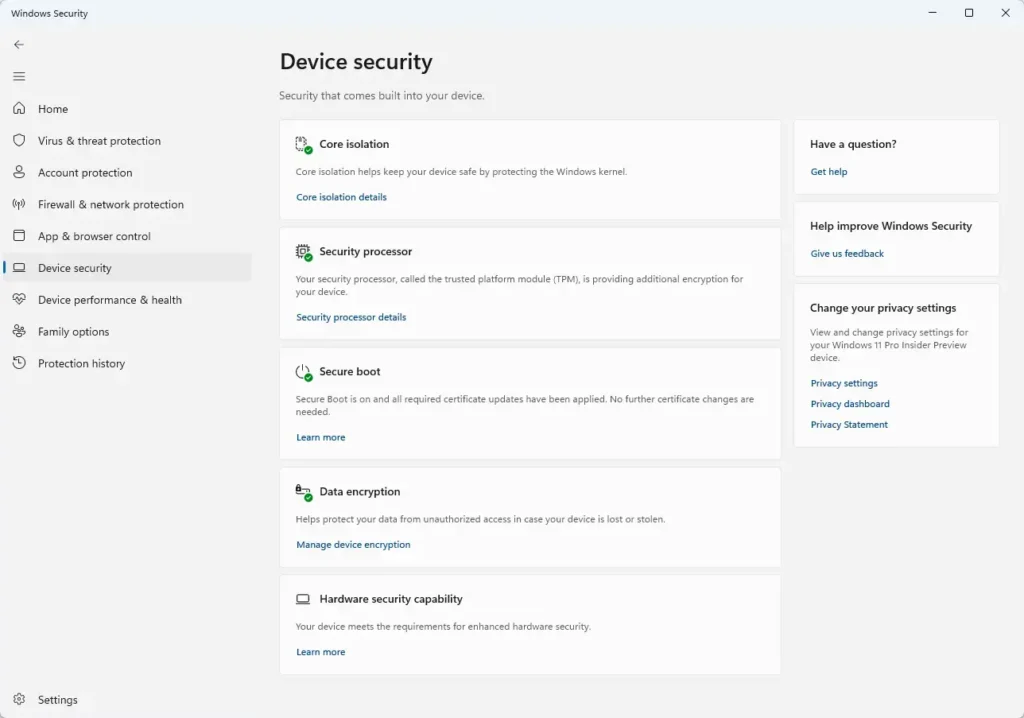
Windows Security › Device security - Select Core isolation details. It sits under the Core isolation heading. A page opens with the isolation toggles, including Memory integrity.
Windows Security - Turn on Memory integrity if it is off. Memory integrity (also called hypervisor-protected code integrity) uses virtualization to block untrusted code from running in the kernel. Stack protection depends on it. Administrator rights are required, so approve the User Account Control prompt. If Windows asks you to restart, restart now, then repeat steps 1 to 3.
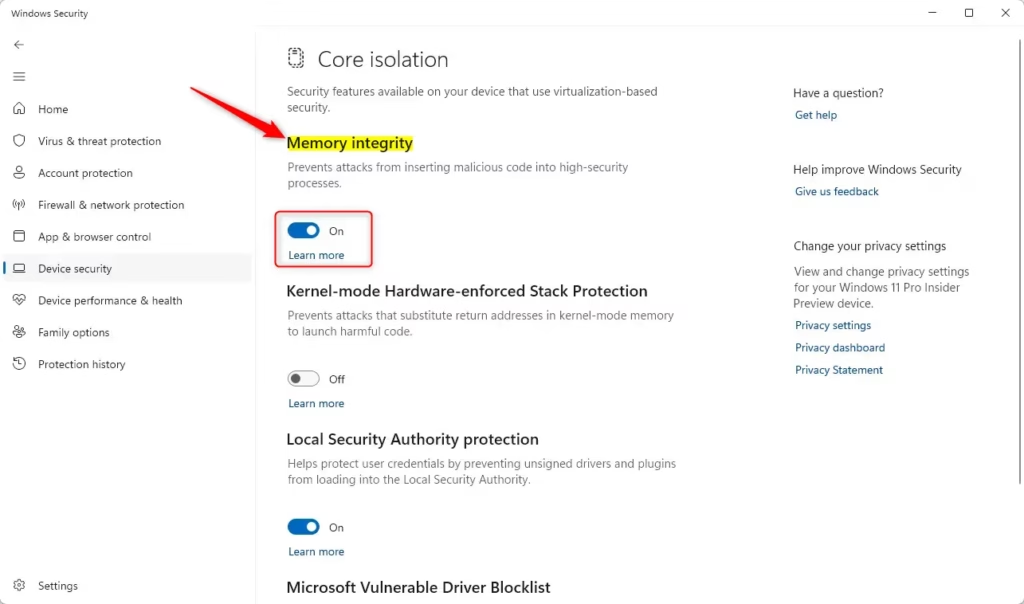
Disable Memory Integrity in Windows 11 for better gaming performance. - Find Kernel-mode Hardware-enforced Stack Protection. It appears below Memory integrity on the same page. If you do not see it, go to the troubleshooting section below.
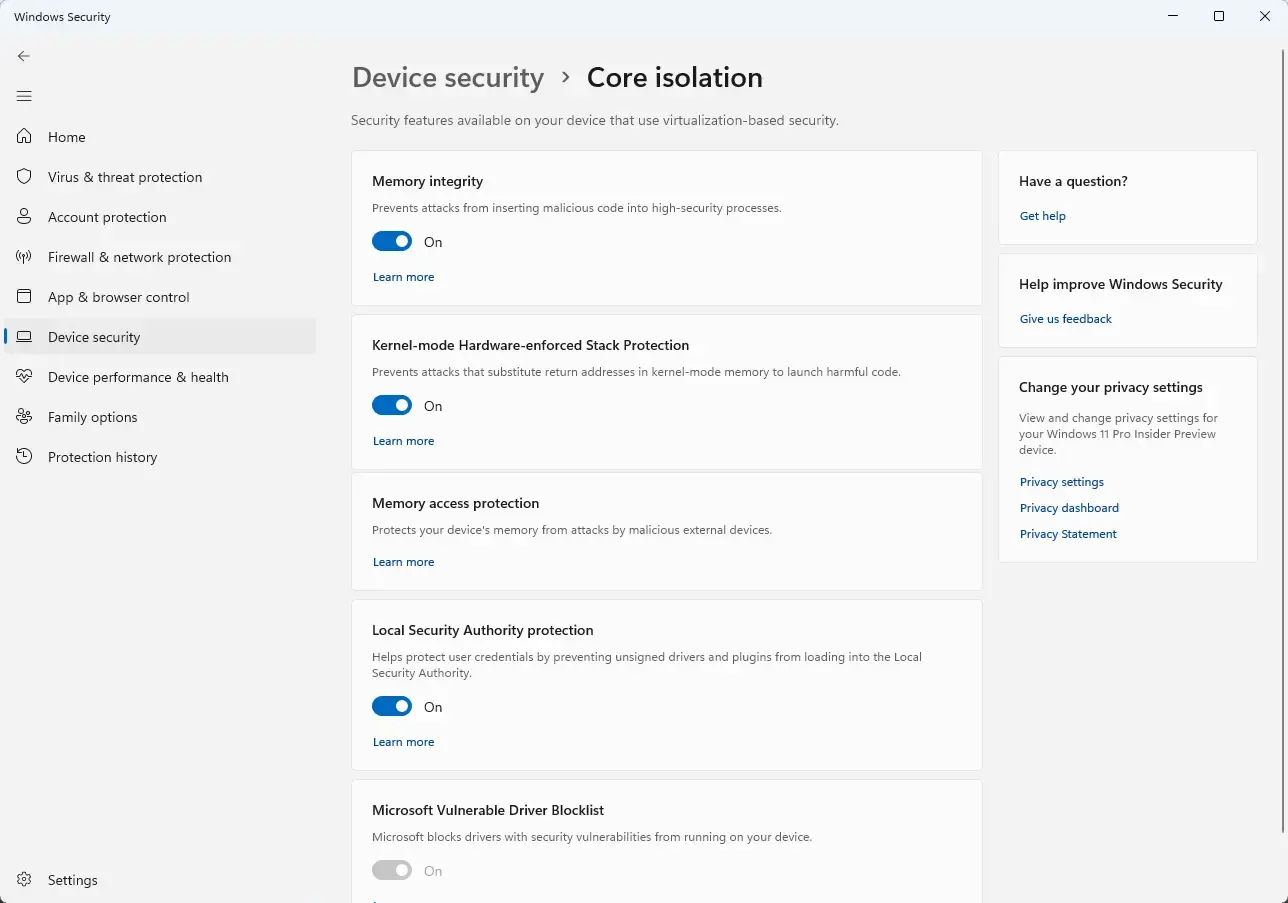
Windows Security Core isolation page showing Kernel-mode Hardware-enforced Stack Protection toggle - Switch the toggle to On. Administrator rights are required. The toggle changes to On after you approve the prompt.
- Select Yes at the User Account Control prompt. If you are on a standard account, enter an administrator’s username and password instead.
- Restart the PC. Windows Security shows a message that a restart is needed. Save your work, then select Start Power Restart.
- Reopen Core isolation details after the restart. Repeat steps 1 to 3 and check that Kernel-mode Hardware-enforced Stack Protection still shows On.
When the toggle stays On after the restart, the protection is active. On some new PCs the setting is already on from the factory, so check before you change anything.
If the Toggle Is Missing or Greyed Out
Most failures fall into one of the three cases below. Work through them in order, because the first is the most common.
The toggle does not appear at all
Windows Security hides Kernel-mode Hardware-enforced Stack Protection when the system cannot support it. The usual cause is a processor without shadow stack support, or a Windows 11 version older than 22H2. Check both using the steps in the requirements section.
If you meet both and the option is still missing, look for a BIOS or UEFI update from your PC maker, since firmware also has to support the feature. The exact firmware setting is not confirmed here, so check your PC maker’s notes.
Memory integrity will not turn on
If Windows says Memory integrity cannot be turned on, it has found a driver that is incompatible. Windows lists the driver names and file names so you can identify them. Update the device or app that owns each driver, then try again. If an incompatible driver belongs to hardware or software you no longer use, uninstall it.
Memory integrity also relies on the processor’s virtualization support being enabled in firmware. If you or a previous owner turned virtualization off in the BIOS or UEFI (the firmware that starts your PC), turn it back on and retry.
The toggle is greyed out or reverts to Off
A greyed-out toggle usually means Memory integrity is off, so go back and turn that on first. If the toggle sets itself back to Off after a restart, an incompatible driver may be blocking the feature. Update your drivers through Windows Update and your PC maker’s support page, then try the steps again. If your organisation manages the PC, an administrator policy may control the setting, and you need to ask your IT team.
If you are unsure about an older driver, see how to enable LSA Protection in Windows 11. LSA Protection (a Windows security setting that protects the login process) has the same driver compatibility risk, so check its drivers before you change it.
If Windows Has Problems After You Turn It On
If Windows crashes or shows a blue screen after this change, a driver probably does not work with shadow stacks. Note the name of the driver or device if the blue screen shows it, then update or remove that driver. If Windows starts normally, return to Core isolation details and switch Kernel-mode Hardware-enforced Stack Protection to Off while you fix the driver.
If Windows does not start at all, open the Windows Recovery Environment (it appears after several failed starts) and use System Restore if you have a restore point. This works only if System Restore was on before the problem began.
How to Turn Off Hardware-Enforced Stack Protection
The change is fully reversible and does not touch your files. To undo it, open Windows Security, go to Core isolation details, and switch Kernel-mode Hardware-enforced Stack Protection to Off. Restart the PC.
- Open Windows Security from the Start menu.
- Select Device security, then Core isolation details.
- Switch Kernel-mode Hardware-enforced Stack Protection to Off. Administrator rights are required, so approve the User Account Control prompt.
- Restart the PC to finish the change.
Leave Memory integrity on unless it is the cause of the problem. It is a separate protection and switching off one does not require switching off the other.
Hardware-Enforced Stack Protection for Individual Apps
The toggle above protects the kernel. Apps that run in user mode have their own setting under Exploit protection, which Windows Security lists on the App & browser control page. You can adjust it per program from the Program settings tab.
Change it only for a specific program, and test the app straight afterwards. Option names can differ between Windows 11 versions, so read the on-screen descriptions before you change anything.
What to Do Next
Stack protection works best alongside other Windows Security layers. Check that Tamper Protection is on so malware cannot switch off your settings, and confirm Real-Time Protection for Microsoft Defender Antivirus is running. If you want to limit what apps can do with admin rights, read how to turn on Administrator Protection. For protection against phishing sites, check SmartScreen Enhanced Phishing Protection in Windows Security.
Have a question about this guide?
Answered by AI from this guide. Good questions may be added to this page — please don't include personal details.
Did this guide fix your problem?

About the Author
Richard
Tech Writer, IT Professional
Richard is a writer at Geek Rewind who turns complex IT tasks into clear, step-by-step guides. He draws on years of hands-on experience in system administration and enterprise IT operations, focusing on Windows, Linux and WordPress: the problems people actually run into, and the fixes that work. His server and WordPress guides come from systems he runs himself. Richard builds and maintains the platform behind Geek Rewind, from its Ubuntu servers and Nginx configuration to its custom WordPress plugins. Many new tutorials start with readers' questions, and he's always glad to answer them in the comments.
No comments yet — be the first to share your thoughts!