How to Enable Kernel-Mode Stack Protection in Windows 11

Kernel-mode Hardware-enforced Stack Protection is a built-in security setting in Windows 11. It stops malicious software from taking over your PC through memory tricks. It is available on Windows 11 version 22H2 and later. It watches how code runs in the kernel, the core of the operating system, and blocks attempts to redirect that code.
You turn it on in the Windows Security app. You can also set it through the registry, which is covered further down. Both Windows 11 Home and Pro include the setting. It is only usable on supported hardware.
Open Windows Security, click Device security, then Core isolation details. Find Kernel-mode Hardware-enforced Stack Protection and toggle it on. Restart your computer to apply the change. The feature requires Windows 11 version 22H2, supported Intel or AMD hardware with virtualization enabled, and Memory Integrity turned on.
How It Works
Many attacks work by overwriting a return address. That is the spot in memory that tells a function where to go back to when it finishes. If an attacker changes it, the program jumps to the attacker’s code instead of its own.
Stack protection closes that gap. The processor (CPU) keeps a second, protected copy of each return address on a shadow stack. When a function returns, the CPU compares the two addresses. If they don’t match, the return is blocked. Software can’t write to the shadow stack the way it can to the normal stack, so the copy is hard to tamper with.
What You Need
- CPU: Intel Tiger Lake (11th Gen) or newer with Control-Flow Enforcement Technology (CET), or AMD Zen 3 Ryzen or newer with AMD shadow stacks
- CPU virtualization turned on
- Memory Integrity turned on
The feature depends on both hardware and settings. If your processor is older than the ones listed, the option will not appear or will not work. You can’t fix that with a setting.
CPU virtualization is usually switched on in your UEFI/BIOS firmware settings. It often goes by a name like Intel Virtualization Technology (VT-x) or AMD-V/SVM. Many new PCs ship with it already on. Memory Integrity is on the same Core isolation page in Windows Security where you will find the stack protection toggle. Turn Memory Integrity on first.
KB5026372 Build 22621.1702 adds more drivers to a list of drivers that don't work with Kernel-mode Hardware-enforced Stack Protection. Your computer checks this list when you turn on this feature. If you have an older driver on that list, Windows may not let you turn the feature on until the driver is updated or removed.
Not all drivers work with Kernel-mode Hardware-enforced Stack Protection. If your PC runs older hardware tools or utilities with their own drivers, check for updates from the vendor before you turn this on.
Option 1Use Windows Security App
Turn Kernel-mode Hardware-enforced Stack Protection On or Off
- Open Windows Security. You can search for it in the Start menu.
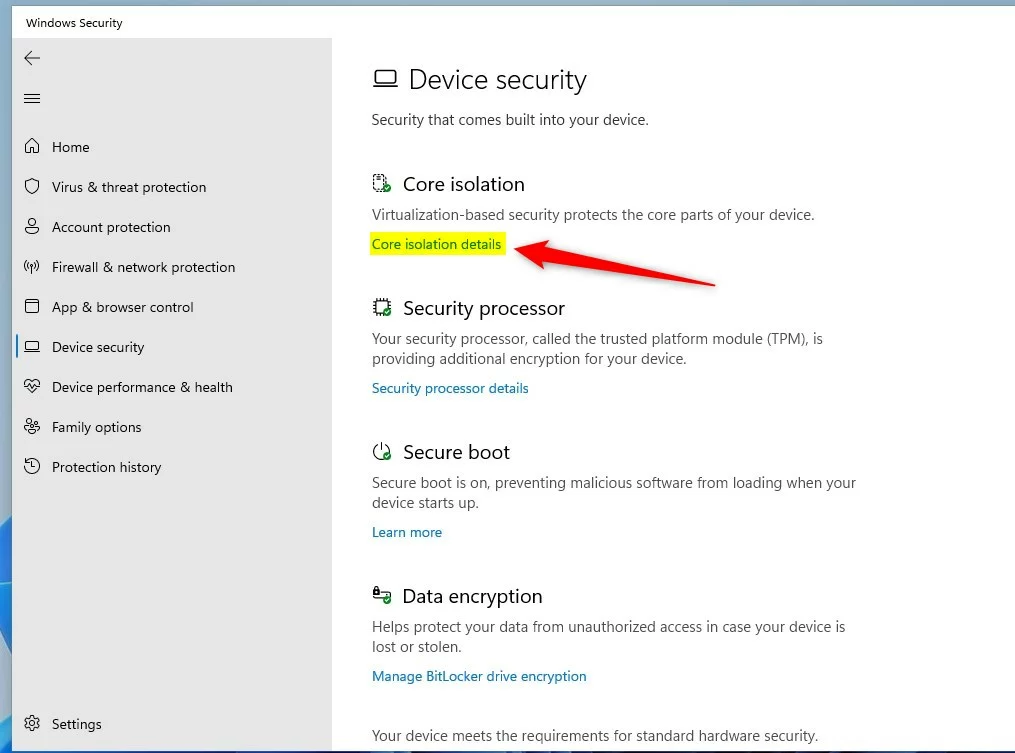
- Click Device security on the left side. Then click Core isolation details on the right side. You should now see the Core isolation page, with Memory Integrity and the stack protection setting.
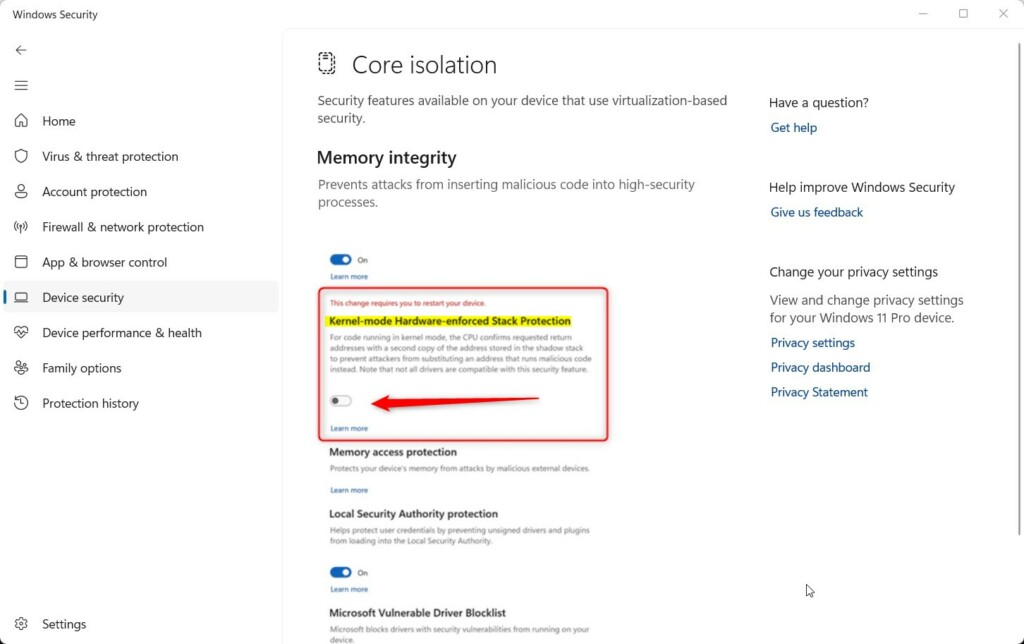
- Find Kernel-mode Hardware-enforced Stack Protection and switch the toggle on or off, whichever you want. On supported PCs, Windows turns it on by default.
If the toggle is greyed out or the entry is missing, check three things. First, make sure Memory Integrity is on. Second, make sure your PC is running Windows 11 version 22H2 or later. Third, confirm your CPU is on the supported list above. If Windows says a driver is incompatible, update that driver and try again.
- [REQUIRES ADMIN] If prompted by UAC, click Yes to approve.
- Restart your computer to apply the change. The setting does not take effect until you do.
To undo the change, return to the same page, switch the toggle the other way, and restart again. If the PC has trouble after you turn it on, such as a driver that fails to load, turning the setting off is the first thing to try.
Option 2Use Registry Editor
Turn Kernel-mode Hardware-enforced Stack Protection On or Off Using Commands
This method works on both Home and Pro. It is useful if the Windows Security page won't let you change the setting, or if you want to script the change. Windows usually has the feature on by default on compatible PCs, so check the Windows Security page first.
- Right-click the Start button and select Terminal (Admin). [REQUIRES ADMIN]
- Click Yes if UAC asks for permission. A Terminal window opens with administrator rights.
- Run the command below.
Turn On Kernel-mode Hardware-enforced Stack Protection
If the command ran without an error, restart your computer so the change applies. This method does not skip the hardware and driver requirements above. Memory Integrity must still be running, and the CPU must support the feature. To undo it, switch the toggle off in Windows Security and restart.
reg add "HKLM\SYSTEM\CurrentControlSet\Control\DeviceGuard\Scenarios\HypervisorEnforcedCodeIntegrity" /v Enabled /t REG_DWORD /d 1 /f
reg add "HKLM\SYSTEM\CurrentControlSet\Control\DeviceGuard\Scenarios\KernelShadowStacks" /v Enabled /t REG_DWORD /d 1 /f
reg add "HKLM\SYSTEM\CurrentControlSet\Control\DeviceGuard\Scenarios\KernelShadowStacks" /v WasEnabledBy /t REG_DWORD /d 2 /f
Turn Off Kernel-mode Hardware-enforced Stack Protection
reg add "HKLM\SYSTEM\CurrentControlSet\Control\DeviceGuard\Scenarios\KernelShadowStacks" /v Enabled /t REG_DWORD /d 0 /f
reg delete "HKLM\SYSTEM\CurrentControlSet\Control\DeviceGuard\Scenarios\KernelShadowStacks" /v WasEnabledBy /f
Summary
Kernel-mode Hardware-enforced Stack Protection helps guard the core of Windows 11 against malware. It uses a protected copy of return addresses to catch code that has been redirected. It needs a supported CPU, CPU virtualization and Memory Integrity. If you meet those requirements and no incompatible driver blocks it, turning it on takes a few clicks and a restart.
Was this guide helpful?

About the Author
Richard
Tech Writer, IT Professional
Richard is a writer at Geek Rewind who turns complex IT tasks into clear, step-by-step guides. He draws on years of hands-on experience in system administration and enterprise IT operations, focusing on Windows, Linux and WordPress: the problems people actually run into, and the fixes that work. His server and WordPress guides come from systems he runs himself. Richard builds and maintains the platform behind Geek Rewind, from its Ubuntu servers and Nginx configuration to its custom WordPress plugins. Many new tutorials start with readers' questions, and he's always glad to answer them in the comments.



No comments yet — be the first to share your thoughts!