How to Turn On Automatic Super Resolution (ASR) in Windows 11

Automatic Super Resolution (ASR) is a Windows 11 feature that uses AI to raise game frame rates and improve image quality. The game renders at a lower resolution and Windows upscales the image, so supported games run smoother without manual tweaks.
To use ASR, your PC needs Windows 11 version 24H2 or newer and specific hardware. That means an NVIDIA GeForce RTX 30-series graphics card, an AMD Radeon RX 7000-series GPU, or an Intel Core Ultra processor with an NPU. Once your system qualifies, you can turn the setting on in the system display menu and let Windows handle the upscaling in supported games. This guide covers three routes: ViVeTool (if the feature is still hidden), the Settings app , and Registry Editor.
Open Settings , go to System Display Graphics, and toggle Automatic Super Resolution on. Your PC needs Windows 11 version 24H2 or newer with an NVIDIA RTX 30-series, AMD Radeon RX 7000-series GPU, or Intel Core Ultra processor. If the option doesn’t appear, use ViVeTool to enable the hidden feature first.
What is Automatic Super Resolution?
Windows 11 Automatic Super Resolution is a built-in graphics feature that uses AI to make games look sharper and run smoother. It analyzes game frames in real time and builds clearer detail from them. The result is better visual quality and higher frame rates without extra strain on your hardware.
It only works in games that Windows supports, and it needs the hardware listed above. If your PC doesn’t meet the requirements, the option won’t show up in Settings.
Why use ASR? Games look better, with sharper graphics and clearer details, while your computer works less. That helps most on laptops and mid-range systems, where every extra frame per second counts.
Turning on ASR improves graphics quality and boosts performance by analyzing game frames and building sharper, more detailed images. There are three ways to switch it on, and which one you need depends on your Windows build and whether the option is visible. Try the Settings app first. Use ViVeTool or the registry only if the option is missing.
ASR is currently a hidden feature in Windows 11 build 26052 and later versions. Microsoft has not rolled it out to everyone yet, so you may have the right hardware and still see no ASR option.
Open Settings, go to System, then About, and look under Windows specifications. If your build is older than 26052, these steps won't help until you update Windows.
To try ASR now, use ViVeTool. It's a free utility that turns on hidden Windows features, and here it enables this experimental option.
Because the feature is experimental, expect rough edges. If something misbehaves, you can turn ASR off again in Settings or reverse the change with ViVeTool.
Steps to Turn On ASR Using ViVeTool
Step 1Download and Install ViVeTool
This guide explains how to use ViVeTool. In short, you download the tool, open an elevated Command Prompt, and run one command that switches the hidden feature on. You then use the Settings app to control it.
Step 2Open Command Prompt as Administrator
- Click the Start button. The Start menu opens with a search box.
- Type
cmd. Command Prompt appears at the top of the search results. - Right-click Command Prompt and choose Run as administrator. ⚠️ Admin privileges required If a User Account Control prompt appears, click Yes. The window title should say Administrator: Command Prompt. If it doesn't, close it and try again, because ViVeTool fails without admin rights.
Step 3Enter the Command to Turn On ASR
With the elevated Command Prompt open and pointing at the folder where you extracted ViVeTool, type this command and press Enter:
vivetool /enable /id:39695921 /variant:3
If the command works, ViVeTool prints a message saying the feature configuration was set. An error usually means the window isn't running as administrator or you're in the wrong folder. Restart your PC afterwards, since hidden features often don't appear until the next sign-in or boot.
After running the command, turn ASR on or off from the Windows Settings app. The steps are in the next section.
Turn On or Off ASR in Windows Settings
- Open the Settings app by pressing
Windows key + Ion your keyboard, or click the Start menu and select Settings. - Click System on the left side. The system options appear on the right.
- Click Display on the right.
- Scroll down and click Graphics. You should see the graphics settings page with a list of options.
- Find the tile that says Automatic super resolution and click it. If you can't find it, your hardware, Windows version or build doesn't support it yet. Check that you're on 24H2 or newer, then try the ViVeTool method above.
- Set the switch to On to enable ASR, or Off to disable it. The change applies right away, and you can reverse it any time by flipping the switch back.
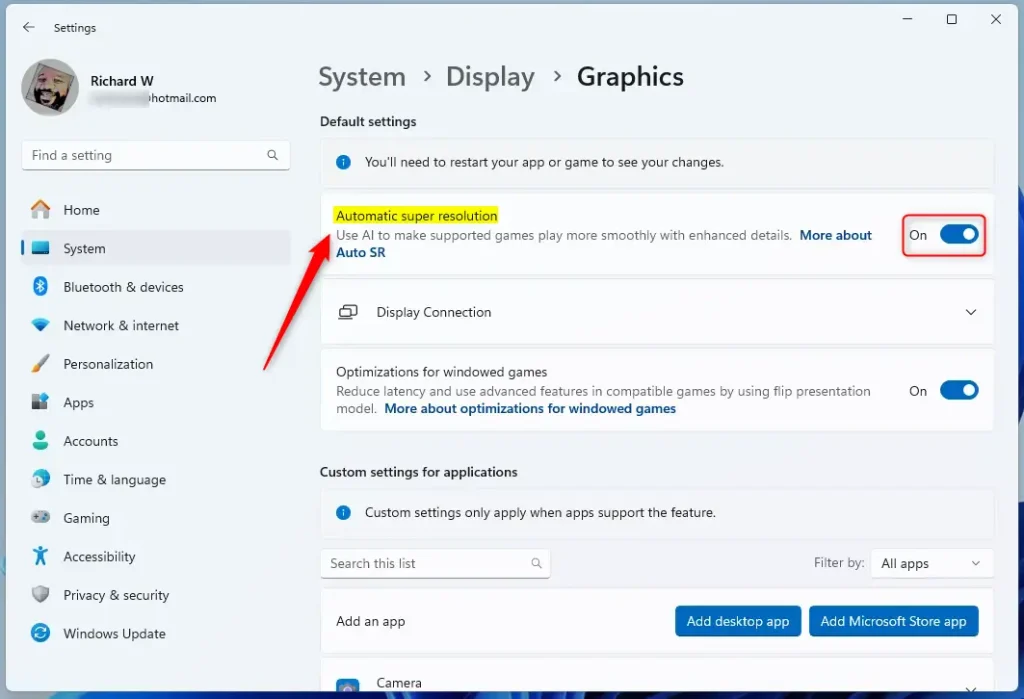
You can turn on Windows 11 Automatic Super Resolution directly in the main Settings app. Go to System, open Display, click Graphics, and switch the Automatic super resolution toggle to On. This is the simplest method and works on both Windows 11 Home and Pro.
When you finish, close the Settings app. Launch a supported game to see the effect. ASR only acts on games Windows supports, so you won't see a change on the desktop or in unsupported titles.
Alternative Way: Use Registry Editor to Turn On or Off ASR
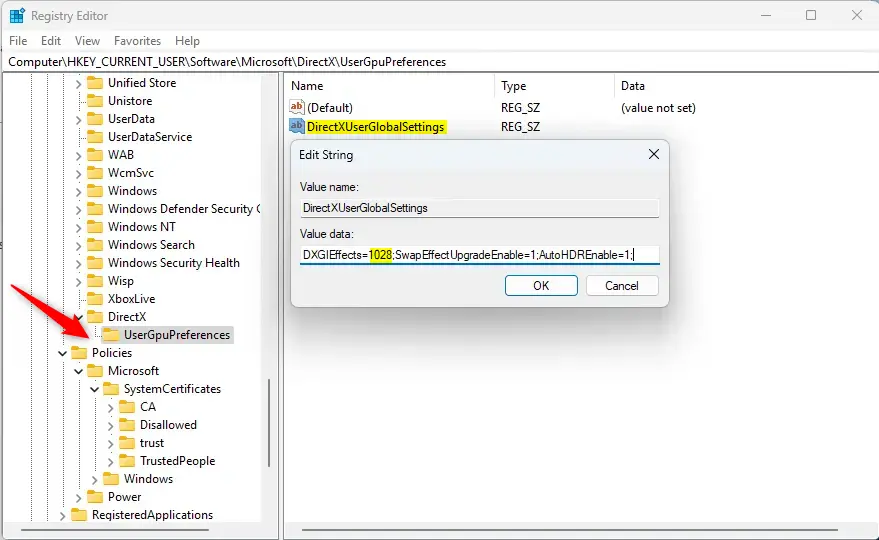
You can configure Windows 11 Automatic Super Resolution in Registry Editor if the option does not appear in the main Settings app. Open the registry tool, go to Computer\HKEY_CURRENT_USER\Software\Microsoft\DirectX\UserGpuPreferences, and change the relevant value to turn the feature on or off.
Before you start, click File, then Export, and save a backup of the key you're about to change. If something goes wrong, double-click the saved file to restore it.
- Press
Windows key + R, typeregedit, and press Enter. ⚠️ Admin privileges required Click Yes on the User Account Control prompt. Registry Editor opens. - Go to this folder path:
Computer\HKEY_CURRENT_USER\Software\Microsoft\DirectX\UserGpuPreferences. You can paste it into the address bar at the top of Registry Editor, or expand the folders in the left pane one by one. - On the right side, find
DirectXUserGlobalSettingsand double-click it. An edit window opens. - Look for the part called
DXGIEffectsand change its value to1028to turn ASR on. Change only that part and leave the rest of the entry as it is. - To turn ASR off, change that value back to
1024. - Click OK and close Registry Editor.
- Restart your computer to apply the changes. After the restart, check Settings System Display Graphics to confirm the ASR setting matches what you chose.
Summary
Windows 11 Automatic Super Resolution gives you a simple way to boost game performance and sharpen visuals without buying new hardware. You can turn it on through the standard display settings, or use advanced tools like ViVeTool and Registry Editor, depending on your system setup. Start with Settings, and move to the other methods only if the option is missing.
- Automatic Super Resolution (ASR) makes games look better and run smoother by improving graphics.
- You can unlock this hidden feature using the free ViVeTool.
- Turn ASR on or off in the Windows Settings under Graphics.
- Advanced users can also change ASR settings via Registry Editor. Back up the key first.
- Try these steps if you're running Windows 11 build 26052 or newer.
- Enjoy sharper graphics and smoother games with Automatic Super Resolution!
Was this guide helpful?

About the Author
Richard
Tech Writer, IT Professional
Richard is a writer at Geek Rewind who turns complex IT tasks into clear, step-by-step guides. He draws on years of hands-on experience in system administration and enterprise IT operations, focusing on Windows, Linux and WordPress: the problems people actually run into, and the fixes that work. His server and WordPress guides come from systems he runs himself. Richard builds and maintains the platform behind Geek Rewind, from its Ubuntu servers and Nginx configuration to its custom WordPress plugins. Many new tutorials start with readers' questions, and he's always glad to answer them in the comments.


No comments yet — be the first to share your thoughts!