

This article explains switching to ‘Dark Mode‘ in the new Outlook app in Windows 11.
The new Outlook for Windows brings the latest features and a modern and simplified design with support for Exchange-backed Microsoft 365 work or school, Outlook.com, Hotmail, and Gmail accounts.
The app has many features, including support for subscription management, email forwarding, setting default From address, backing up your mailbox, changing the reading pane, opening a new window for a message, language translations, turning text predictions on or off, switch primary account, sharing a calendar, changing language, date and time format, public a calendar, show week numbers in Outlook calendar, deleting your search history, export your search history, add or remove events from emails to your calendar, and more.
Outlook offers a variety of features that help users stay organized and productive. One of these features is the Dark Mode option, which provides a different visual experience and can be easier on the eyes.
Change to ‘Dark Mode’ in Outlook
As mentioned above, users can change to ‘Dark Mode’ in the new Outlook app in Windows to provide a different visual experience.
Here’s how to do it.
Note: The steps listed in this tutorial may differ slightly depending on your device and operating system. However, the general steps should apply to most versions of the app.
Step 1: Open the Outlook App
Launch the Outlook app on your device. Once the app is open, you should see the default interface.
Step 2: Access the Settings Menu
In the app’s upper-left corner, you will see a Settings button. Tap on this icon to open the Settings menu.
Step 3: Select the Appearance Option
In the Settings menu, select “General” on the sidebar menu. Then, scroll down until you see the “Appearance” option on the right. Tap on this option to access the Appearance settings.
Step 4: Choose the Dark Mode Option
You will see the “Dark Mode” option in the Appearance settings. Tap on this option to choose a theme. You will see three options:
- Light
- Dark
- System Default
Tap on the “Dark” option to switch to Dark Mode. If you prefer the app to switch to Dark Mode automatically whenever your device is set to Dark Mode, choose the “System Default” option.
Step 5: Save Your Changes
Once you have chosen your preferred theme, tap the “Save” or “Done” button at the bottom of the screen to save your changes.
Step 6: Enjoy Dark Mode
The Outlook app will now switch to Dark Mode, and you should see the interface switch to the chosen mode.
Pictures:
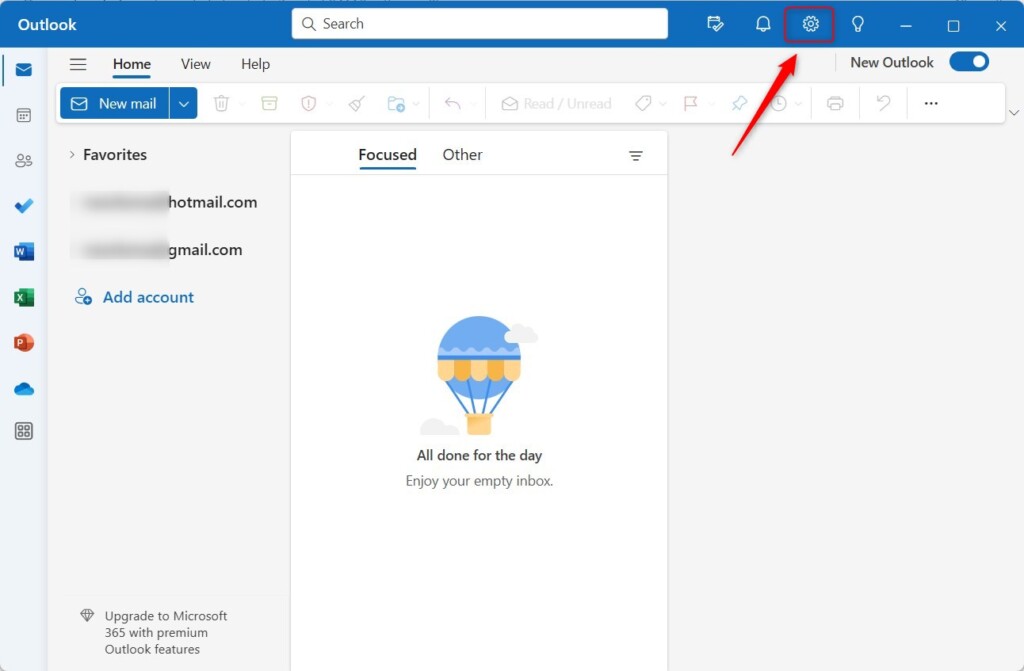
First, click the Settings button at the top right corner to open the Settings menu.
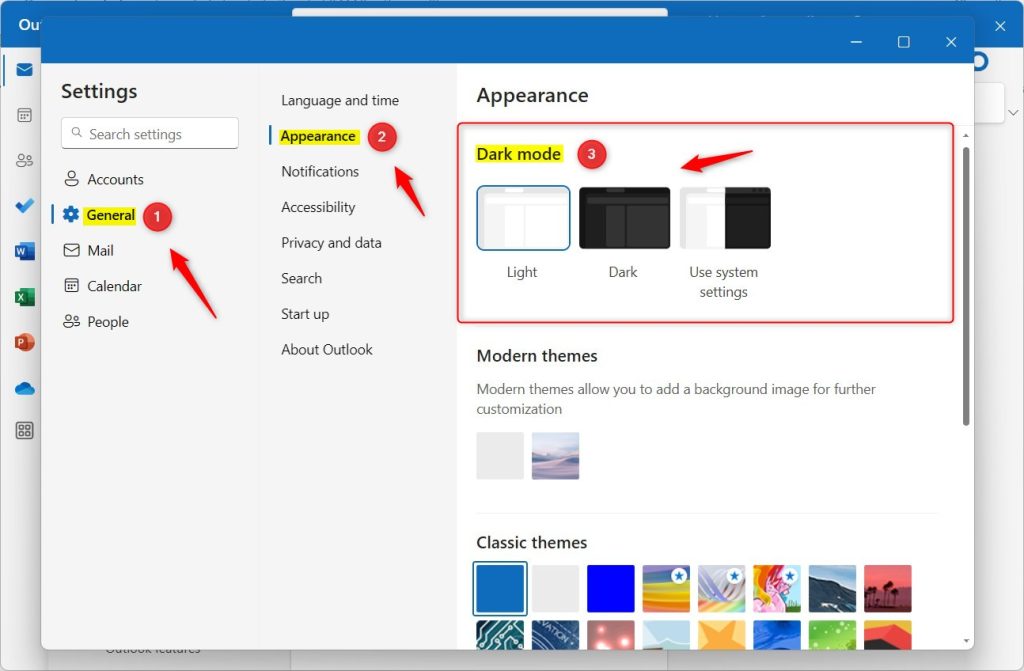
In the Setting pane, select General -> Appearance -> and select the ‘Dark‘ desktop appearance.
That should do it!
Conclusion:
- The new Outlook app in Windows 11 introduces various features for improved productivity and organization.
- Dark Mode is a valuable option that offers a different visual experience while being more accessible to the eyes.
- Following the steps, users can seamlessly switch to Dark Mode, enhancing their Outlook app usage experience.
Leave a Reply