How to Share Your Files and Set Folder Permissions in Windows 11 File Sharing

Folder sharing in Windows 11 lets you make files and folders available to other people on your network or in your organization. Sharing a folder only makes it reachable over the network. Permissions then decide what each person can do once they connect, such as read files, change them or delete them.
This guide covers both steps: turning sharing on for a folder, then setting read and write permissions for specific people. Most steps need administrator access, and each one that does is marked Administrator required.
Right-click a folder, select Properties, open the Sharing tab, click Share, add a person, choose Read or Read/Write permission, then click Share. File permissions control what they can do once connected—Read lets them view files, Read/Write lets them change them. NTFS permissions on the Security tab apply to everyone and override share permissions if more restrictive.
How 🪟 Windows 11 file sharing and file permissions work
Windows applies two separate sets of permissions to a shared folder. Knowing which is which saves a lot of guessing when someone gets “Access is denied”.
- Share permissions apply only to people who connect over the network. They have three levels: Read, Change and Full Control. You set them in Advanced Sharing.
- NTFS permissions apply to everyone, whether they sit at the PC or connect remotely. NTFS is the file system Windows uses on its drives. You set these permissions on the Security tab. The levels are Full control, Modify, Read & execute, List folder contents, Read and Write.
When both sets apply, the more restrictive one wins. If the share permission is Full Control but the NTFS permission is Read, the person can only read.
A Deny entry overrides an Allow entry for the same person or group. Keep that in mind when you check why someone is blocked.
🪟 Windows 11 Home vs Pro
Windows 11 Home and Pro can both share folders and set permissions with the steps below. Home has no Local Users and Groups console (lusrmgr.msc), which Pro includes. On Home, you create sharing accounts in Settings or with a command instead.
Both editions also allow only a limited number of simultaneous incoming connections (20). This matters only if you share with many people at once.
Before you start: prepare your PC for sharing
Sharing fails more often because of network settings than folder permissions. Start by checking these three things before you touch any folder.
Set your network profile to Private
Windows blocks file sharing on networks marked Public. Switch your home or office network to Private so Windows allows sharing and network discovery. Network discovery is the feature that lets PCs see each other by name.
- Open Settings and select Network & internet.
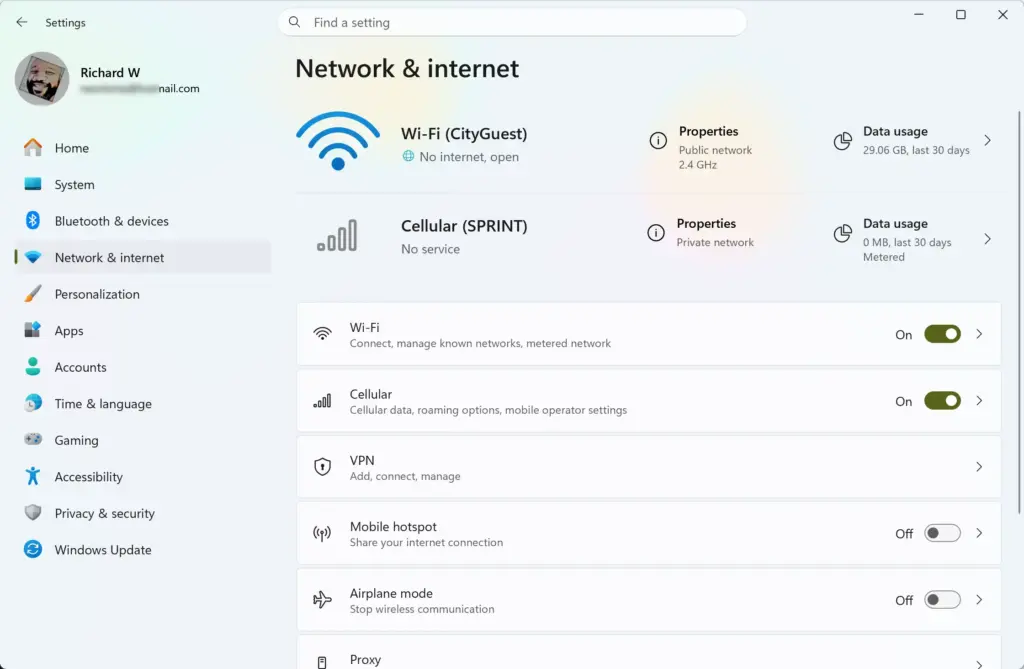
Settings › Network & internet - Select Wi-Fi or Ethernet, depending on how you connect. For Wi-Fi , select the properties entry for your connected network. For Ethernet, select the connection.
- Under Network profile type, select Private network.
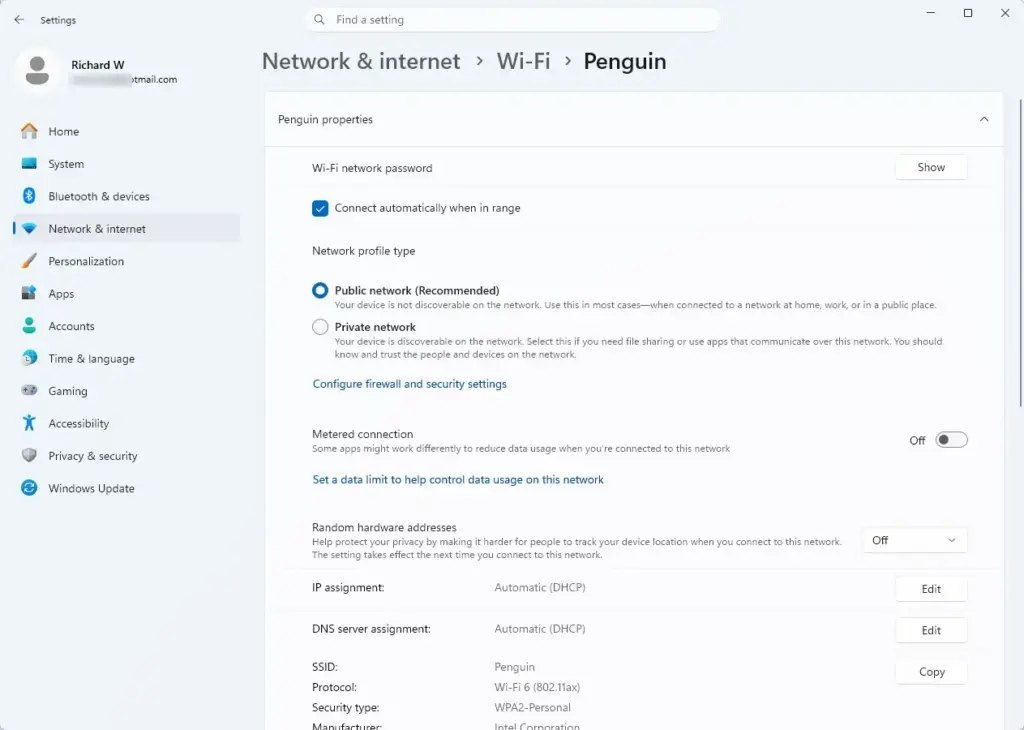
The setting applies immediately. You do not need to restart. To undo it, return to the same page and select Public network.
Turn on network discovery and file and printer sharing
Administrator required. These switches control whether your PC can be found on the network and whether it answers file requests.
- Open Settings Network & internet Advanced network settings
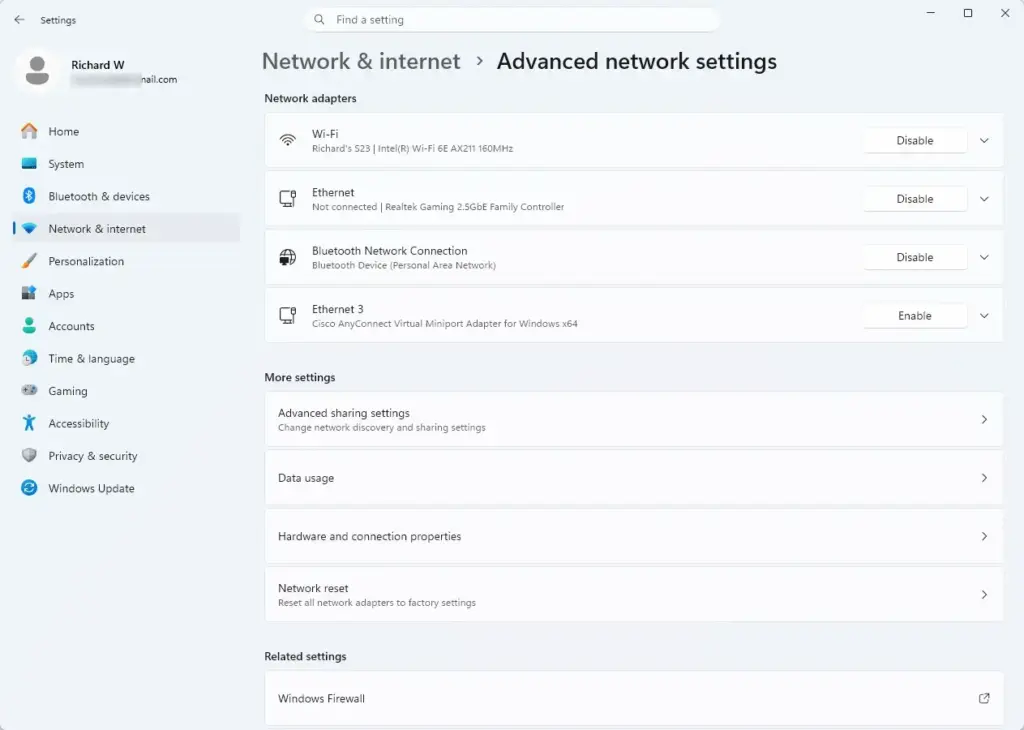
Settings › Network & internet › Advanced network settings - Select Advanced sharing settings.
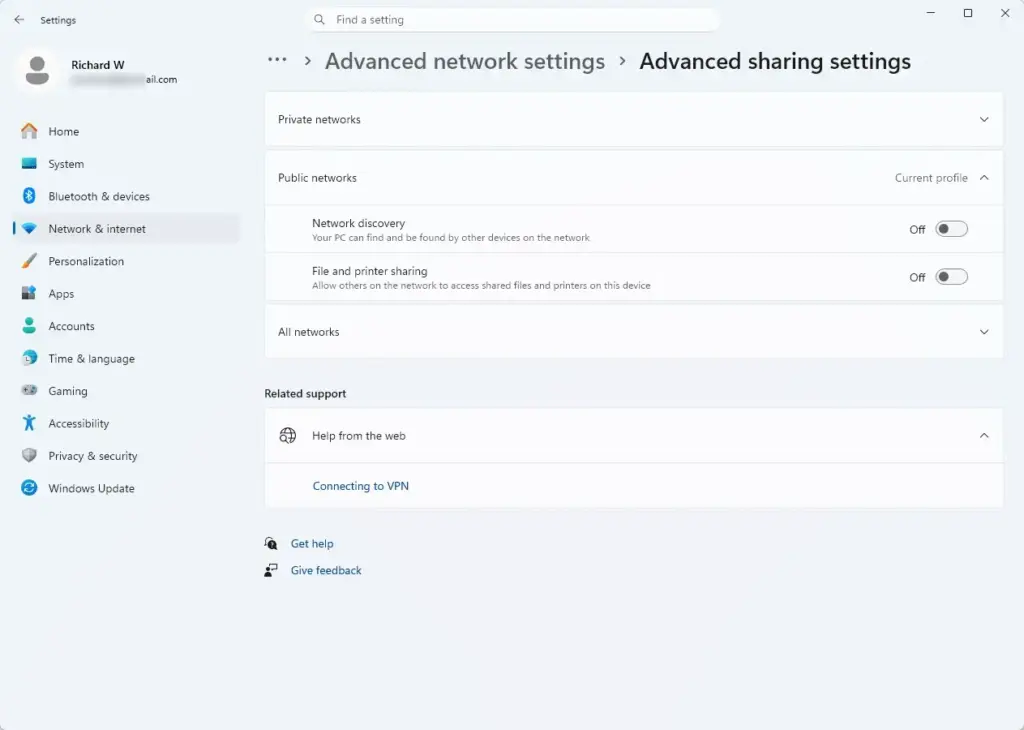
Settings › Network & internet › Advanced network settings › Advanced sharing settings - Expand Private networks.
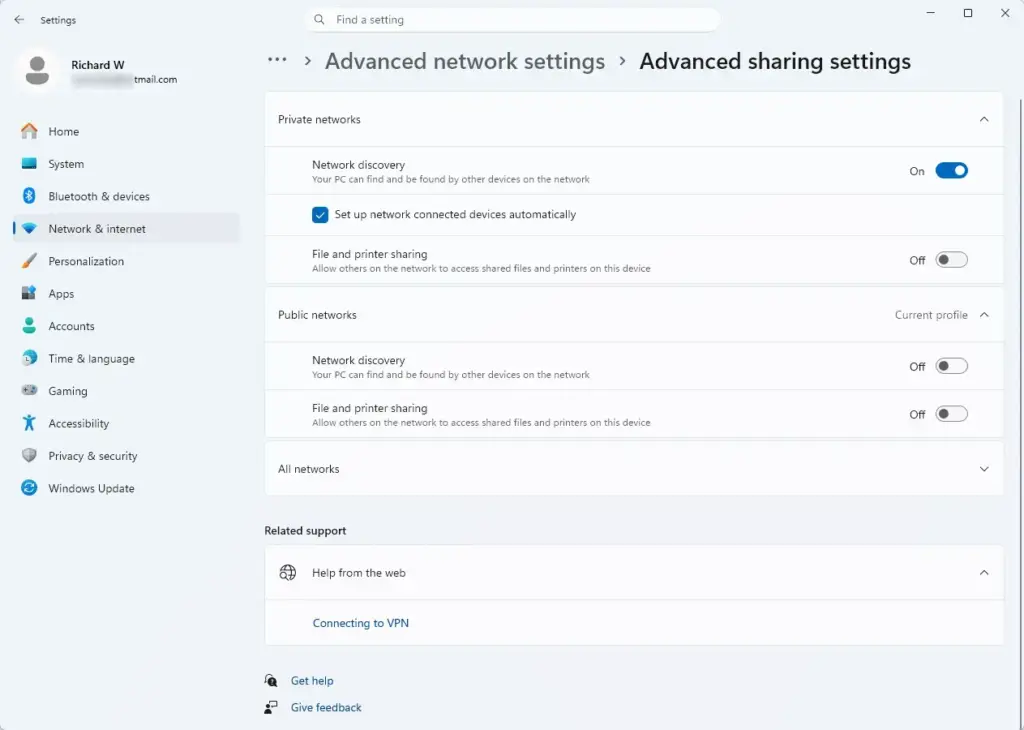
- Turn Network discovery on. Leave Set up network connected devices automatically ticked if it appears.
- Turn File and printer sharing on.
- Expand All networks and check Password protected sharing. Leave it on unless you have a specific reason to turn it off.
With Password protected sharing on, anyone who connects must sign in with a user name and password that exists on your PC. This is the safer setting, and the rest of this guide assumes it is on.
Make sure the person has an account on your PC
With password-protected sharing on, each person needs an account on your PC. A Microsoft account works: the person signs in with their email address and its password. Windows also blocks network sign-in for accounts with a blank password by default, so every sharing account must have a password.
If you need to create an account, start in Settings:
- Administrator required. Open Settings Accounts Other users
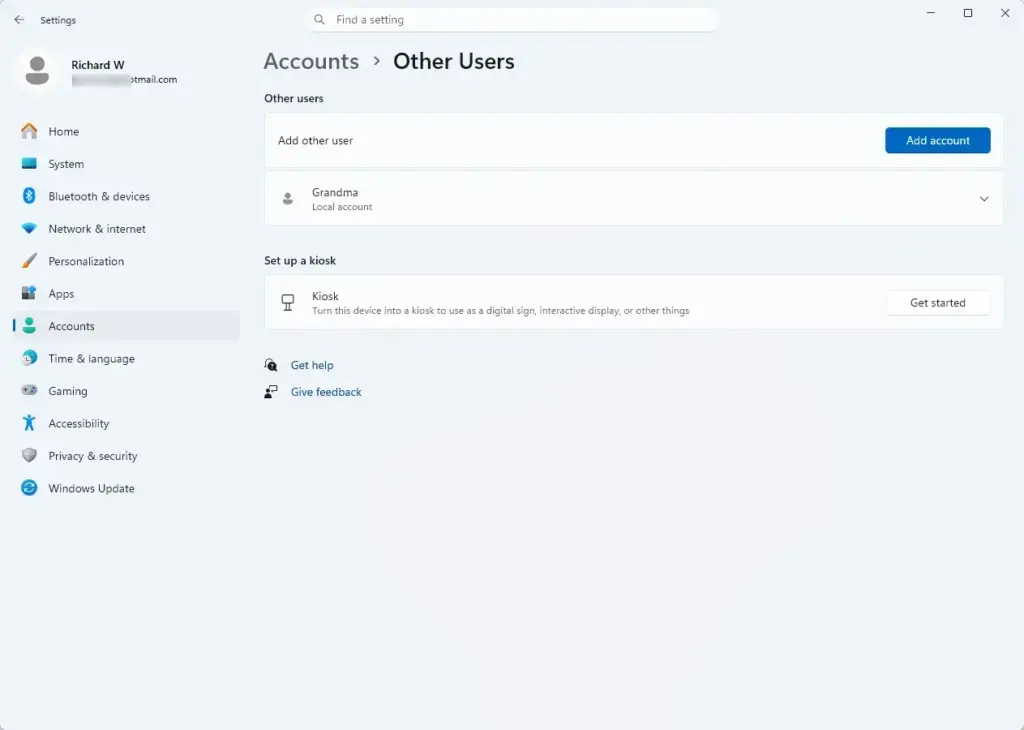
Settings › Accounts › Other users - Select Add account and follow the prompts.
Recent Windows 11 builds push you toward a Microsoft account in this dialog. If you want a local account instead, use a command in Terminal. A local account exists only on this PC and is not tied to an email address.
Use a long one that is hard to guess and not used anywhere else. Share folders only with people you trust.
When you are ready, open Terminal (Admin) and run this command. It creates the account and prompts you for a password:
net user USERNAME * /addThe new account has no sign-in tile on your PC unless you add it through Settings. It still works for network access. To delete it later, run net user USERNAME /delete.
Choose the folder to share
Create a dedicated folder, for example C:\Shared, and share that. Do not share your whole user profile or the root of a drive. A broad location exposes documents, app data and settings you did not intend to hand out.
A dedicated folder also keeps the permissions simple. You can see at a glance who has access, and nothing else on the PC is affected.
Share a folder with specific people
This method is the fastest route. It opens a sharing dialog and sets up access for named accounts in one pass.
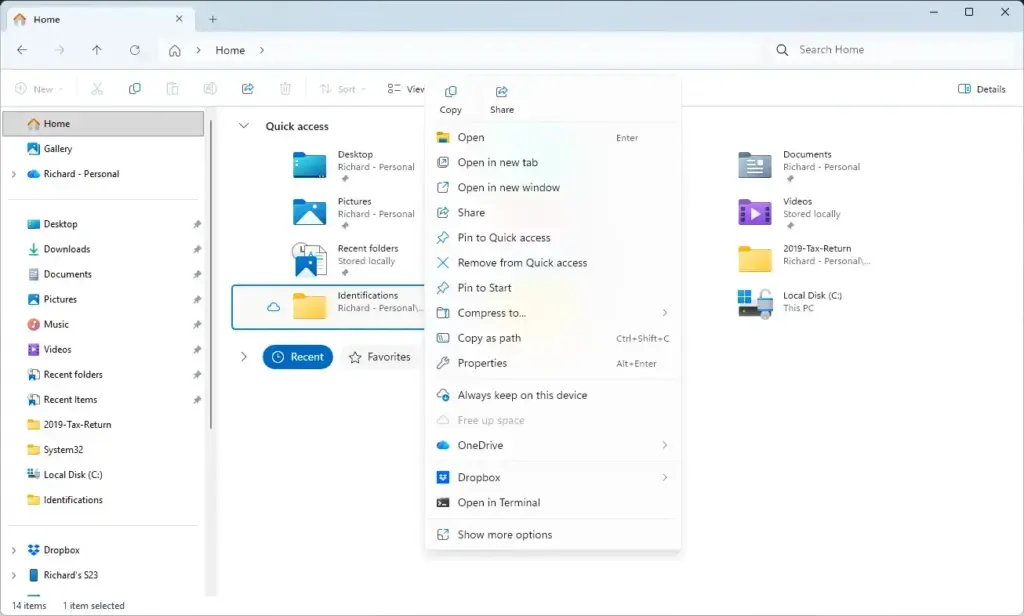
- Open File Explorer and right-click the folder you want to share.
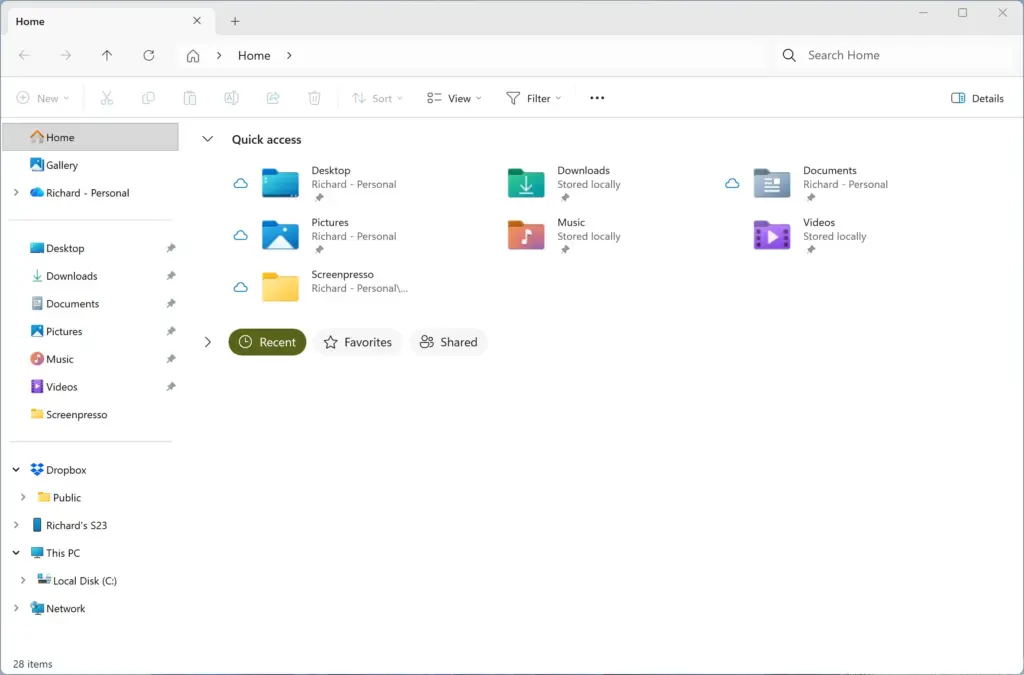
File Explorer - Select Properties. The folder’s Properties window opens.
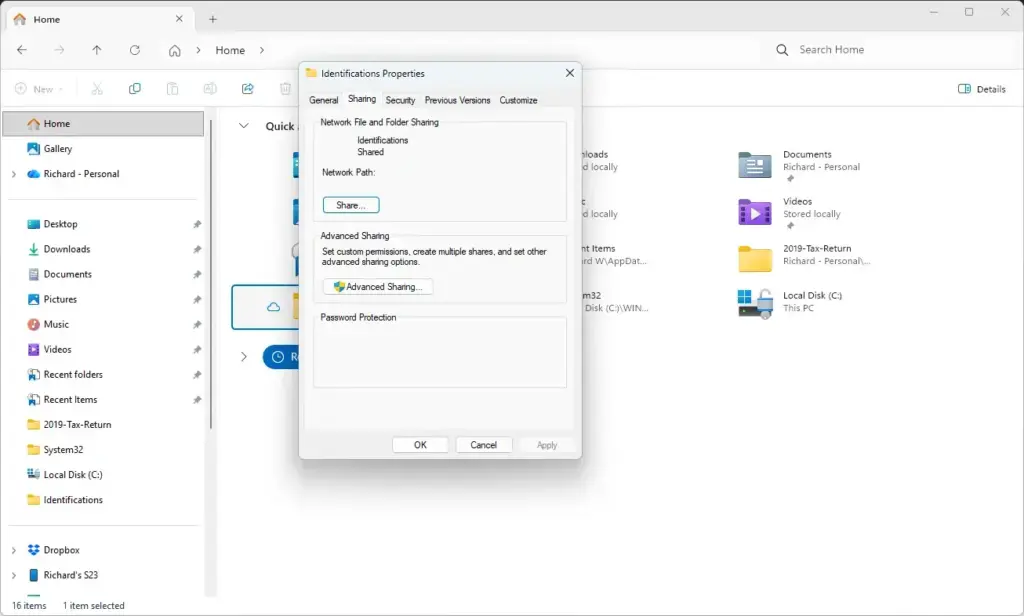
- Select the Sharing tab. Under Network File and Folder Sharing, the folder shows as Not Shared.
- Click Share…. A window titled Network access opens, headed Choose people to share with.
- Click the drop-down arrow next to the text box, select the person’s account, and click Add. If you do not see the account, type the user name and click Add. The person now appears in the list below.
- In the Permission Level column, click the arrow next to the person’s name and choose Read or Read/Write. Read lets them open and copy files. Read/Write also lets them add, change and delete files.
- Click Share. Windows adds the person to the folder’s permissions. This step needs administrator approval, so select Yes if a prompt appears.
- Wait for the message Your folder is shared. It shows the network path, such as
\\COMPUTER-NAME\Shared. Click Done.
Send the person that path. They need it only if they cannot browse to your PC by name.
The Share button in the File Explorer toolbar is a different feature. It sends files through apps and nearby devices. It does not set up a network share or any folder permissions.
For people outside your network, a OneDrive share link or Nearby Sharing is simpler than network (SMB) sharing. A OneDrive link lets the person open files from anywhere, and Nearby Sharing sends files to a device close to you. Both are separate from the network share methods in this guide, so none of the permissions here apply to them.
If the Sharing tab, Share button or Give access to menu is missing or greyed out
If the Share... button is missing or fails, check these causes:
- The folder is on a drive or location that cannot be shared. Some locations, such as certain system folders, do not offer sharing. Move the files to a regular folder on a local drive.
- You are not an administrator. Sign in with an administrator account or approve the prompt with administrator credentials.
- File and printer sharing is off. Repeat the steps in "Turn on network discovery and file and printer sharing" above.
- The Sharing Wizard is turned off. Open File Explorer, select the three-dot menu, then Options. On the View tab, under Advanced settings, tick Use Sharing Wizard (Recommended) and click OK.
Set share permissions with Advanced Sharing
Administrator required. Use Advanced Sharing when you want to choose the share name, limit connections or set share-level permissions yourself.
- Right-click the folder and select Properties.
- Open the Sharing tab and click Advanced Sharing....
- Tick Share this folder.
- Edit Share name if you want a different name on the network. Other people see this name, not the folder's real name.
- Click Permissions. The Share Permissions tab opens with Everyone listed by default.
- Select Everyone and click Remove if you want only named accounts to have access.
- Click Add..., type the account name, click Check Names, then click OK.
- Select the account in the list and tick Allow for Read, Change or Full Control in the lower box.
- Click OK on each open window to save.
A practical approach is to give your named users a wide share-level permission and do the fine control with NTFS permissions on the Security tab. That way you manage access in one place, and the share-level setting never overrides what you set there.
Set NTFS folder permissions on the Security tab
Use the Security tab for the detailed file permissions: who can read, edit, create or delete. These apply to local and network users alike.
Add a person and set what they can do
Administrator required.
- Right-click the folder, select Properties, and open the Security tab.
- Click Edit.... The Permissions for window opens.
- Click Add....
- Type the account name in Enter the object names to select and click Check Names. Windows underlines the name when it finds a match. If it reports it cannot find the name, check the spelling and make sure the account exists on this PC.
- Click OK. The account appears in Group or user names.
- Select the account. In the lower box, tick Allow for the level you want:
- Read (with Read & execute and List folder contents) lets the person open and copy files.
- Write lets them create files and folders and save changes.
- Modify covers reading, writing and deleting. It is the usual choice for a shared work folder.
- Full control adds the ability to change permissions and take ownership. Give it only to people who manage the folder.
- Click Apply, then OK.
To change an existing person, select them in Group or user names and change the ticked boxes. To remove access, select them and click Remove.
Use Deny sparingly
A Deny tick beats every Allow, including ones inherited through a group. Denying Write to one person does more than take away their own write access. It blocks writing even if a group they belong to has it.
Prefer leaving a person off the list over using Deny. Reserve Deny for the rare case where you must block someone who belongs to a group that otherwise has access.
Understand inheritance before changing subfolder permissions
Subfolders and files automatically inherit permissions from the parent folder. If you give someone Modify on C:\Shared, they get Modify on everything inside it. To give a subfolder different permissions, you break inheritance on that subfolder.
If you remove them, add your own account and the Administrators group back before you close the window.
- Right-click the subfolder, select Properties, and open the Security tab.
- Click Advanced. The Advanced Security Settings window opens.
- Click Disable inheritance.
- Choose Convert inherited permissions into explicit permissions on this object. This keeps the current entries so you can edit them. Choose Remove all inherited permissions from this object only if you plan to rebuild the list from scratch.
- Click OK, then use Edit... on the Security tab to adjust the entries.
Check what a person can actually do
Windows can calculate the combined result for you. This saves guessing when a person belongs to several groups.
- In Advanced Security Settings, open the Effective Access tab.
- Click Select a user and choose the account.
- Click View effective access. The list shows which permissions the account has after groups and Deny entries are applied.
This view reflects NTFS permissions only. Check the share permissions separately on the Advanced Sharing Permissions tab.
Open the shared folder from another PC
Connect from the second computer to confirm that your permissions behave as intended.
- On the other PC, open File Explorer.
- Click the address bar and type
\\COMPUTER-NAME\Shared, then press Enter. If the name does not resolve, use the IP address instead, for example\\192.0.2.10\Shared. - Enter the user name and password for the account you added. For a Microsoft account, use the email address, such as
user@example.com. - Tick Remember my credentials if you want Windows to store them, then click OK.
The folder's contents open. Try to create a test file. If you gave Read access only, Windows refuses, which confirms the permission works.
To find your PC's name, open Settings System About and read Device name.
Map the share to a drive letter
Mapping gives the folder a permanent drive letter on the other PC, so it is always one click away.
- In File Explorer on the other PC, select This PC.
- Select the three-dot menu in the toolbar, then Map network drive.
- Choose a Drive letter and type the path in Folder, for example
\\COMPUTER-NAME\Shared. - Tick Reconnect at sign-in. If the account differs from the one signed in to this PC, also tick Connect using different credentials.
- Click Finish. The share opens as a drive under This PC.
Share with everyone on the network using the Public folder
The C:\Users\Public folder is a built-in shared location. Use it only for files you are happy for anyone on your network to see. Windows controls it with a single setting, not with per-user permissions.
- Administrator required. Open Settings Network & internet Advanced network settings Advanced sharing settings
- Expand All networks.
- Turn Public folder sharing on.
Files you place in the Public folder are now available to people on your network. Turn the setting off again to stop sharing it.
Fix common sharing and access errors
"Network path was not found" (error 0x80070035)
The other PC cannot find yours. Try the IP address in place of the computer name. If the IP address works, name resolution is the problem.
Confirm both PCs are on the same network and that Network discovery is on for both. If neither works, check that your PC's network profile is Private and that no third-party firewall is blocking file sharing, which uses TCP port 445.
"You do not have permission to access" or "Access is denied"
The connection works, but the account lacks rights. Check both layers, one after the other.
- Open Advanced Sharing Permissions and confirm the account has at least Read under share permissions.
- Open the Security tab and confirm the account has an NTFS permission.
If you recently added the person to a group, they may need to disconnect and sign in again before the change takes effect.
Windows keeps asking for a password or uses the wrong account
Windows may have saved old credentials. On the connecting PC, open Control Panel Credential Manager Windows Credentials. Remove the entry for your PC, then connect again and enter the current user name and password.
"Your organization's security policies block unauthenticated guest access"
This is intentional. Create a user account on the sharing PC and connect with it, as described above. Do not re-enable insecure guest sign-in to get around the message.
The Server service is not running
If the shares do not appear at all, the Server service may be stopped. Administrator required to start it.
- Open Services and find Server.
- Check that Status shows Running and Startup Type is Automatic.
- If it is not running, right-click Server and select Start.
Permission changes do not seem to apply
New permissions apply to new connections. A person who is already connected may keep their old access until they disconnect or sign out of their PC. You do not need to restart your PC after changing share or file permissions.
Stop sharing a folder or undo permission changes
Administrator required. You can reverse any step in this guide.
- To stop sharing the folder, right-click it, select Properties, open the Sharing tab, click Advanced Sharing..., clear Share this folder, and click OK. The folder is no longer reachable over the network, and its files are unchanged.
- To remove one person's access, open the Security tab, click Edit..., select their name, click Remove, and click OK. Also remove them under Advanced Sharing Permissions if you added them there.
- To reset a folder to inherit permissions from its parent, open Security Advanced and click Enable inheritance if the button is available.
- To see everything you share, open Terminal and run
net share. Shares ending in$, such asC$, are hidden administrative shares that Windows creates itself. Leave them alone.
If this didn't work
If the other PC still cannot open the folder, connect with the IP address, for example \\192.0.2.10\Shared. A successful connection by IP address but not by name points to network discovery, not file permissions.
If a sign-in prompt appears but the credentials fail, recheck that the account has a password and exists on the sharing PC. Once access works, map the share to a drive letter so you do not have to type the path each time.
Frequently asked questions
How to set permissions for shared files and folders?
Right-click the folder, select Properties, then Advanced Sharing. Click Share this folder, set Share permissions (Read, Change, or Full Control) for specific users or groups, then click Apply. For finer control, use the Security tab to set NTFS permissions on who can read, modify, or delete files.
How do I share a folder with others in 🪟 Windows 11?
Right-click the folder and select Properties. On the Sharing tab, click Advanced Sharing, then check Share this folder. Enter a share name, click Permissions to set who can access it, then click Apply and OK. The folder is now available to others on your network.
What is the best way to share files between two computers?
Enable network file sharing on both PCs: right-click a folder, go to Properties Sharing Advanced Sharing, check Share this folder, and set permissions. On the other computer, open File Explorer, click Network, find the PC, and browse to the shared folder. You can also map it as a drive for quicker access.
How to enable file sharing settings?
Open Settings, go to System Sharing or Network. Toggle File sharing on. Then enable sharing for individual folders: right-click each folder, select Properties Sharing Advanced Sharing, check Share this folder, and configure permissions for the users who need access.
Still have a question?
Answered by AI from this guide. Good questions may be added to this page — please don't include personal details.
Did this guide fix your problem?

About the Author
Richard
Tech Writer, IT Professional
Richard is a writer at Geek Rewind who turns complex IT tasks into clear, step-by-step guides. He draws on years of hands-on experience in system administration and enterprise IT operations, focusing on Windows, Linux and WordPress: the problems people actually run into, and the fixes that work. His server and WordPress guides come from systems he runs himself. Richard builds and maintains the platform behind Geek Rewind, from its Ubuntu servers and Nginx configuration to its custom WordPress plugins. Many new tutorials start with readers' questions, and he's always glad to answer them in the comments.
No comments yet — be the first to share your thoughts!