How to Enable or Disable Pause Updates Feature in Windows 11

- 34 steps
- Needs administrator rights
- Group Policy needs Windows 11 Pro, Enterprise or Education
- Includes a restart or sign-out
The Pause Updates feature in Windows 11 stops your PC from downloading and installing new updates for a set period. Pausing automatic updates lets you pick a convenient time for a restart, avoid sudden reboots, or save mobile data on a metered connection.
Standard Windows 11 editions let you pause updates for up to 35 days. The Pause for 1 week button can be repeated up to five weeks in total. Windows Insider preview builds limit the pause to 7 days. Critical security fixes for Microsoft Defender still install automatically during a pause, so your protection stays current.
This guide shows how to turn the feature on or off for a PC. You might do this on a shared computer, or to stop users from postponing updates. There are two methods: the Local Group Policy Editor and the Registry Editor.
To turn Pause Updates on or off in Windows 11 Pro, Enterprise or Education, open the Local Group Policy Editor (gpedit.msc), go to Windows Update Manage end user experience, and set “Remove access to ‘Pause updates’ feature” to Not Configured. Home users need the Registry Editor method instead.
Option 1Managing Pause Updates with the Local Group Policy Editor
The Local Group Policy Editor is the safer way to manage the “Pause Updates” feature, if your edition has it. Group Policy is a set of advanced settings that control how Windows behaves. The editor is only available on Windows 11 Pro, Enterprise and Education.
Windows 11 Home does not include it, so Home users should skip to the Registry Editor method further down.
Microsoft’s release notes for the Windows 11 2026 Update say that version 26H2 continues the annual feature update cadence. Each new Windows 11 feature update arrives in the second half of the calendar year. The notes do not mention any change to Pause updates, so the steps below stay as written.
Step 1Open the Local Group Policy Editor
The Local Group Policy Editor manages advanced system settings, and you open it from the Run box. Sign in with an administrator account first, because standard accounts cannot change these policies.
- Press Win+R. A small window called the Run box opens in the bottom-left corner of the screen.
- Type
gpedit.mscinto the box. Then press Enter or click OK. - Click Yes if User Account Control (UAC) asks to allow changes. This message asks whether you want to let the app make changes to your device.
The Local Group Policy Editor window should now be open, with a folder tree on the left and settings on the right. If Windows says it cannot find the file, you are most likely on Windows 11 Home. Use the registry method instead.
Step 2Find the Windows Update Settings
The pause setting sits several levels deep in the folder tree on the left. Expand each folder in turn, in the order below. The numbering continues from the steps above.
- Double-click Computer Configuration in the left pane. The folder expands to show more items beneath it.
- Double-click Administrative Templates.
- Double-click Windows Components.
- Scroll down and double-click Windows Update .
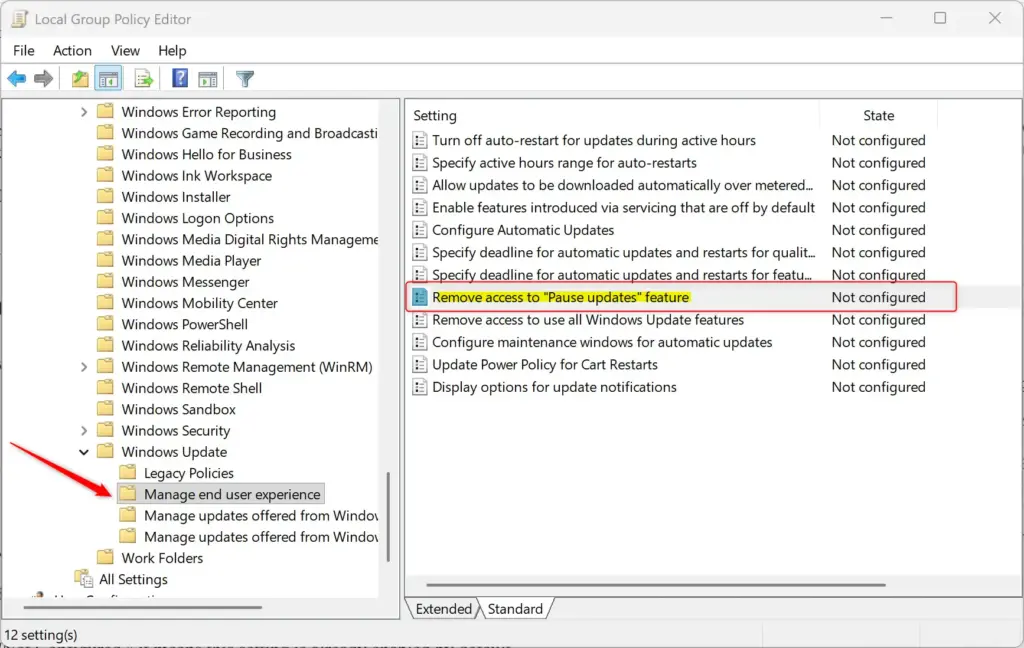
- Click Manage end user experience. Do not double-click it, because it has no further folders to open.
The right pane now shows a list of settings. Look for the one named Remove access to “Pause updates” feature. If the list is hard to read, widen the Setting column or click the column header to sort it by name.
Step 3Configure the “Pause Updates” Setting
That one policy controls the feature. Not Configured lets users pause updates, and Enabled removes the pause option. The two sections below cover each choice, and both continue from step 8.
To Enable the “Pause Updates” Feature (Allow Users to Pause):
These steps let users pause updates for a convenient time in Windows 11 by making the Pause updates button work in Windows Settings. Follow them to undo an earlier block as well.
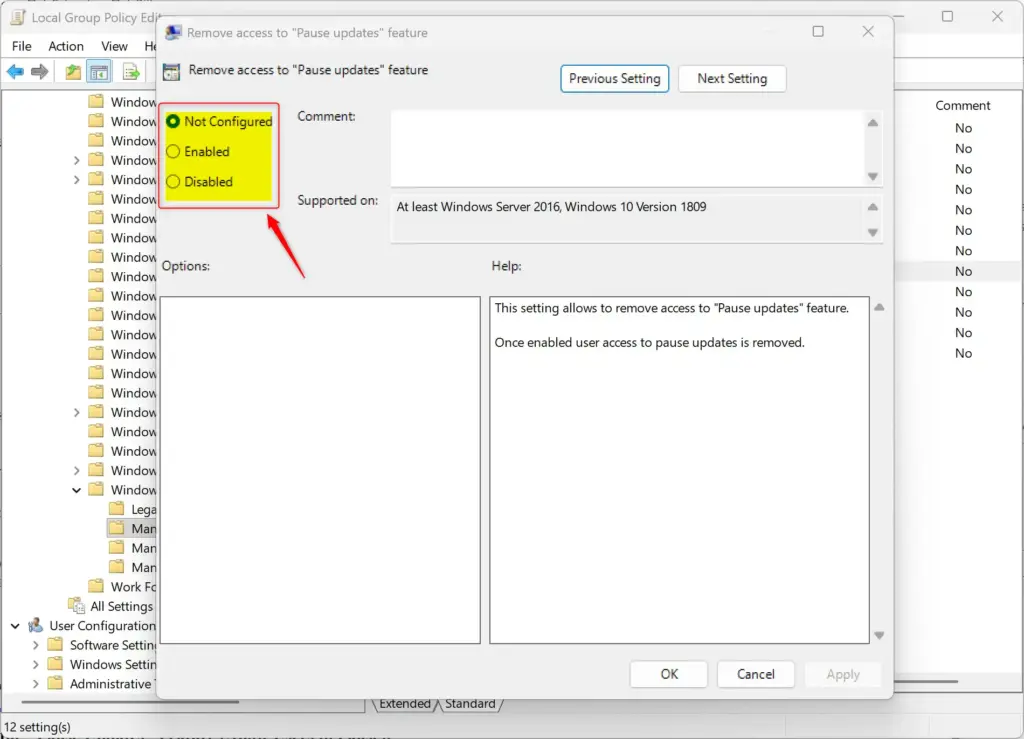
- Double-click Remove access to “Pause updates” feature in the right-hand list. A settings window opens.
- Select Not Configured. This is the default, and Windows then works normally and lets users pause updates.
- Click Apply, then click OK. The window closes and the policy is saved.
Disabled has the same practical effect as Not Configured. Not Configured is cleaner, though, because it leaves no policy behind.
If the policy was previously set to Enabled, you will see that choice selected when the window opens. Changing it back to Not Configured is all it takes to restore the pause option.
To Disable the “Pause Updates” Feature (Prevent Users from Pausing):
These steps turn off Pause updates in Windows 11 by removing the option completely. This is useful when users should receive updates on schedule.
- Double-click Remove access to “Pause updates” feature in the right-hand list. A settings window opens.
- Select Enabled.
- Click Apply, then click OK. The window closes and the policy is saved.
The setting name is a little confusing. Enabled means the policy is active, and what it does is remove the pause feature.
To bring it back, set the policy to Not Configured as described above.
Step 4Close the Editor
You can now close the Local Group Policy Editor window. Policy changes to Windows 11 update settings usually take effect right away. If the Settings app still shows the old behavior, close it and reopen it. If it still looks wrong, restart your computer so the change fully applies.
Option 2Managing Pause Updates with the Registry Editor
If your version of Windows does not include the Local Group Policy Editor, you can make the same change in the Registry Editor. The registry is the database where Windows stores its system settings. This method works on all editions, including Home. It needs more care, because a wrong change can cause system problems.
Important Warning: Editing the registry incorrectly can cause serious system problems or even prevent Windows from starting. Always back up your registry or create a System Restore point before making changes.
Step 1Open the Registry Editor
Start by opening the Registry Editor. An administrator account is required.
- Press Win+R to open the Run box.
- Type
regeditinto the box. Then press Enter or click OK. - Click Yes if a User Account Control (UAC) message appears.
The Registry Editor window opens, showing a tree of keys on the left and values on the right.
Step 2Go to the Correct Registry Location
Typing the key path into the address bar at the top of the window takes you to the right location. It saves clicking through every folder. The numbering continues from the steps above.
- Click the address bar at the top of the Registry Editor window.
- Type the following path exactly as shown:
HKEY_LOCAL_MACHINE\SOFTWARE\Policies\Microsoft\Windows\WindowsUpdate
- Press Enter. The left pane jumps to that key and selects it.
WindowsUpdate key does not exist under Windows, you need to create it.This is common on a PC that has never had update policies applied. Right-click the Windows key, select New Key, and name it WindowsUpdate. Then select the new key and continue.
Step 3Create or Change the Value to Control Pause Updates
The setting you are changing is a value on the right side of the Registry Editor window. Its presence, and its data, decide whether the pause feature is available. You either delete it or create it, depending on what you want. The next two sections cover each case, and both continue from step 6.
To Enable the "Pause Updates" Feature (Allow Users to Pause):
These steps let users pause updates again by removing the registry value that hides the feature. Windows Update then works normally.
- Look at the right side with the
WindowsUpdatekey selected on the left. The values stored in that key are listed there. - Find a value named
SetDisablePauseUXAccess. - Right-click the value and select Delete. Click Yes to confirm.
- Skip the deletion if the
SetDisablePauseUXAccessvalue does not exist. The pause feature is already available, because that is the default state.
Explanation: The presence of the SetDisablePauseUXAccess value tells Windows to turn off the pause feature. Deleting it removes that instruction. To be cautious, right-click the key first and choose Export to save a backup before you delete anything.
To Disable the "Pause Updates" Feature (Prevent Users from Pausing):
These steps turn off Pause updates in Windows 11 by creating the value, or changing it if it already exists, and setting it to 1.
- Right-click an empty space on the right side with the
WindowsUpdatekey selected on the left. A short menu appears. - Select New DWORD (32-bit) Value. A new value appears with its name highlighted for editing.
- Name the new value exactly:
SetDisablePauseUXAccess - Press Enter. The name is saved.
- Double-click the new
SetDisablePauseUXAccessvalue. An Edit DWORD (32-bit) Value window opens. - Enter 1 in the Value data box.
- Click OK. The value now shows 1 in the right pane.
Explanation: Setting the SetDisablePauseUXAccess value to 1 (a DWORD value, which is a 32-bit number) tells Windows to hide the option to pause updates. The name must match exactly, or Windows will ignore it. To reverse this later, delete the value as described in the previous section.
Step 4Close the Registry Editor and Restart
You can now close the Registry Editor. For registry changes to fully apply, restart your computer. Save your work first.
After restarting, check your Windows Update settings. If you enabled the feature, you should see the "Pause updates" option. If you disabled it, the option should be gone.
Checking Your Pause Updates Status
To check the current status, open the Settings app and look at the Windows Update page. It shows whether the change worked and whether updates are paused.
- Press Windows key + I. The Settings app opens.
- Click Windows Update in the left menu. The update page opens on the right.
- Look at the Pause updates section on the right.
If the feature is enabled, you will see the option to pause updates and a menu to choose how long to pause them. If you disabled the feature, this section might be missing, or the "Pause updates" button may be grayed out and unusable.
If nothing has changed, restart the PC and check again. Also make sure you made the change on the same PC and in the right key or policy.
Summary
Managing when Windows updates install gives you better control over your system. Use the Local Group Policy Editor (on Pro, Enterprise or Education versions of Windows 11) or the Registry Editor (on all versions) to enable or disable the "Pause Updates" feature.
Whichever you choose, you can undo the change at any time. Set the policy back to Not Configured or delete the registry value.
Frequently asked questions
How to turn off pause updates 🪟 Windows 11?
To turn off a pause, open Settings, select Windows Update, and click Resume updates. Windows starts checking for and installing waiting updates. A pause also ends on its own after the date shown, so you only need to act if you want updates back sooner.
How to disable pause updates?
To disable the Pause updates feature, open the Local Group Policy Editor on Windows 11 Pro, Enterprise or Education and enable the policy that turns off Pause updates. Windows 11 Home doesn't include this editor, so use the Registry Editor instead. Restart your PC afterward so the change takes effect.
How to unpause updates 🪟 Windows 11?
To unpause updates, open Settings, go to Windows Update, and click Resume updates. Windows then checks for and installs the updates it was holding back. If the button is missing, the pause has already ended or a policy is controlling it.
How to remove pause updates in 🪟 Windows 11?
You can't delete a pause, but you can end it early. Open Settings, select Windows Update, and click Resume updates. To remove the Pause updates option for good, disable the feature with a policy in the Local Group Policy Editor or the Registry Editor.
How to stop pausing updates 🪟 Windows 11?
To stop pausing updates, open Settings, go to Windows Update, and click Resume updates. Windows will install updates when it can. To block pausing permanently, disable the feature with a policy, as described in this guide.
Pausing automatic updateswhat is your purpose?
Pausing automatic updates temporarily stops Windows from downloading and installing new updates. People do this to pick a convenient restart time, avoid sudden reboots during work, or save mobile data on a metered connection. Critical Microsoft Defender security fixes still install during a pause.
Still have a question?
Answered by AI from this guide. Good questions may be added to this page — please don't include personal details.
Did this guide fix your problem?

About the Author
Richard
Tech Writer, IT Professional
Richard is a writer at Geek Rewind who turns complex IT tasks into clear, step-by-step guides. He draws on years of hands-on experience in system administration and enterprise IT operations, focusing on Windows, Linux and WordPress: the problems people actually run into, and the fixes that work. His server and WordPress guides come from systems he runs himself. Richard builds and maintains the platform behind Geek Rewind, from its Ubuntu servers and Nginx configuration to its custom WordPress plugins. Many new tutorials start with readers' questions, and he's always glad to answer them in the comments.
No comments yet — be the first to share your thoughts!