How to Install OpenSSH Client on Windows 11

OpenSSH Client is a built-in Windows 11 tool that lets you connect to and manage remote computers securely using text commands. Windows 11 includes this feature by default, so you normally don’t need to download extra software to set up encrypted connections over your network. It is one of Windows’ “optional features”, which means it can be added or removed without touching the rest of the system.
You can check for it, and turn it on if it’s missing, through the Windows Settings app in a few clicks. Once it’s in place, you can run commands on other machines or move files safely without third-party apps. It works the same way on Windows 11 Home and Pro, and you need an administrator account to add or remove optional features.
Open Settings , click Apps, then Optional features, search for OpenSSH Client, tick its checkbox, and click Install. Windows downloads and installs it in moments with no restart needed. Verify it works by typing ssh in Command Prompt.
How to Install OpenSSH Client on 🪟 Windows 11
Installing the OpenSSH Client on Windows 11 takes about a minute through your system settings. Open Settings , go to Apps, and click Optional features to find and add the OpenSSH Client tool so you can connect securely to other computers. If the client is already in your list of installed features, there is nothing to install and you can skip straight to using it.
Open Settings on your PC. You can do this two ways:
- Press Win+I on your keyboard.
- Or click the Start button, then select Settings.
The Settings window should open, with a list of categories down the left side.

windows 11 start settings In the Settings window, click Apps in the left menu. Then click Optional features on the right side. You should now see a list of the features already installed on your PC.
📝NoteOn some newer builds of Windows 11 (version 24H2 and later), Optional features has moved to Settings > System > Optional features.If you don't see it under Apps, look there.
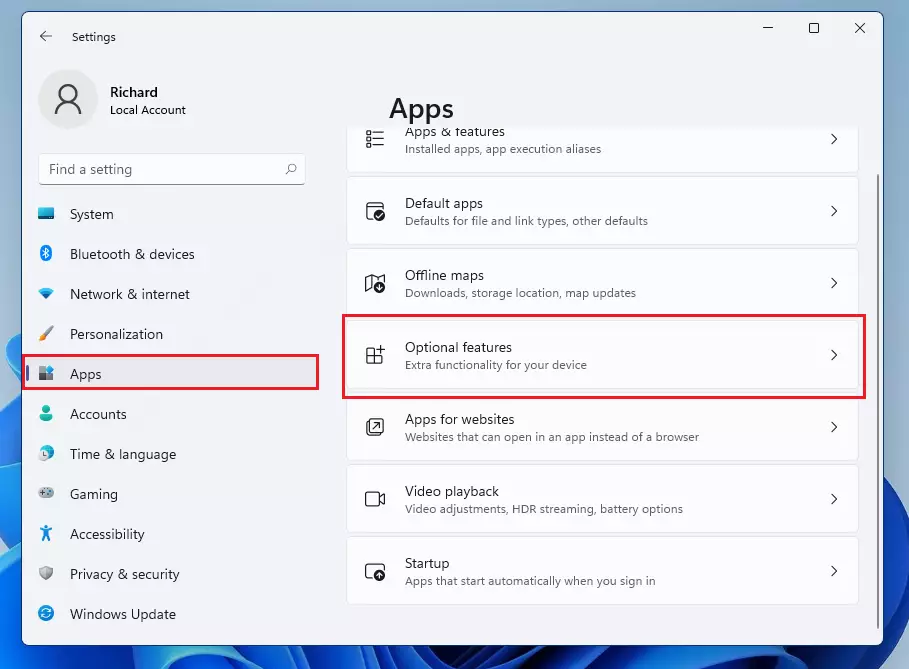
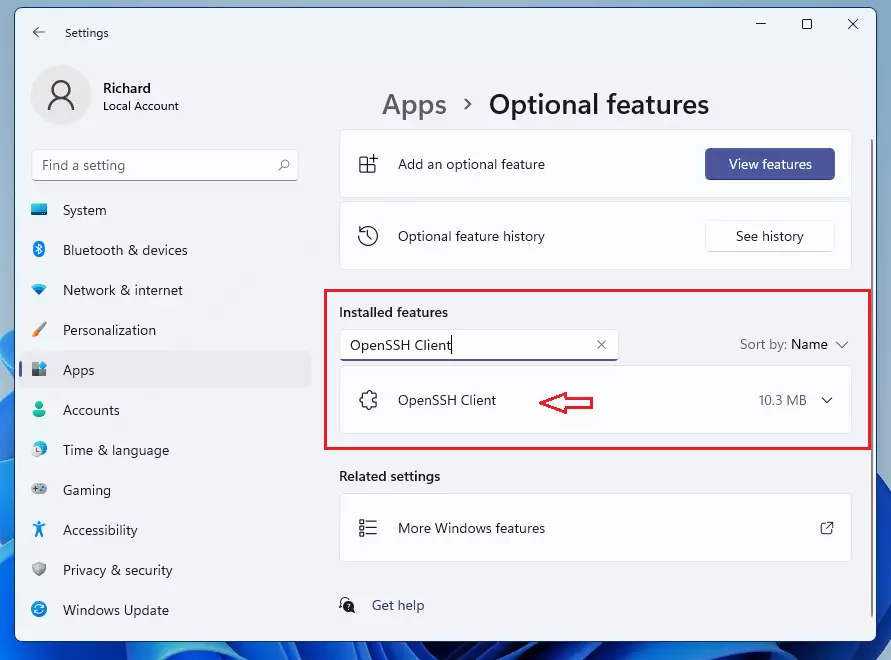
widnows 11 apps optional features Scroll down the list of installed features and look for OpenSSH Client. If it's already there, the client is installed and you're done. You can use the list's search box to find it faster.
If you don't see it, click Add an optional feature at the top. On some builds this button is labelled View features. A window listing available features should open.
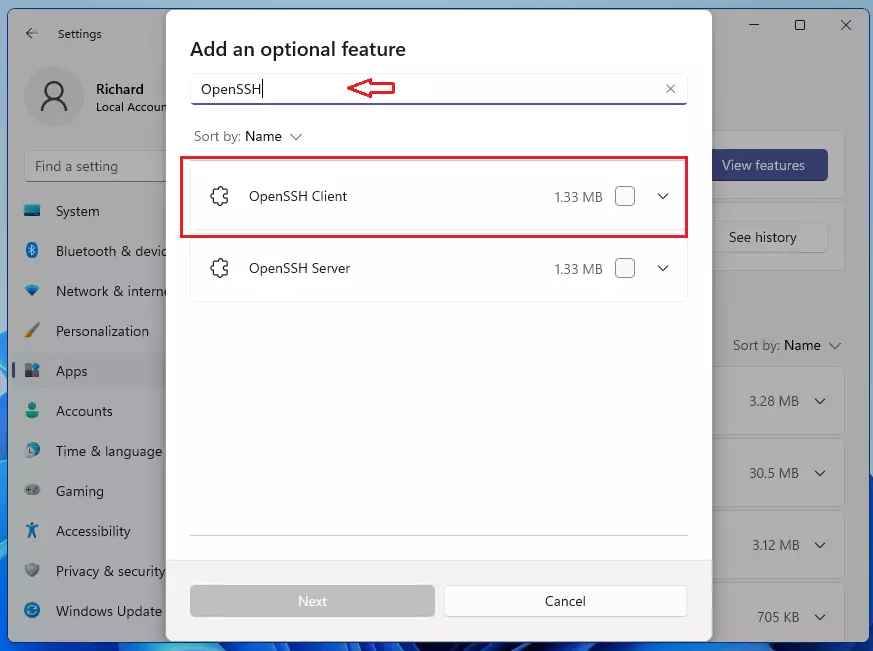
windows 11 openssh client install In the search box, type OpenSSH Client. When it appears in the list, tick its checkbox, then click Install (on some builds you click Next first, then Install). Wait a few moments while Windows installs the feature. You can watch its progress under the recent actions in Optional features.
📝Good to KnowIf the install fails or the button stays greyed out, check that you are signed in as an administrator and that the PC is online, because Windows downloads the feature from Windows Update.On a work or school PC, an IT policy may block optional features.
openssh windows 11 install
What happens when you're done? The OpenSSH Client is now installed and ready to use on your Windows 11 PC. You normally don't need to restart. To confirm it works, open Command Prompt or PowerShell and type ssh. If the client is installed, it prints a short list of usage options instead of an error.
To undo the change later, go back to the Optional features page, find OpenSSH Client in the installed list, click it, and choose Uninstall.
How to Use OpenSSH Client on 🪟 Windows 11
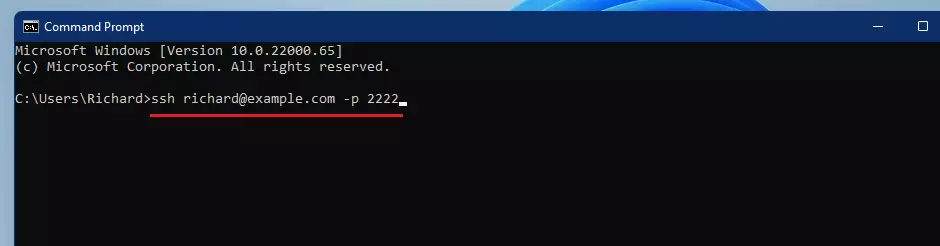
Using the OpenSSH Client on Windows 11 to connect to another computer takes one command in your terminal. Open Command Prompt or PowerShell, type ssh followed by your username and the computer's address, and press Enter to start a secure remote session. The other computer must be running an SSH server and be reachable from your network.
- Open Command Prompt or PowerShell on your PC. To do this, press the Windows key, type
cmdorPowerShell, then press Enter. A window with a blinking cursor should open. In the window that opens, type the following command and press Enter:
ssh user@192.168.1.100Replace
userwith your login name on the remote computer, and192.168.1.100with the address or IP of the remote computer.Example:
ssh admin@server.example.comThe first time you connect to a computer, SSH may show a message saying it can't verify the host and ask whether to continue. If you trust the machine, type yes and press Enter. Windows remembers the host, so you won't be asked again.
If the connection is set up correctly, you will be asked for your password. Enter it and press Enter. Nothing appears on screen as you type, not even dots, which is normal. Once you're accepted, the prompt changes to the remote machine's, and you can start working securely on it.
If you see "Connection timed out" or "Connection refused", check the address, make sure the remote computer is on, and confirm that its SSH server is running and not blocked by a firewall. If you see "Permission denied", recheck your username and password.
openssh use in windows 11
Summary
Windows 11 comes with a built-in OpenSSH client, so you don't need to download anything extra to connect securely to other computers.
Did this guide fix your problem?

About the Author
Richard
Tech Writer, IT Professional
Richard is a writer at Geek Rewind who turns complex IT tasks into clear, step-by-step guides. He draws on years of hands-on experience in system administration and enterprise IT operations, focusing on Windows, Linux and WordPress: the problems people actually run into, and the fixes that work. His server and WordPress guides come from systems he runs himself. Richard builds and maintains the platform behind Geek Rewind, from its Ubuntu servers and Nginx configuration to its custom WordPress plugins. Many new tutorials start with readers' questions, and he's always glad to answer them in the comments.
No comments yet — be the first to share your thoughts!