How to Show or Hide Accent Color on Start Menu and Taskbar in Windows 11

- 25 steps
- Includes a restart or sign-out
Windows 11 taskbar accent colors are controlled in Settings Personalization Colors, using the Show accent color on Start and taskbar toggle. Turn it on and Start and the taskbar use your chosen highlight color instead of staying dark or light gray.
An accent color is the highlight tone Windows uses for buttons, icons, selected items, and menus. The toggle only works when Windows mode is set to Dark, or to Custom with the Windows mode set to Dark.
This guide covers the Settings method first, then a Registry method for advanced users. Both work on Windows 11 Home and Pro.
Open Settings Personalization Colors and turn on Show accent color on Start and taskbar to colour the Start menu and taskbar with your Windows 11 accent color. If the toggle is greyed out, set Choose your mode to Dark first. The change applies immediately, with no restart needed.
How to Turn Accent Color On or Off
- Press Win+I to open Settings. The Settings window opens with a list of categories on the left.
- Click Personalization in the left menu. The personalization options appear on the right.
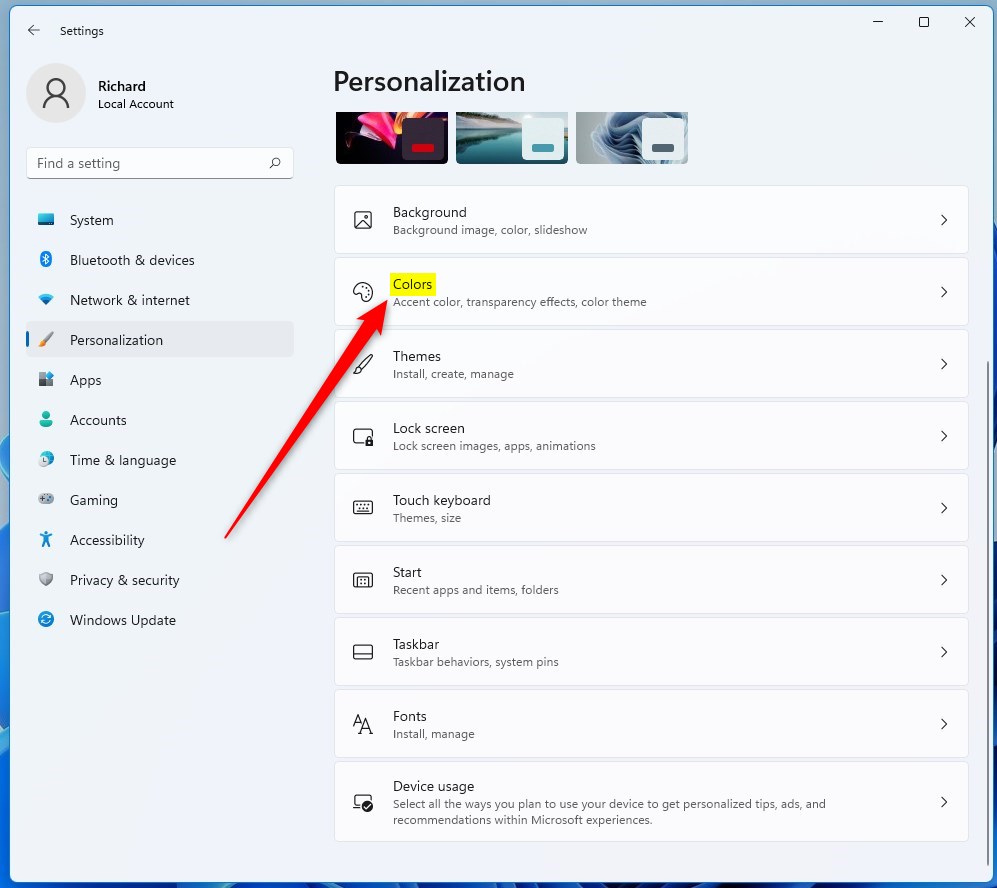
- Click Colors. The Choose your mode setting is at the top, followed by Transparency effects and Accent color.
- Check Choose your mode. If it says Light, change it to Dark. If you use Custom, make sure the Windows mode inside it is set to Dark. The Settings window and the taskbar turn dark when the mode changes.
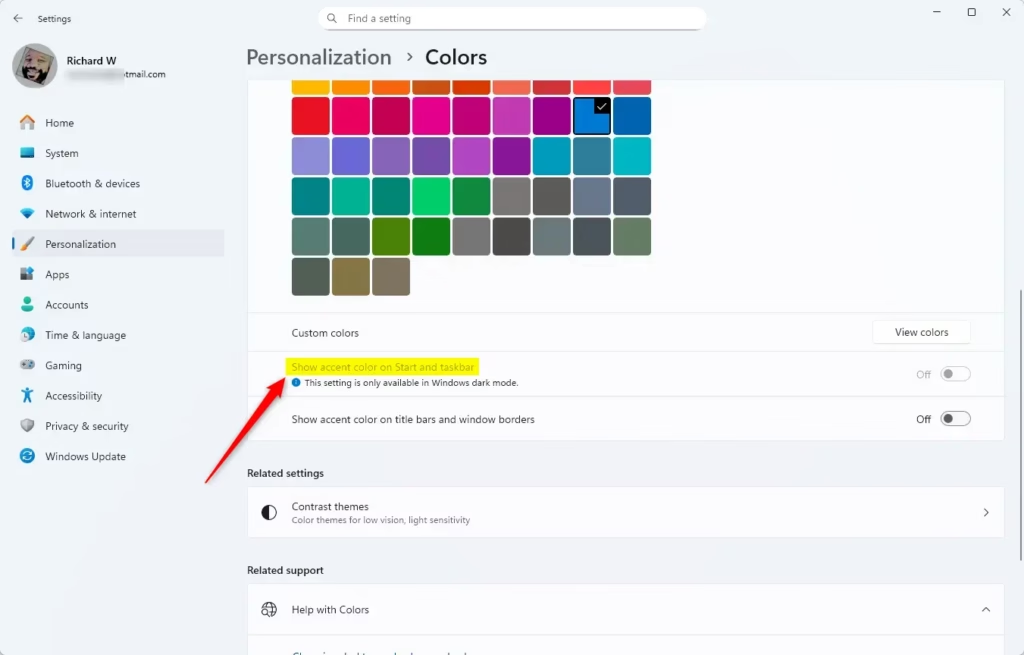
- Scroll down to Show accent color on Start and taskbar. If it was greyed out, it is now clickable.
- Turn the toggle On to color Start and the taskbar, or Off to return to the plain look. Both areas change color right away.
That’s it. Start and the taskbar now follow your choice, and the change stays in place until you flip the toggle again.
The change applies immediately in Settings, with no restart or sign-out. If the color is not the one you want, pick another under Accent color on the same page. Choose Automatic to take a color from your wallpaper, or Manual to pick a swatch yourself.
Update KB5089573 improves the Automatic option. According to Microsoft’s release notes, color selection is more accurate when you match your accent color to your wallpaper with automatic accent color selection turned on. The same update also makes the wallpaper stay in place more reliably across restarts and upgrades. These options live in the Personalization settings, so the steps above do not change.
In Light mode, Windows hides the accent color on Start and the taskbar, and the toggle stays greyed out. Switch Windows mode to Dark, or to Custom with Windows mode set to Dark.
To undo the change, return to the same page and flip the toggle back. Nothing else is altered by this setting.
Microsoft’s October 15, 2026 post on the Windows Experience Blog, “Incredible deals and more to love in a new Windows PC this holiday,” lists a section called “Personalizing Start and the taskbar.” It says you can now choose where the taskbar appears on screen, and that Windows offers more flexibility to personalize Start and the taskbar.
Look for the taskbar position option in Settings Personalization Taskbar. Microsoft is rolling this out gradually, so some PCs will get it later. The post does not name a specific update number or list every new setting, so menus on your PC may look different from the steps above.
If you do not see new options yet, open Settings Windows Update, install what is available, and check again in a few weeks. The steps above still apply either way.
How to Change Accent Color Using the Registry (Advanced)
You can also set this through the Registry. This helps if you want to apply the same setting consistently on several machines. The setting is stored per user, so it affects only the account you change it under.
Warning: The Registry Editor is a database that stores low-level system settings. Back up your registry before changing any values, since mistakes can cause system instability. To make a backup, open Registry Editor, choose File Export, select All as the export range, and save the file somewhere safe. Creating a restore point first is also a good idea.
- Back up the registry as described in the warning above.
- Pick the Registry Editor steps below that match what you want. One set shows the accent color on Start and the taskbar, and another hides it.
- Follow those steps in Registry Editor, then close it.
- Check Start and the taskbar. If nothing changes, sign out and back in, or restart the PC, so Windows reloads the setting.
You should now have the Registry change applied to your account. If you also see no color, check that the mode is Dark before trying again.
To undo the change, follow the steps for the opposite result. The Dark or Custom mode requirement from the Settings method still applies. If the mode is Light, Windows saves the value but you will not see the color.
Turn On Accent Color on Start Menu and Taskbar
- Open Registry Editor: press Win+R, type
regedit, and press Enter. Select Yes if User Account Control asks. Registry Editor opens with a folder tree on the left. - Go to
HKEY_CURRENT_USER\Software\Microsoft\Windows\CurrentVersion\Themes\Personalize— paste the path into the address bar at the top of Registry Editor and press Enter. The tree jumps to that key, and its values show in the right pane. - If there is no Personalize key, right-click Themes in the left pane, select New Key, name it Personalize, and select it. Create any other missing key in the path the same way.
- Right-click an empty area of the right pane, select New DWORD (32-bit) Value, and name it ColorPrevalence. If ColorPrevalence is already there, skip this step. The new value appears in the right pane.
- Double-click ColorPrevalence, set Base to Decimal, type 1 in Value data, and select OK. The dialog closes and the list shows the new number.
That’s it. The ColorPrevalence value is now 1. Close Registry Editor, then sign out and back in if the color does not appear.
Turn On Accent Color Only on Taskbar (Not Start Menu)
- Open Registry Editor: press Win+R, type
regedit, and press Enter. Select Yes if User Account Control asks. Registry Editor opens with a folder tree on the left. - Go to
HKEY_CURRENT_USER\Software\Microsoft\Windows\CurrentVersion\Themes\Personalize— paste the path into the address bar at the top of Registry Editor and press Enter. The tree jumps to that key, and its values show in the right pane. - If there is no Personalize key, right-click Themes in the left pane, select New Key, name it Personalize, and select it. Create any other missing key in the path the same way.
- Right-click an empty area of the right pane, select New DWORD (32-bit) Value, and name it ColorPrevalence. If ColorPrevalence is already there, skip this step. The new value appears in the right pane.
- Double-click ColorPrevalence, set Base to Decimal, type 2 in Value data, and select OK. The dialog closes and the list shows the new number.
You should now have ColorPrevalence set to 2 for this key. Close Registry Editor, then sign out and back in so Windows reloads the setting.
Turn Off Accent Color (Default Setting)
- Open Registry Editor: press Win+R, type
regedit, and press Enter. Select Yes if User Account Control asks. Registry Editor opens with a folder tree on the left. - Go to
HKEY_CURRENT_USER\Software\Microsoft\Windows\CurrentVersion\Themes\Personalize— paste the path into the address bar at the top of Registry Editor and press Enter. The tree jumps to that key, and its values show in the right pane. - If there is no Personalize key, right-click Themes in the left pane, select New Key, name it Personalize, and select it. Create any other missing key in the path the same way.
- Right-click an empty area of the right pane, select New DWORD (32-bit) Value, and name it ColorPrevalence. If ColorPrevalence is already there, skip this step. The new value appears in the right pane.
- Double-click ColorPrevalence, set Base to Decimal, type 0 in Value data, and select OK. The dialog closes and the list shows the new number.
That’s it. The ColorPrevalence value is now 0, which hides the accent color on Start and the taskbar. Close Registry Editor, then sign out and back in if the change does not show.
Summary
Windows 11 accent color settings let you customize the look of your desktop interface by applying your favorite hue to the taskbar and Start menu. These color choices only appear when your system is set to Dark or Custom mode, giving you a sharp contrast against standard light backgrounds. You can control these visual tweaks easily through the built-in Settings app or the advanced Registry Editor.- Windows 11 has three color modes: Dark, Light, and Custom.
- Accent color works on the Start menu and taskbar only with Dark or Custom mode.
- You can change this setting easily in Settings.
- Advanced users can also use the Registry Editor to make changes.
- Try different colors and modes to make your PC look the way you want.
Frequently asked questions
How to pin apps to 🪟 Windows 11 taskbar efficiently?
Open the Start menu, find the app, right-click it, and choose Pin to taskbar. To pin an app that is already open, right-click its icon on the taskbar and select Pin to taskbar. You can also drag the app's icon from the Start menu or desktop onto the taskbar. Pinned apps stay there after you restart your PC.
How to calibrate display color in 🪟 Windows 11?
Click the search box on the taskbar, type calibrate display color, and press Enter. The Display Color Calibration tool opens. Follow the screens to adjust gamma, brightness, contrast, and color balance. Click Next to move through each screen, then click Finish to save your settings.
How to configure 🪟 Windows 11 color profiles?
Search for Color Management in the Start menu and open it. On the Devices tab, select your monitor and check Use my settings for this device. Click Add to choose an ICC or ICM profile file, then select it and click Set as default profile. Click OK to apply the change.
How to pin apps to start menu in 🪟 Windows 11?
Open the Start menu and click All apps if the app is not listed. Right-click the app and choose Pin to Start. The app tile appears in the pinned section of the Start menu. To remove it, right-click the tile and select Unpin from Start.
Still have a question?
Answered by AI from this guide. Good questions may be added to this page — please don't include personal details.
Did this guide fix your problem?

About the Author
Richard
Tech Writer, IT Professional
Richard is a writer at Geek Rewind who turns complex IT tasks into clear, step-by-step guides. He draws on years of hands-on experience in system administration and enterprise IT operations, focusing on Windows, Linux and WordPress: the problems people actually run into, and the fixes that work. His server and WordPress guides come from systems he runs himself. Richard builds and maintains the platform behind Geek Rewind, from its Ubuntu servers and Nginx configuration to its custom WordPress plugins. Many new tutorials start with readers' questions, and he's always glad to answer them in the comments.
No comments yet — be the first to share your thoughts!