How to Clear User Dictionary Data in Windows 11 Text Input Settings

User dictionary data in Windows 11 Text Input settings stores the words, names, and misspellings your keyboard learns as you type. Windows 11 saves these words in a personal file to predict what you want to type next. Over time that file often fills up with unwanted text and typos.
Clearing this saved data wipes your typing history and stops Windows from suggesting odd words or old search terms. You can reset the dictionary in a few steps through the Settings app. This protects your privacy and gives you a clean spelling list. No restart is needed, and the steps are the same on Windows 11 Home and Pro.
Open Settings , go to Privacy & security, scroll to Inking & typing personalization, click Custom dictionary, then click the reset or clear button. All saved words and auto-corrections are removed immediately with no restart needed.
Understanding How 🪟 Windows 11 Learns Your Typing Habits
Windows 11 learns your typing habits by recording the words, names, and phrases you type across apps. It uses them to improve auto-corrections and word predictions. These custom entries are stored in a personal dictionary file tied to your user account, so the touch keyboard and text suggestions adapt to your vocabulary over time.
Whenever predictive text or spelling suggestions appear above the touch keyboard or while you type on a physical keyboard, your computer is checking this user dictionary. It saves time for everyday typing, but it has no common sense. If you mistype a word and press space, Windows 11 may treat the typo as a new, valid word and keep suggesting it.
Clearing the dictionary data removes all custom entries at once. Your typing suggestions go back to their defaults, and Windows starts learning again from scratch.
How to Clear User Dictionary Data in 🪟 Windows 11 Text Input Settings
Clearing user dictionary data removes all the custom words and auto-correction history Windows has saved for your account. You do this in the Settings app, under the privacy options for inking and typing personalization.
The exact label of the control differs a little between Windows 11 versions. Some builds show a toggle for the custom inking and typing dictionary, and others show a clear or reset button. The steps below cover both.
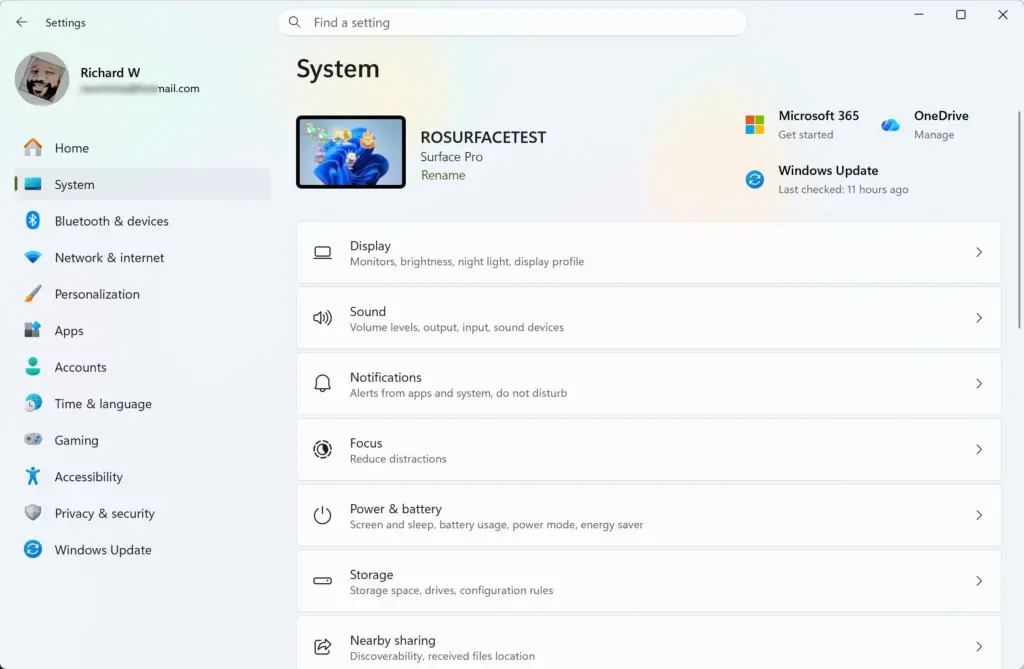
- Open Settings. Click the Start button on your taskbar and select the Settings app icon (the gear), or press Windows Key + I. The Settings window opens.

Taskbar - Click Privacy & security in the menu on the left side of the window. The privacy options appear on the right.
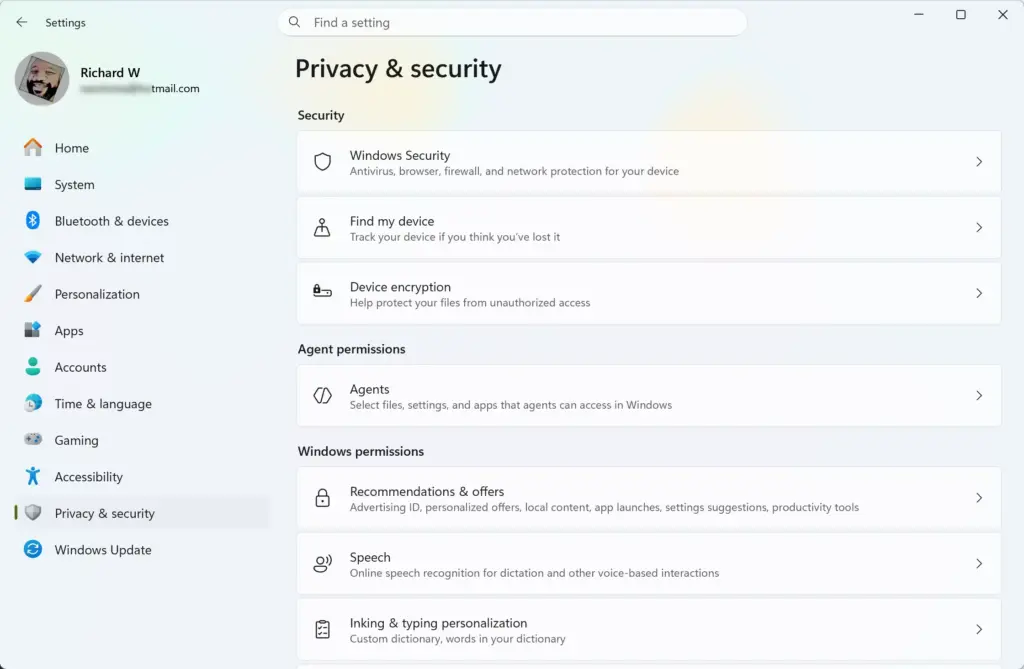
Settings › Privacy & security - Scroll down the page and click Inking & typing personalization.
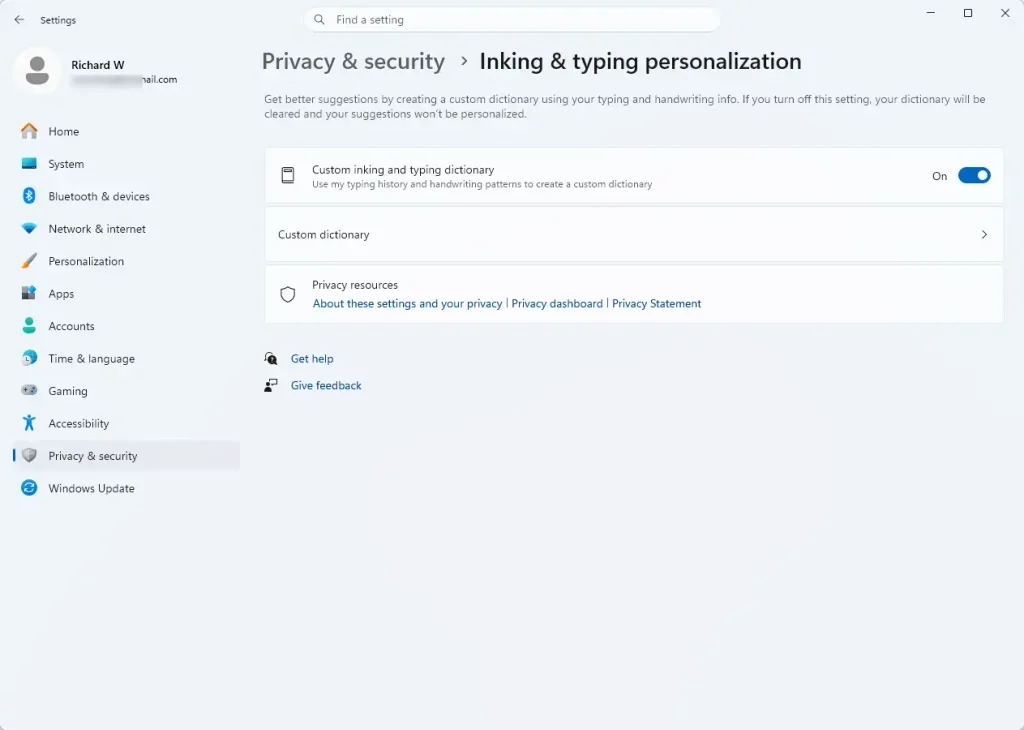
- Find the Custom dictionary option and click it. On some builds it is labeled Custom inking and typing dictionary.
- Click the button that clears or resets your personal dictionary data. If you only see a toggle, switch it to Off. Either action removes all the saved words.
(Note: This action requires administrator privileges on some organizational computers, but standard user accounts can usually modify their own typing privacy options.)
If the option is greyed out or missing, your PC is probably managed by a work or school account, and an administrator has locked the setting. A missing page can also mean your Windows 11 build has moved or removed it. In that case, try the language settings in the next section.
Once the data is cleared, the old words are gone. Windows will start learning only the new words you type from this point forward.
Managing and Editing Specific Words Instead of a Full Reset
If you only want to get rid of a few typos, a full reset is more than you need. Removing individual entries lets you keep the rest of your typing history.
Microsoft Word and other Office apps have a custom dictionary dialog box where you can delete specific words line by line. Windows 11 system-wide text input does not offer a word-by-word list in the same way. What you can do is check the input languages and keyboards on your PC, and look at the options for each language if you use more than one layout.
- Press Windows Key + I to open Settings.

Settings - Click Time & language in the left menu.

Settings › Time & language - Select Language & region. Your installed languages are listed on the right.
- Find your primary language in the list, click the three dots next to it, and select Language options.
- Review the keyboard settings and input methods for that language. Look for anything that lets you manage user words or reset the predictive text dictionary for that language.
What you see here depends on the language and keyboard. Some languages have more options than others, so there may be no reset option for yours.
Unique Expert Tips: Preventing Unwanted Words from Returning
To stop unwanted words from coming back, turn off typing data collection and inking personalization in your privacy settings. If Windows stops tracking your keystrokes, it stops saving new typos, slang, and unrecognized phrases to your dictionary.
- Turn off typing data collection: If you do not want Windows to learn from your typing at all, turn the feature off. Go to Settings Privacy & security Inking & typing personalization and switch the main toggle to Off. Windows then stops learning new words from your typing. To undo this, switch the toggle back to On.
- Regularly clear your clipboard history: Typing suggestions can also draw on what you copy and paste. Press Windows Key + V to open the clipboard history, then click Clear all. This removes copied text that Windows might otherwise suggest later.
Troubleshooting: What to Do If Saved Words Keep Coming Back
If saved words come back after you clear the dictionary, the cause is usually sync. When you sign in with a Microsoft account, your typing data can sync across your devices. Your other laptops and desktops may then push the deleted words back to this PC through cloud settings. To keep the dictionary empty, you have to stop that syncing.
This only applies to Microsoft accounts. If you sign in with a local account, nothing syncs. With a Microsoft account, clearing the words on your laptop does not help if your desktop still holds them and syncs them back over the internet.
You can check your Microsoft account privacy dashboard online, or turn off setting sync on your Windows 11 device. With sync off, typing history and personal dictionary words stay on this PC and are not shared with your other linked Windows computers.
- Open Settings and click Accounts.
- Select Windows backup.
- Find Remember my preferences and turn off the options related to passwords and personal settings syncing. Switching the main toggle off stops all of them at once. If you want to keep some sync running, clear only the checkboxes you do not want, such as Language preferences.
Do this on each of your devices if they all use the same Microsoft account. That way, changes you make to your text input dictionary stay local and are not overwritten by older data stored in the cloud. Clear the dictionary again after you turn sync off, so no stale words remain.
Summary
Clearing user dictionary data in Windows 11 removes saved words from your predictive text and stops your computer from remembering old typos. It also lets you manage your language options. Combined with turning off typing data collection and cloud sync, the reset keeps unwanted words from coming back.
Have a question about this guide?
Answered by AI from this guide. Good questions may be added to this page — please don't include personal details.
Did this guide fix your problem?

About the Author
Richard
Tech Writer, IT Professional
Richard is a writer at Geek Rewind who turns complex IT tasks into clear, step-by-step guides. He draws on years of hands-on experience in system administration and enterprise IT operations, focusing on Windows, Linux and WordPress: the problems people actually run into, and the fixes that work. His server and WordPress guides come from systems he runs himself. Richard builds and maintains the platform behind Geek Rewind, from its Ubuntu servers and Nginx configuration to its custom WordPress plugins. Many new tutorials start with readers' questions, and he's always glad to answer them in the comments.
No comments yet — be the first to share your thoughts!