How to Configure Text Input Preferences in Windows 11 Personalization Settings

Text input preferences in Windows 11 control how your PC handles typing assistance, including automatic spelling corrections and word suggestions. These built-in settings manage 3 core typing features: autocorrect, text suggestions, and the touch keyboard.
You can adjust these options to stop Windows from changing your words or to turn on help for multiple languages. Open the Settings app and go to Time & language Typing to find all available preferences. Everything here applies per user account, so changes you make will not affect other people who sign in to the same PC. Exact labels and layout can differ slightly between Windows 11 versions, so if a setting is worded a little differently on your build, look for the closest match.
Open Settings , select Time & language from the left menu, then click Typing. Toggle Autocorrect misspelled words, Highlight misspelled words, and Show text suggestions when typing on the physical keyboard On or Off as needed. Changes apply immediately to your account only.
Navigating to Personalization and Typing Settings
The typing settings sit inside the main Settings app . You reach them through Time & language, then Typing. The steps below take about ten seconds once you know the route.
- Open the Start menu and select Settings (the gear icon), or press the Win+I keyboard shortcut. The Settings window opens.

Windows 11 Start menu with Settings gear icon highlighted. - Select Time & language from the left-hand navigation menu. The right-hand pane now shows date, time, and language options.

Settings › Time & language - Click Typing to open the text input preference panel.
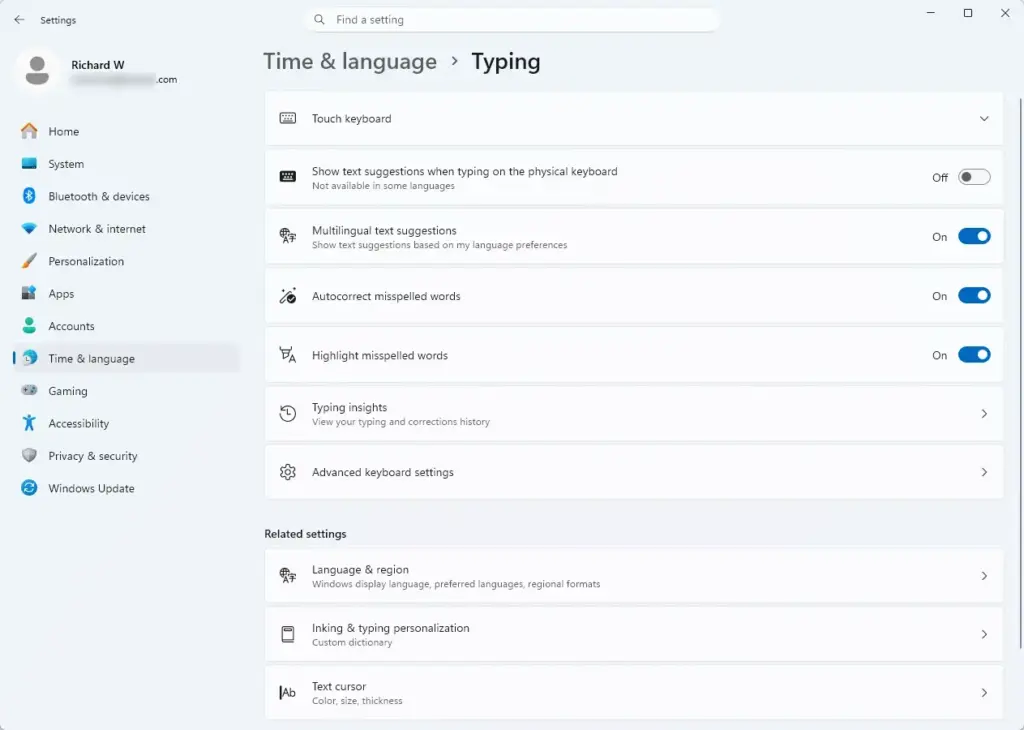
Settings › Time & language › Typing
You will now see a list of toggles and expandable sections covering spelling, autocorrect, text suggestions, and touch keyboard options. Each one changes a specific aspect of how Windows handles your keystrokes. Nothing here needs a restart, and every toggle can be flipped back at any time.
If you want to change the look of the on-screen keyboard (its theme or size), recent builds of Windows 11 also have a Personalization Text input page for that. The behavior settings in this tutorial stay under Time & language.
Configuring Hardware Keyboard Typing Settings
These settings apply to a physical keyboard, whether that is a desktop keyboard or the built-in one on a laptop. They let you turn autocorrect and predictive text on or off.
- Go to Settings Time & language Typing.
- Find the spelling options near the top of the page (the Spelling section on some builds).
- Set the Autocorrect misspelled words switch to On or Off. When it is on, Windows automatically fixes typos as you press the spacebar.
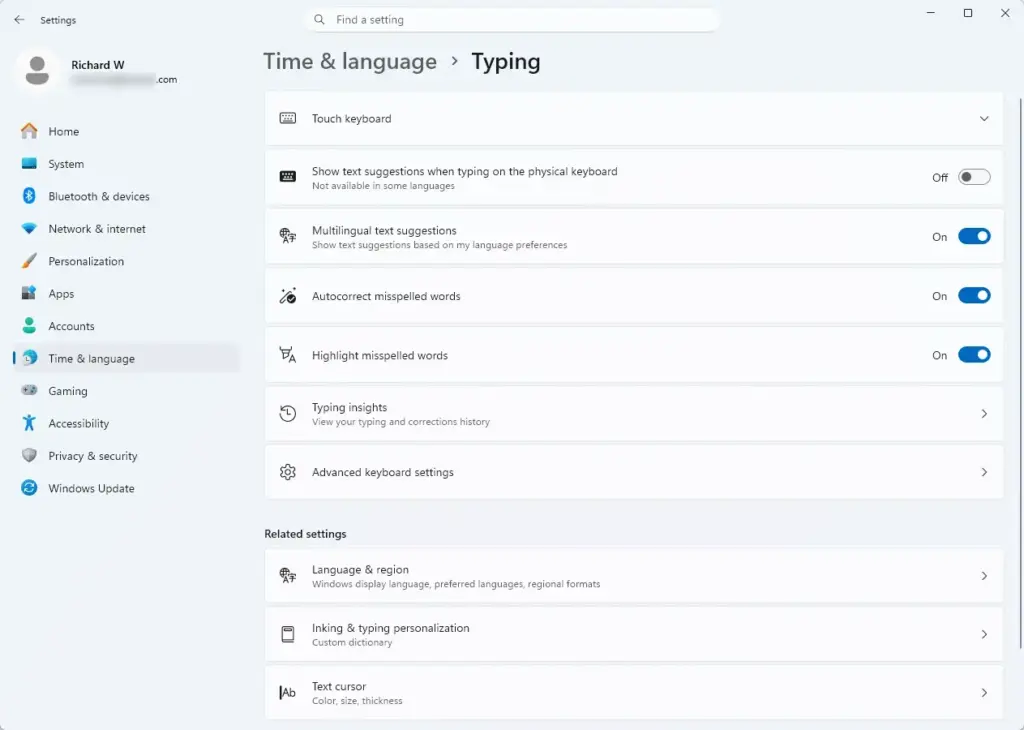
Settings › Time & language › Typing - Set the Highlight misspelled words switch to On or Off. When it is on, a red underline appears beneath unrecognized text.
- Scroll down to the Typing section and set Show text suggestions when typing on the physical keyboard to On if you want predictive words to appear above your cursor as you type.
After each step, try typing a misspelled word in Notepad or a browser to confirm the behavior has changed. Some apps, such as Microsoft Word, have their own spell checker and ignore these system settings, so a result there does not tell you whether the Windows setting worked.
Disabling autocorrect prevents Windows from changing unusual technical terms, acronyms, or proper nouns into common dictionary words. That is useful for writing code, commands, or product names. Enabling text suggestions provides a smartphone-like prediction bar that can speed up long-form writing. To undo either change, return to this page and flip the switch back.
Managing Touch Keyboard and Shapewriting Options
The touch keyboard is the on-screen keyboard that appears on tablets and touch-enabled laptops. Its options let you change key sounds, capitalization, and punctuation shortcuts. On a PC with no touchscreen, some of these options may be missing or have no visible effect, because Windows only shows the touch keyboard on request.
- Open Settings Time & language Typing.
- Click Touch keyboard to expand the section. The touch keyboard options appear below the heading.
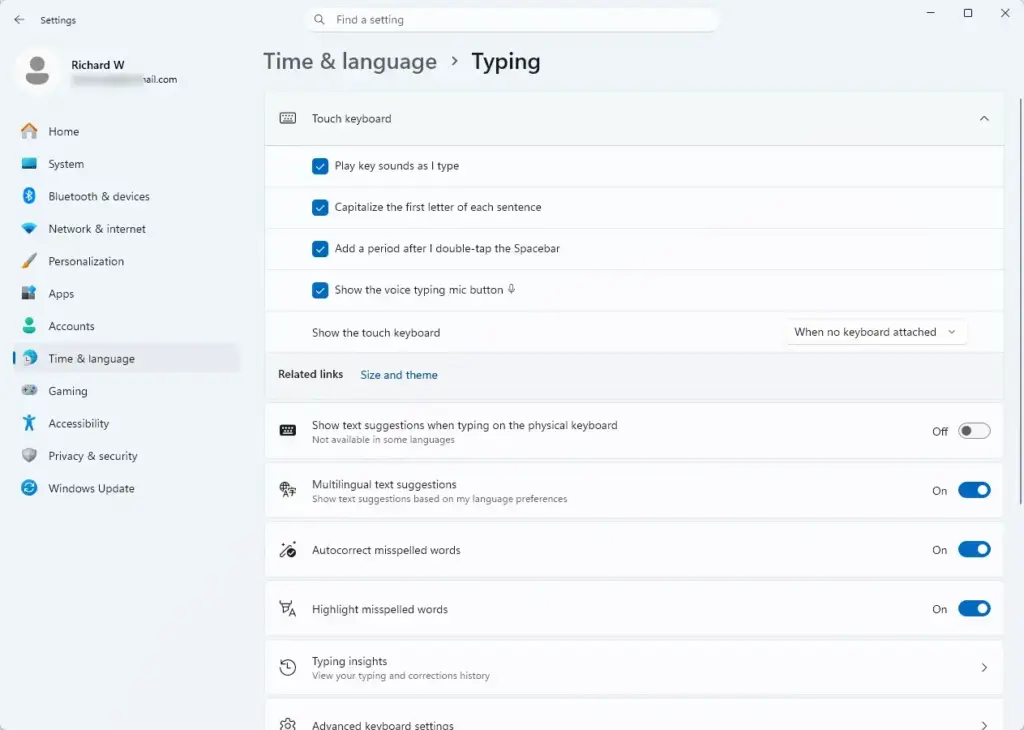
- Check the box for Play key sounds as I type if you want audible feedback with each keystroke.
- Set Capitalize the first letter of each sentence to On to automate sentence capitalization.
- Set Add a period after I double-tap the spacebar to On to insert punctuation quickly while typing. If your build words it as Add a period after you double-space the Spacebar, it is the same setting.
You can also enable shapewriting (also known as swiping or gesture typing) within this section if your hardware supports touch input. It lets you slide your finger continuously across keys to form words. If you cannot find the option, your device or build may not offer it. To test any of these, open the touch keyboard from the taskbar and type a sentence.
Enabling and Customizing Multilingual Text Suggestions
Multilingual text suggestions let Windows predict words and offer spelling corrections across more than one language at the same time. This only helps if you have installed at least one additional language, so check Time & language Language & region first if the option does nothing for you.
- Go to Settings Time & language Typing.
- Click Multilingual text suggestions to expand the section.
- Set Show text suggestions based on the other languages you've installed to On.
- If prompted, download the required language features. This lets Windows analyze typing patterns across your active languages, and it needs an internet connection.
Once the download finishes, suggestions should start to include words from your other languages as you type. This feature adapts to your writing style in each configured language, reducing typing friction during multilingual correspondence. If the suggestions get in the way, turn the switch off again.
Accessing Advanced Keyboard and Typing Diagnostics
Windows can learn from your typing and handwriting to improve its suggestions. These controls live in the privacy settings, not on the Typing page, so they are easy to miss.
- Open Settings Privacy & security.

- Click Inking & typing personalization. This is the feature that helps Windows recognize your handwriting and typing patterns.
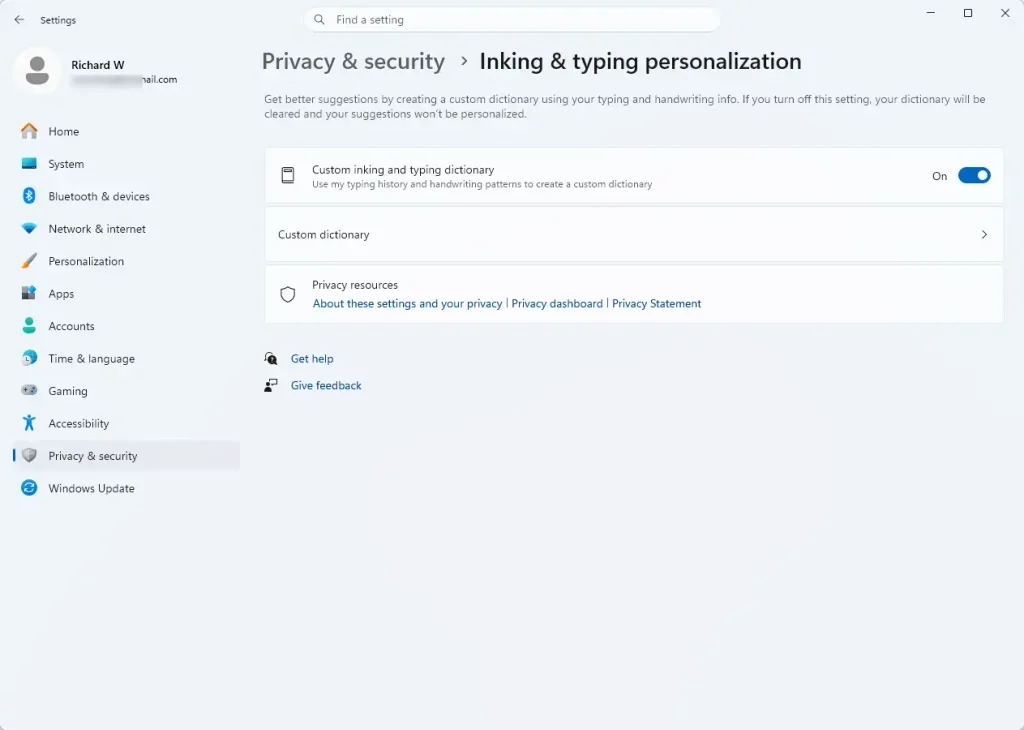
Windows 11 inking and typing personalization settings screen for clearing user dictionary data - Set the switch for Personal inking and typing dictionary to On or Off. Some builds label this switch Custom inking and typing dictionary.
That preserves your typing privacy on shared or sensitive work devices. Be aware that turning it off removes the words Windows has already learned, so turn it back on only if you are happy to start building the dictionary again from scratch.
Using Group Policy to Enforce Text Input Preferences Across Networks
System administrators can use Group Policy to standardize autocorrect behavior and typing rules across many Windows 11 machines. The Local Group Policy Editor is only included in Windows 11 Pro, Enterprise, and Education. Windows 11 Home does not have it, so use the registry method in the next section on Home.
- Press the Windows Key + R to open the Run dialog box.
- Type
gpedit.mscand press Enter to open the Local Group Policy Editor (Administrator privileges required). The editor window opens with a tree on the left. - Navigate through the left-hand tree to Computer Configuration Administrative Templates Control Panel Regional and Language Options.
- Look through the policies in the right-hand pane for text input settings, such as turning off autocorrect or disabling data collection for typing suggestions.
- Double-click a policy, select Enabled or Disabled, and click Apply followed by OK.
Policy changes may need a sign-out or restart before they take effect. To undo a policy, open it again and select Not Configured. Enforcing these policies via Group Policy ensures consistent text input behavior across domain-joined enterprise hardware. It also prevents users from altering standardized spelling and prediction configurations. For a whole domain, you would set the same policies in a Group Policy Object from the domain controller instead of editing each PC locally.
Modifying Text Input Behavior via the Windows Registry
Editing the Windows Registry lets advanced users and scripters change autocorrect and typing preferences without using the graphical interface. The settings live under HKEY_CURRENT_USER\Software\Microsoft\InputSettings, so they apply to the current user.
Back up your registry before proceeding. In Registry Editor, you can do this with File Export, choosing All as the export range, and saving the file somewhere safe. To restore it later, double-click the saved .reg file.
- Press the Windows Key + R, type
regedit, and press Enter to open the Registry Editor (Administrator privileges required). Approve the User Account Control prompt if one appears. - Navigate to the following key in the left sidebar:
HKEY_CURRENT_USER\Software\Microsoft\Input\Settings - Look in the right-hand pane for DWORD values such as
EnableAutocorrectionorEnableTextSuggestions. If a value is not there, the setting has not been changed from its default on this account. - Double-click a value and change its data to
0to disable the feature or1to enable it. - Click OK and restart your computer for the changes to take effect.
After the restart, open Settings Time & language Typing and check that the matching toggle shows the new state. Modifying these registry keys directly mirrors the toggles found in the Settings app, providing a reliable way to configure text input rules programmatically. To undo a change, set the value back to its previous data or import the backup you exported.
Was this guide helpful?

About the Author
Richard
Tech Writer, IT Professional
Richard is a writer at Geek Rewind who turns complex IT tasks into clear, step-by-step guides. He draws on years of hands-on experience in system administration and enterprise IT operations, focusing on Windows, Linux and WordPress: the problems people actually run into, and the fixes that work. His server and WordPress guides come from systems he runs himself. Richard builds and maintains the platform behind Geek Rewind, from its Ubuntu servers and Nginx configuration to its custom WordPress plugins. Many new tutorials start with readers' questions, and he's always glad to answer them in the comments.




No comments yet — be the first to share your thoughts!