How to Change Time Server in Windows 11

Changing the time server in Windows 11 lets your computer sync its clock with an alternative atomic time source instead of the default time.windows.com. Windows uses these internet time servers to correct clock drift. Drift matters more than it seems: Kerberos logins, TLS certificates, and two-factor codes all fail when the clock is off by more than a few minutes.
You can switch to a server like time.nist.gov in a few clicks through the Control Panel , with no extra software. This guide covers three methods: the Settings app , the Control Panel , and the Registry Editor.
Open Control Panel , go to Clock and Region Set the time and date, select the Internet Time tab, click Change settings, pick a server from the list or type a new one like time.nist.gov in the Server box, then click Update now. The system clock syncs to your chosen server immediately.
Change Time Server Using the Settings App
The Settings app is the modern place to manage your clock. Use it to check when Windows last synced and to force a sync. Whether you can pick a different server here depends on your Windows 11 build. If you can’t, the Control Panel method below always works. You need no special tools for this method.
- Open the Settings app. Click the Start menu and select Settings, or press Win+I on your keyboard. The Settings window opens with a list of categories on the left.
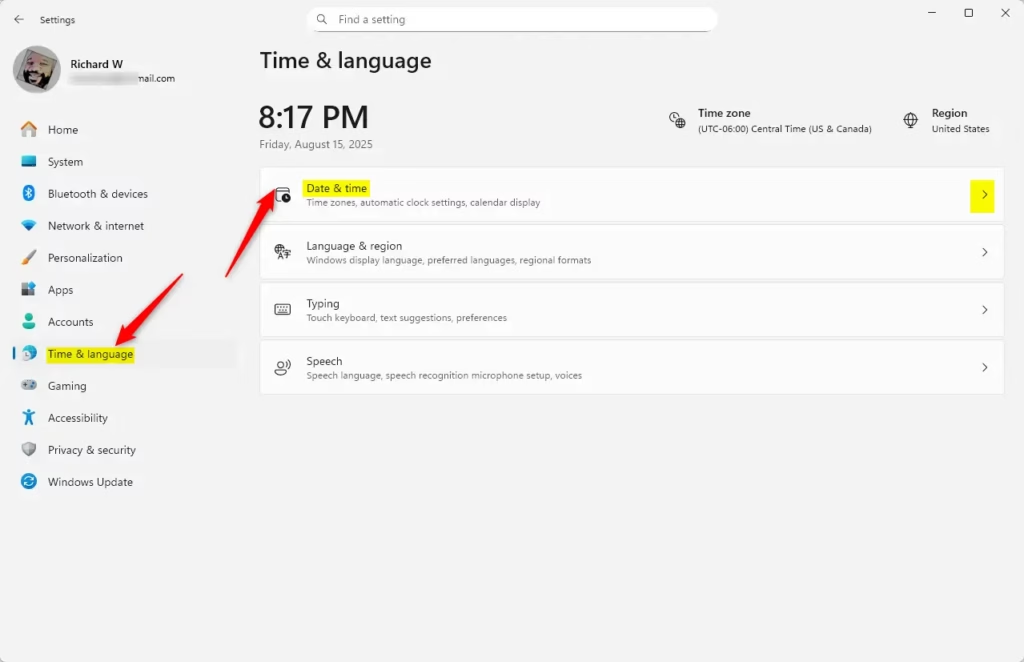
- Click Time & language on the left side. The right pane now shows the date and time options.
- Click Date & time on the right side to see more options. You should see the current time, the time zone, and the automatic time settings.
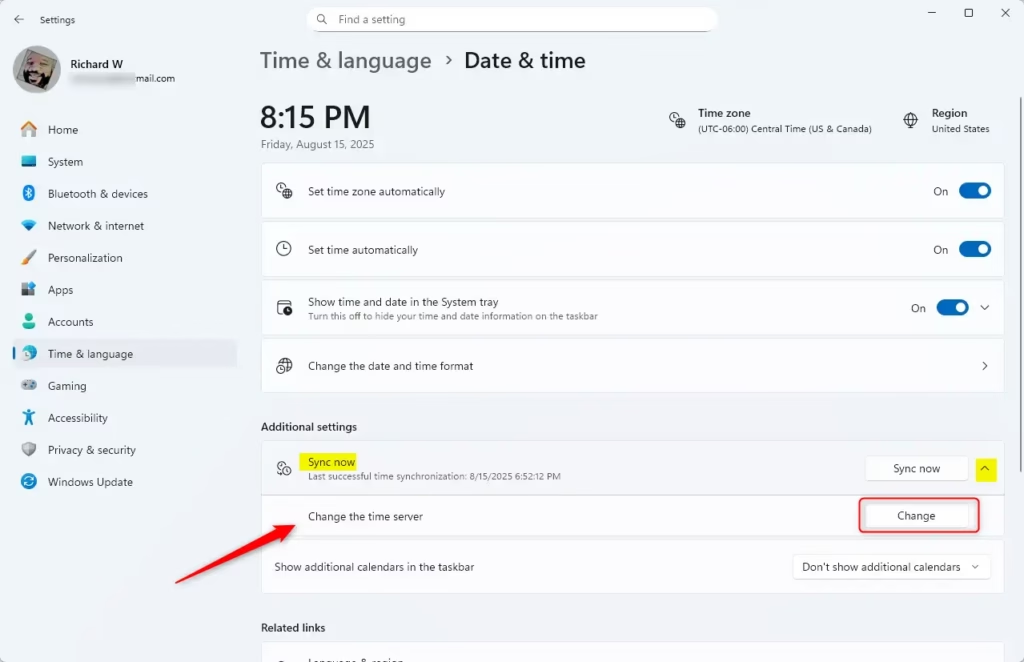
- Scroll down to Additional settings and find the Sync now tile. Expand it if needed. It shows when the clock last synced and which time server was used. Clicking Sync now forces an immediate sync with the current server.
- Click the Change button next to your current time server, if your build shows one. Many Windows 11 builds show only the server name and a Sync now button here, with no way to change the server. If you don’t see Change, skip to the Control Panel method below. A greyed-out or missing option here does not mean anything is broken.
- Type the address of the new time server you want to use. For example, type
time.nist.govand click OK. Then click Sync now to test it. The last-sync time should update to the current time.
Choosing a reliable server makes sure your PC syncs properly. Windows then takes its time from the server you selected, and every app on the machine sees the corrected clock. To undo the change, enter time.windows.com again and sync once more. Make sure Set time automatically is turned on, or Windows won’t keep syncing in the background.
Change Time Server Using Control Panel
It takes you straight to the Internet Time settings, where you can pick a server from a list or type your own. You need an administrator account to save the change.
- Open the Control Panel. Click Start, type Control Panel, and press Enter. If the view is set to Category, you will see headings such as Clock and Region.
- Go to Clock and Region. The next page lists Date and Time, Region, and related links.
- Click Set the time and date. A Date and Time window opens in a pop-up.
- In the pop-up window, select the Internet Time tab. It shows which server you sync with now and when the last sync happened.
- Click Change settings. ⚠️ This step requires admin privileges. If you are a standard user, Windows asks for administrator credentials. If the button is greyed out, the PC may be managed by an organization or a domain. Domain-joined PCs normally take their time from the domain controller.
- Make sure Synchronize with an Internet time server is checked. Then choose a time server from the list or type your own in the Server box.
- Click Update now and then OK. A message should confirm that the clock was successfully synchronized. If you get a timeout error, check that the server name is spelled correctly and that your firewall allows outbound NTP traffic (UDP port 123). Then try again.
The Control Panel gives you direct control over the time settings. Windows tests the new server and updates the system time as soon as you click Update now. No restart is needed for this method. To go back, repeat the steps and pick time.windows.com from the list.


Add or Change Time Servers Using the Registry Editor (Advanced)
You can add servers to the list that the Control Panel shows, and you can set the server the Windows Time service actually uses. Back up first, because a wrong value in the registry can cause problems. In the Registry Editor, click File Export and save a copy of the keys you are about to change. Double-clicking that file later restores them. This method works on both Home and Pro.
- Open the Registry Editor by typing
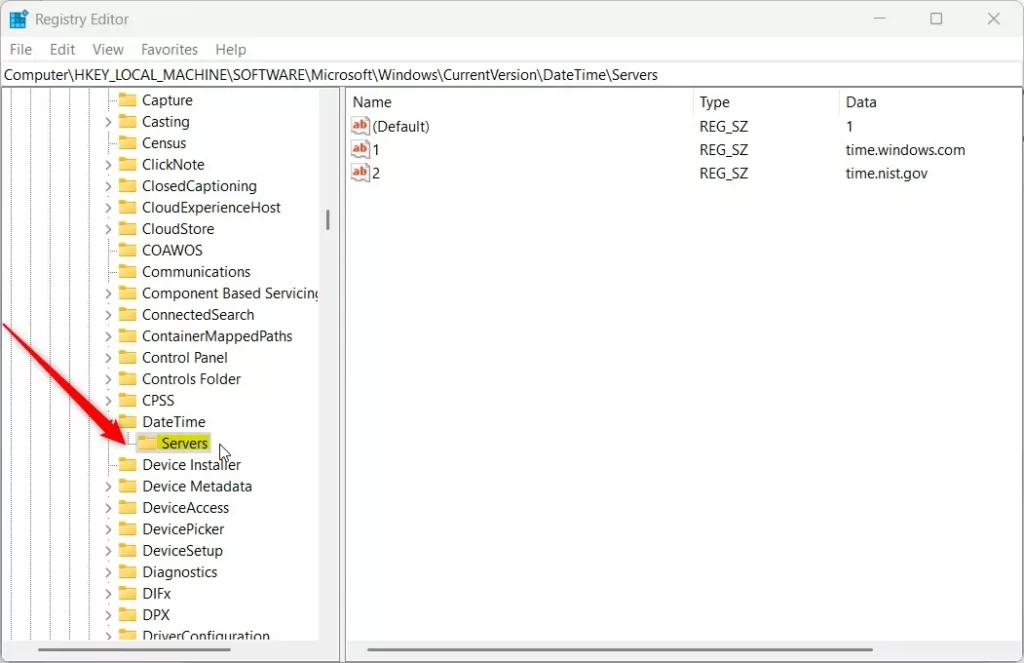
regeditin the Start menu search and pressing Enter. ⚠️ This step requires admin privileges. Click Yes if the User Account Control prompt appears. - Navigate to this folder using the tree on the left, or paste the path into the address bar at the top of the window:
HKEY_LOCAL_MACHINE\SOFTWARE\Microsoft\Windows\CurrentVersion\DateTime\Servers - If the Servers folder doesn't exist, right-click on DateTime, select New Key, and name it Servers. The new key appears under DateTime.
- Click the Servers key. In the right pane, you will see servers listed as numbers (0, 1, 2, etc.). Each number represents a time server address, and these are the entries that fill the list on the Internet Time tab.
- To add a new server, right-click in the right pane. Choose New String Value. Name it the next number, like 3. Then double-click it and enter the server address, such as
time.google.com. Click OK. - Next, go to:
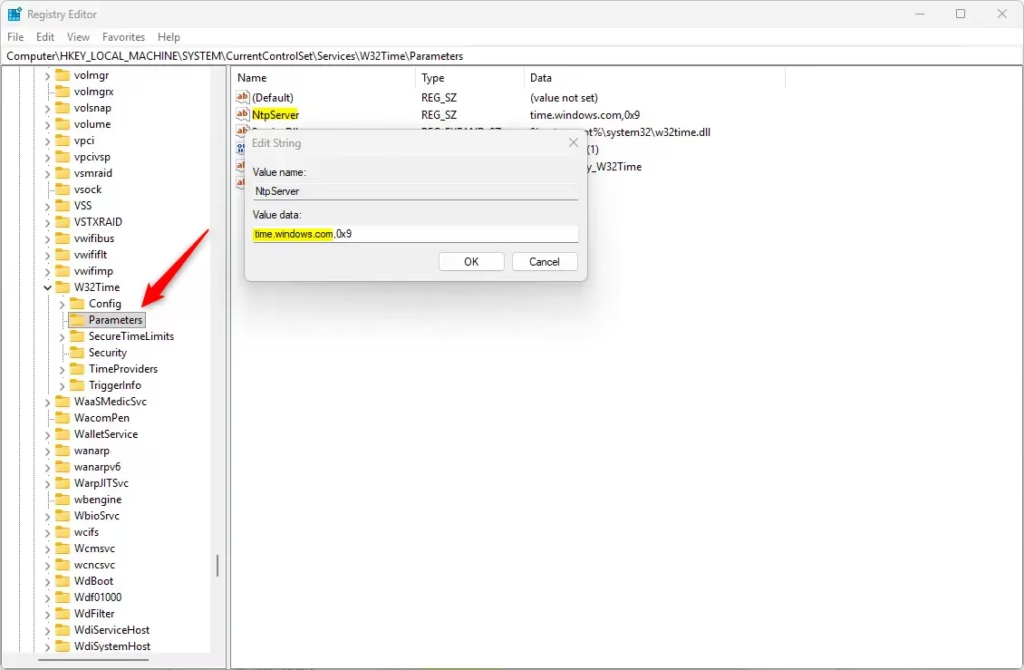
HKEY_LOCAL_MACHINE\SYSTEM\CurrentControlSet\Services\w32time\Parameters - Double-click the NtpServer entry and replace the value with the server you want to use. Write down the old value first so you can restore it. Keep the same format as the existing value, including any suffix after the comma. For example, type:
time.google.com,0x9 - Click OK, then save and close the Registry Editor. Registry changes are saved as soon as you click OK.
- Restart your computer to apply the changes. ⚠️ A restart requires admin privileges. The Windows Time service reads these values when it starts.
Editing the registry allows custom time server setups and lets you manage several servers at once. After the restart, your computer uses the servers you added. To check, open the Internet Time tab from the Control Panel method and click Update now. To undo the change, put the original NtpServer value back, or double-click the .reg backup you exported, then restart.
Summary
You can change the time server in Windows 11 using three methods, depending on what you prefer. Use the Settings app to check and force a sync, the Control Panel for the traditional and most reliable way to pick a server, or the Registry Editor for advanced control. The default server is time.windows.com, but you can replace it with options like time.nist.gov or pool.ntp.org.
- You can change the Internet Time Server in Windows 11 using the Settings app, Control Panel, or Registry Editor.
- The default server is
time.windows.com. Other reliable options includetime.nist.govandpool.ntp.org. - Pick a reliable time server to keep your clock accurate.
- After changing the server, restart your PC to make sure the change takes effect. This is required for the Registry Editor method, and it is a good habit for the others.
- Regular syncing helps keep your computer's time correct for apps and services.
- If you want to learn more about keeping your Windows 11 PC running smoothly, check out Geek Rewind for helpful guides and tips!
Was this guide helpful?

About the Author
Richard
Tech Writer, IT Professional
Richard is a writer at Geek Rewind who turns complex IT tasks into clear, step-by-step guides. He draws on years of hands-on experience in system administration and enterprise IT operations, focusing on Windows, Linux and WordPress: the problems people actually run into, and the fixes that work. His server and WordPress guides come from systems he runs himself. Richard builds and maintains the platform behind Geek Rewind, from its Ubuntu servers and Nginx configuration to its custom WordPress plugins. Many new tutorials start with readers' questions, and he's always glad to answer them in the comments.


No comments yet — be the first to share your thoughts!