How to Change the Time on Your Windows 11 PC

- 4 ways to do it
- Needs administrator rights
The system clock in Windows 11 shows the current time and date in the bottom-right corner of your screen. An accurate clock matters for more than convenience. If the time is far off, web browsers throw security certificate errors, sign-ins to some services fail, and scheduled tasks run at the wrong moment.
Windows can sync the clock automatically with an internet time server. If the time is wrong because the clock drifted or the time zone is off, you can also set the hours, minutes, and time zone by hand. This tutorial covers four ways to do that: Settings, Control Panel, Command Prompt, and PowerShell.
Open Settings, press Win+I, go to Time & language Date & time, turn off Set time automatically, click Change next to “Set the date and time manually,” pick the correct date and time from the dropdowns, and click Change. The taskbar clock updates immediately without restart.
Option 1Change Time Using Windows Settings
You need an administrator account, or you must be able to enter an administrator password when prompted.
- Press
Win + Ion your keyboard to open Settings . - Click Time & language on the left side.
- Click Date & time on the right side. You should see the current time at the top, followed by a list of toggles.
- Turn off Set time automatically if it’s turned on. Until you do, the manual option stays greyed out.
- Click the Change button next to “Set the date and time manually.” A small Change date and time window opens.
- Pick the correct date and time from the dropdown lists in that window.
- Click Change to save your new time. The clock in the taskbar should update right away.
- Close the Settings window.
If the time is right but the hour is off, the time zone is probably the problem. On the same page, use the Time zone dropdown to pick the right one. If the dropdown is greyed out, turn off Set time zone automatically first.
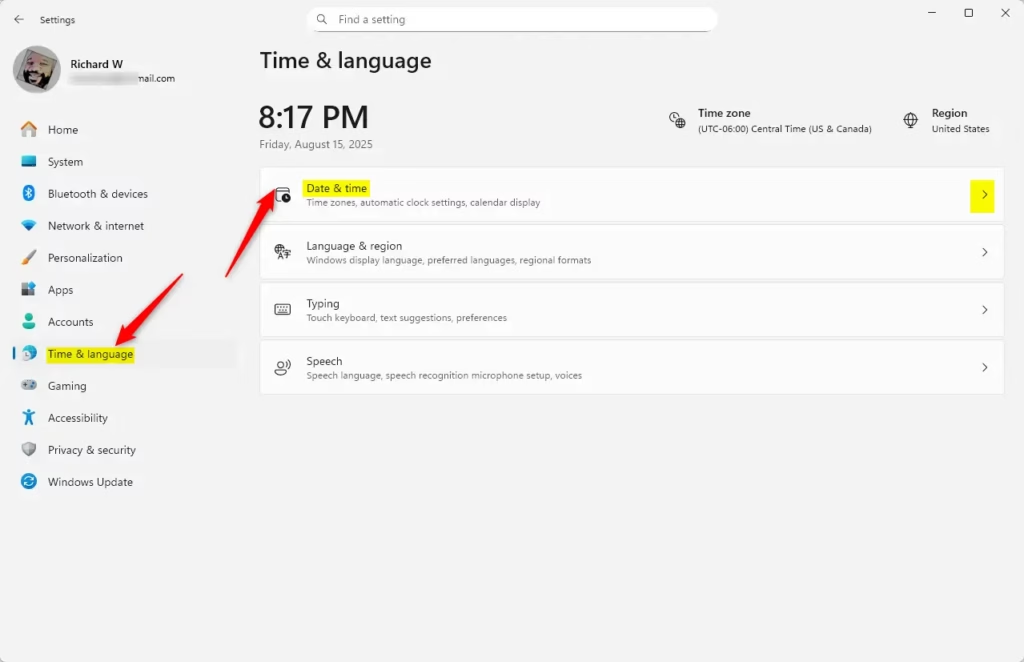
While Set time automatically is on, Windows keeps checking an internet time server and will overwrite any time you enter by hand. Once the toggle is off, the Change button becomes available and you can pick the exact date and time yourself.
No restart is needed. The new time takes effect as soon as you save it.
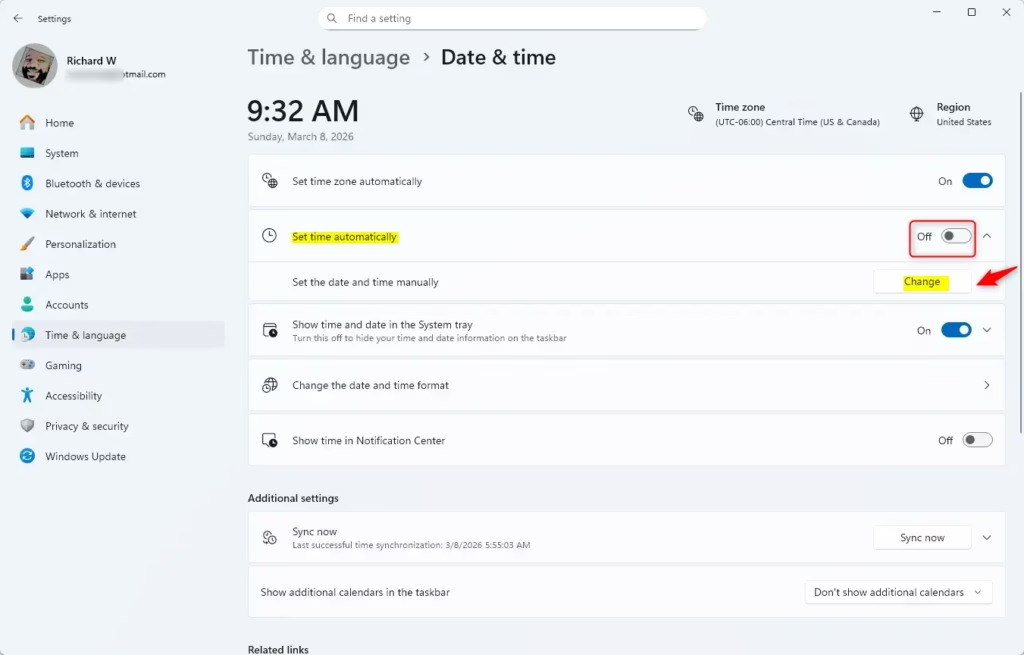
Manual time works well for offline PCs, test machines, or a PC whose clock you need to set to a specific value. For a normal home or office PC, though, automatic time is usually the better choice, because a manual clock slowly drifts and can end up minutes off again.
To undo your change, go back to Settings Time & language Date & time and turn Set time automatically back on. Then click Sync now under Additional settings to pull the correct time from the internet right away. You need a working internet connection for this.
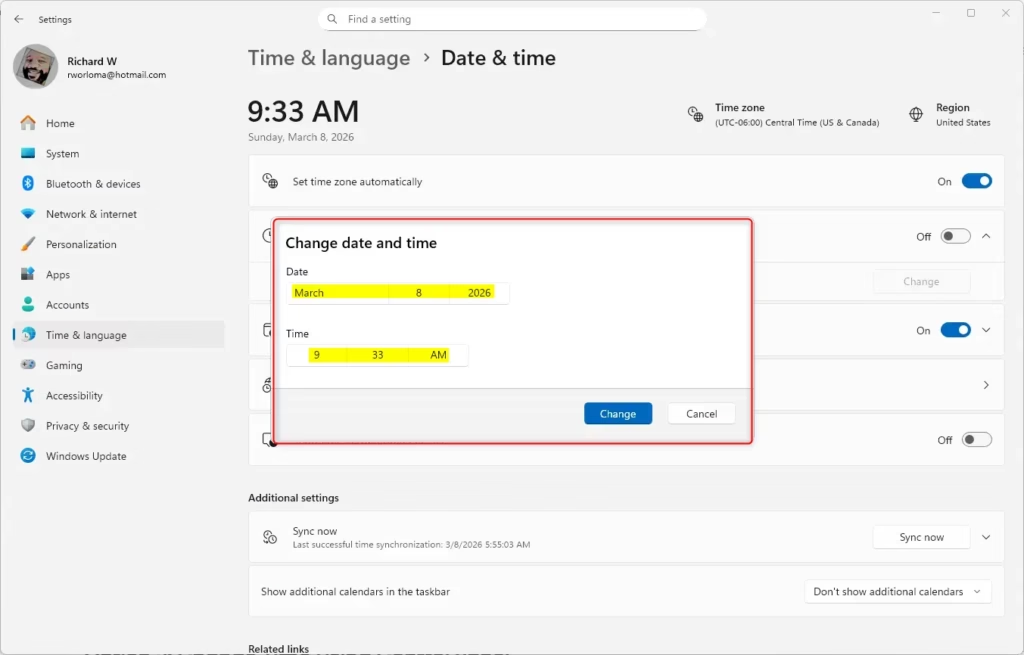
If you can’t change the time in Settings, check these common causes:
- The Change button is greyed out. Set time automatically is still on. Turn it off.
- Windows asks for an administrator password. You’re signed in with a standard account. Enter an administrator’s credentials, or sign in with an admin account.
- The clock keeps going back to the wrong time. Automatic time is probably still active, or a work or school policy is controlling the clock. On a managed PC, ask your IT department.
Option 2Change Time Using Control Panel
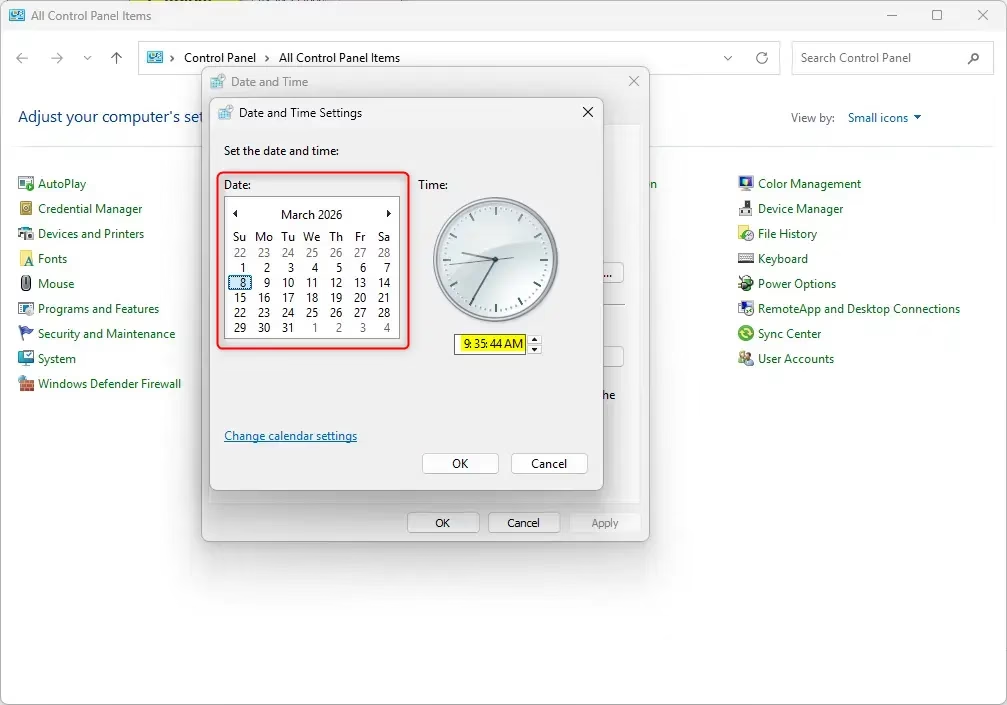
The classic Control Panel still has the older Date and Time window. Some people prefer it because it shows a calendar and an analog clock together.
- Search for Control Panel in the Start menu and open it.
- In the top-right corner, set View by to Large icons or Small icons. Otherwise the Date and Time item may be hidden inside a category.
- Click Date and Time. A window with several tabs opens.
- On the Date and Time tab, click the Change date and time… button. If you see a User Account Control prompt, click Yes or enter an administrator password.
- Select the correct date from the calendar and set the time in the clock box below it.
- Click OK to save.
- Click OK again to close the Date and Time window.
The same window has a Change time zone… button if your time zone is wrong. Your change takes effect immediately, and no restart is needed. Note that if automatic time is still turned on in Settings, Windows may sync the clock again later and replace the time you set.
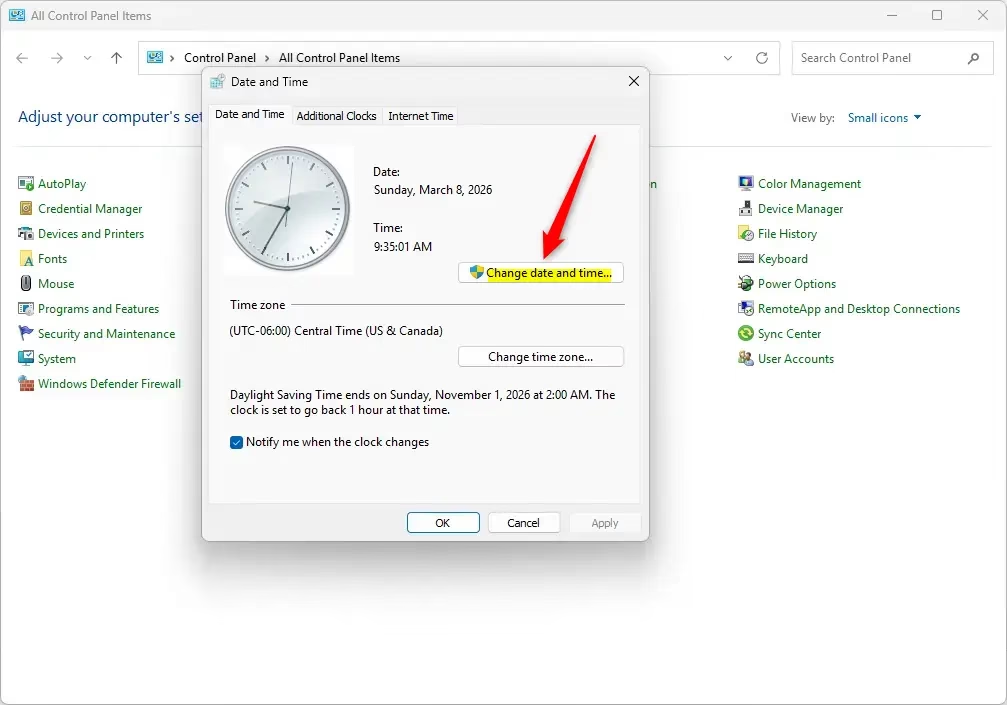
This is the same clock that Settings controls, just through the older interface. It’s handy when Settings won’t open or when you’re following an older guide or working on a PC where the classic tools are familiar. Whichever tool you use, the result is the same.
Option 3Change Time Using Command Prompt
Command Prompt is the fastest method if you’re comfortable typing commands, and it’s useful for remote sessions or scripts. It only works in a window running with administrator rights. In a normal window, the command fails with an error about a required privilege.
This command-line approach requires precise input. Follow these steps carefully:
- Right-click the Start button and select Terminal (Admin) or Command Prompt (Admin). Click Yes if User Account Control asks for permission.
- If the terminal opens on a PowerShell tab, switch to the Command Prompt tab using the dropdown arrow at the top of the window. Then type this command and press Enter:
time HH:MM - Replace
HHwith the hour andMMwith the minutes. Use 24-hour format (for example, 14:30 for 2:30 PM).
Examples:
time 10:34– sets time to 10:34 AMtime 22:15– sets time to 10:15 PM
Check the clock in the taskbar to confirm the new time, then close the terminal window.
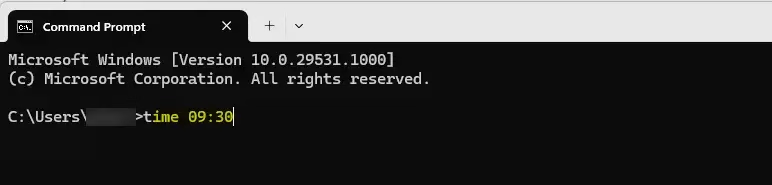
If you see an “access denied” or privilege error, the window isn’t running as administrator. Close it and reopen it from the Start button’s right-click menu. As with the other methods, Set time automatically in Settings can sync the clock again later and undo your manual time.
Option 4Change Time Using PowerShell
PowerShell can also set the clock, and it’s a good fit if you already use it for scripting. Like Command Prompt, it needs an administrator window.
PowerShell handles time configuration through script commands:
- Right-click the Start button and select Terminal (Admin). Click Yes if User Account Control asks for permission.
- From the dropdown menu at the top of the terminal window, select Windows PowerShell. A new tab opens. On many systems it may already be the default tab.
- Type this command and press Enter:
Set-Date -Date "HH:MM" - Replace
HHandMMwith the hour and minutes you want. You can add AM or PM if you like.
Examples:
Set-Date -Date "10:34 AM"Set-Date -Date "3:45 PM"
Look at the taskbar clock to make sure it changed, then close the terminal window. To go back to the correct internet time later, turn Set time automatically back on in Settings Time & language Date & time and click Sync now.
Things to Remember
Changing system clocks requires administrator privileges and careful input to keep your background tasks running properly. An incorrect clock can break file timestamps and scheduled background apps on your computer. Always double-check your final settings after you finish updating the time.- You need admin rights to change the time.
- Be careful when changing the time. Wrong time settings can cause problems with your files and tasks that run on a schedule.
- After changing the time, double-check it to make sure it's correct.
- If you want to learn more about what time is, check out this Wikipedia page.
Summary
Several methods exist for altering time on a Windows 11 PC, including Settings, Control Panel, Command Prompt, and PowerShell. Administrator privileges remain mandatory regardless of the chosen method, and verifying the final time ensures accuracy.
Have a question about this guide?
Answered by AI from this guide. Good questions may be added to this page — please don't include personal details.
Did this guide fix your problem?

About the Author
Richard
Tech Writer, IT Professional
Richard is a writer at Geek Rewind who turns complex IT tasks into clear, step-by-step guides. He draws on years of hands-on experience in system administration and enterprise IT operations, focusing on Windows, Linux and WordPress: the problems people actually run into, and the fixes that work. His server and WordPress guides come from systems he runs himself. Richard builds and maintains the platform behind Geek Rewind, from its Ubuntu servers and Nginx configuration to its custom WordPress plugins. Many new tutorials start with readers' questions, and he's always glad to answer them in the comments.
No comments yet — be the first to share your thoughts!