How to Add the Battery Icon to the Taskbar in Windows 11

- 20 steps
- Needs administrator rights
- Includes a restart or sign-out
The battery icon in Windows 11 sits in the system tray, the group of small icons at the right end of the taskbar. Most laptops and tablets show it automatically, next to the Wi-Fi and volume icons.
If you can’t see it, work through the checks below. They cover hidden icons, the Battery percentage setting, and a disabled battery device in Device Manager. The first two checks take under a minute.
Open Settings Personalization Taskbar, expand System tray icons, and turn on the battery toggle if one is listed. On most laptops the battery icon is already in the tray next to Wi-Fi and volume, so first select Show hidden icons, the small up arrow, and drag the battery icon back onto the taskbar. Desktop PCs have no battery, so no icon appears there.
Where the battery icon appears in 🪟 Windows 11
Windows 11 groups the Wi-Fi (or network), volume and battery icons into one block at the right of the taskbar. Clicking any of them opens Quick Settings, the panel with the toggles for Wi-Fi, Bluetooth, Battery saver and similar options. Quick Settings also shows the battery charge level.
The three icons share one button, so the battery icon cannot be added like an app shortcut. Windows shows it when it detects a battery. Adding it back usually means finding it in a hidden spot, turning on a setting, or fixing the battery device. Windows reads the charge level from that device.
Desktop PCs have no battery, so Windows 11 shows no battery icon on them. If you use a desktop tower, this is expected behavior, not a fault. Some all-in-one PCs and mini PCs behave the same way.
Add the battery icon to the taskbar
Work through the checks in this section in order. Stop as soon as the battery icon appears.
- Look at the right end of the taskbar. Find the block of icons near the clock. On a laptop it normally holds a Wi-Fi icon, a speaker icon and a battery icon. If you see all three, the icon is already there.
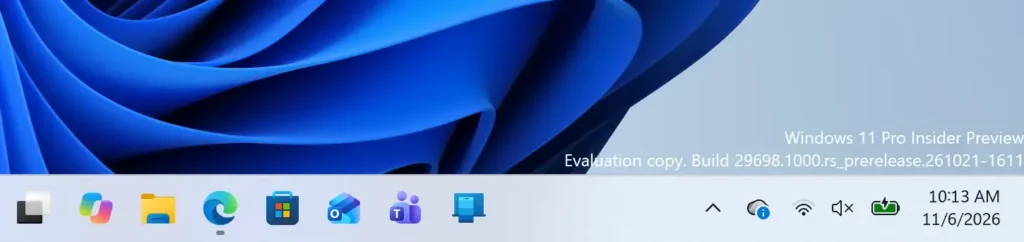
Taskbar - Select Show hidden icons. This is the small up arrow to the left of the system tray icons. A small flyout opens with icons that Windows keeps out of sight to save space.
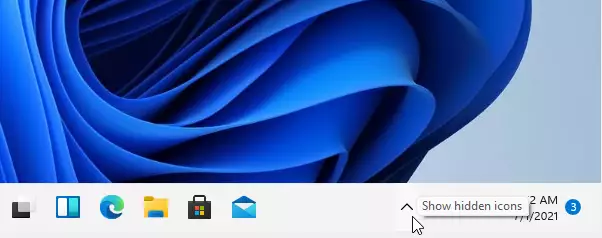
windows 11 show hidden icons - Drag the battery icon onto the taskbar. If a battery icon is in the flyout, drag it out and drop it next to the clock. It then stays visible. If the flyout has no battery icon, go to the next step.
- Right-click an empty part of the taskbar. A small menu opens with one entry, Taskbar settings.

Settings > Personalization > Taskbar - Select Taskbar settings. Settings opens at Settings Personalization Taskbar. You should see sections such as Taskbar items, System tray icons and Taskbar behaviors.
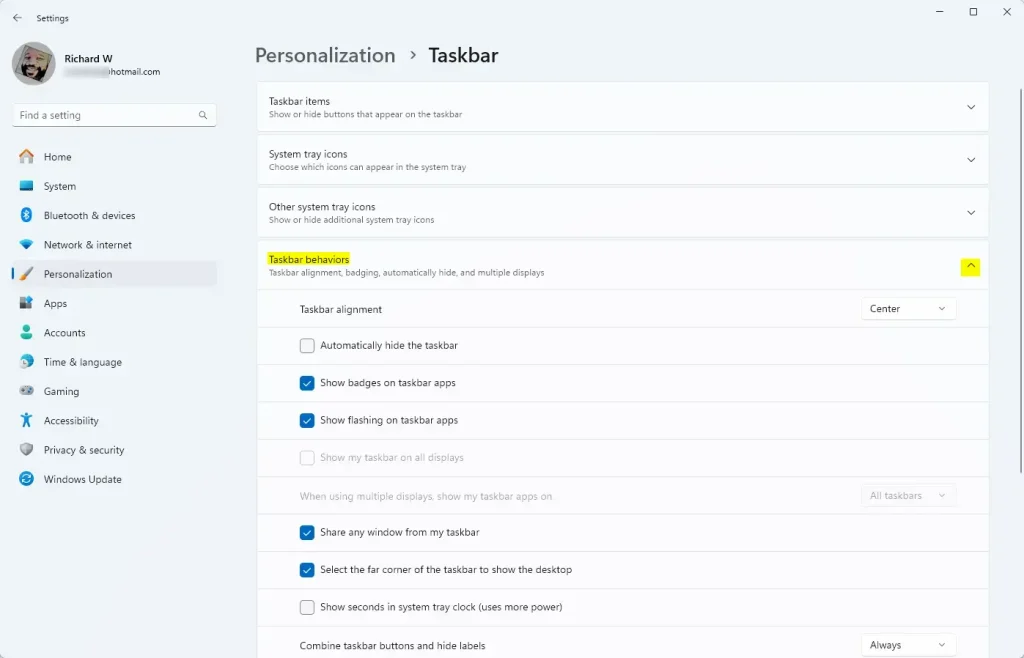
Expand Taskbar behaviors in Windows 11 Personalization settings. - Expand System tray icons. Check the toggles in that section and in Other system tray icons. Menu names vary a little between Windows 11 versions, and I cannot confirm that every build lists a battery toggle here. If yours lists one, turn it on.
- Open Settings System Power & battery. This page shows your current charge level, the battery usage history and the power mode options. If the page shows no battery information at all, skip ahead to the section on a missing battery below.
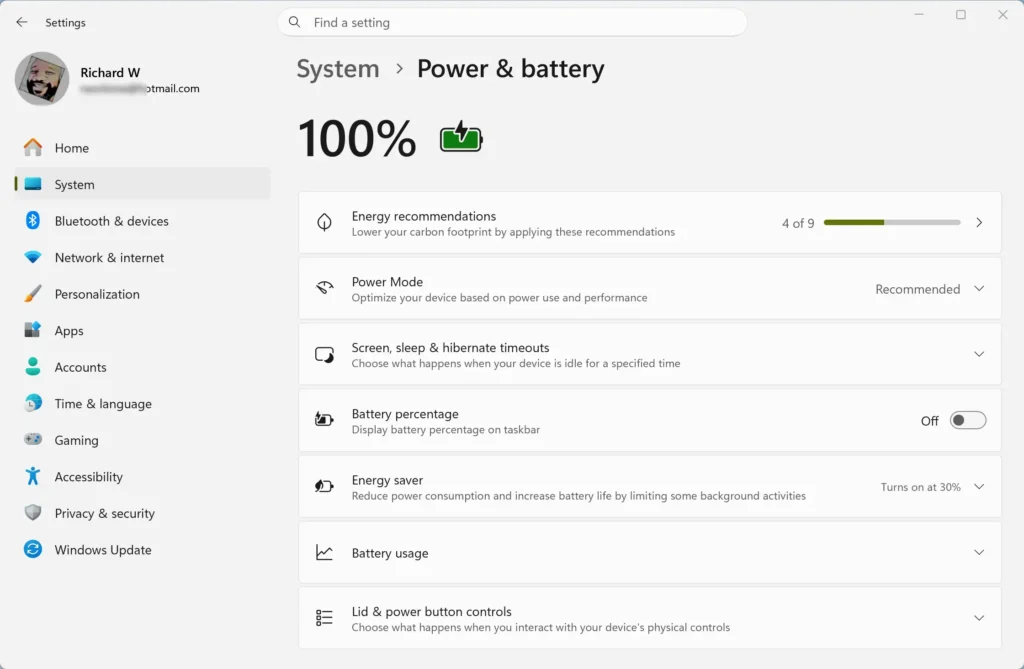
- Turn on Battery percentage. Find this toggle in the Battery section. The percentage then appears next to the battery icon in the system tray. Recent Windows 11 versions have this option. If you do not see it, install the latest updates through Settings Windows Update.
- Press Ctrl+Shift+Esc. This opens Task Manager, the tool that lists running programs. Use it only if the icon is still missing, because the taskbar itself may be stuck.
- Right-click Windows Explorer and choose Restart. Find Windows Explorer on the Processes tab. The taskbar disappears for a second or two and then reloads. The battery icon should be back with it.
If the battery icon is on the taskbar now, hover over it. A tooltip shows the charge level and whether the PC is plugged in. Click it to open Quick Settings and see the same information with the Battery saver option.
If the battery icon is missing
When none of the steps above bring the icon back, Windows may not detect the battery. The cause is often a disabled battery device in Device Manager, the tool that lists the hardware Windows knows about. Re-enabling it usually restores the icon.
This section needs administrator privileges. Sign in with an administrator account, or enter an administrator password when asked. If you do not have administrator rights, ask the person who manages the PC.
Re-enable the battery device in Device Manager
Check whether Windows sees the battery. If the battery device is disabled, turn it back on.
- Right-click the Start button. A menu opens with system tools listed.
- Select Device Manager. A window opens with a list of hardware categories. Approve the User Account Control prompt if one appears.
- Expand Batteries. Select the arrow next to the category name. A working laptop usually lists an AC adapter entry and at least one battery entry underneath. The category name is Batteries.
- Right-click the battery entry. The battery entry is typically named like Microsoft ACPI-Compliant Control Method Battery. The exact name can differ by manufacturer.
- Select Enable device if you see it. That option appears only when the device is disabled. If you see Disable device instead, the device is already on, so go to the next step.
- Select Uninstall device. This removes the battery entry from Windows, and the next step brings it back. It is a low-risk action because Windows reinstalls the driver on its own, but save your work first because the next step restarts the PC.
- Restart the PC. Windows detects the battery during startup and reinstalls the driver. Check the system tray when you sign in.
If Batteries does not appear in Device Manager at all, select Action in the menu bar and choose Scan for hardware changes. If the category still does not appear, Windows is not detecting a battery. That points to a hardware issue, a battery that has been removed, or a firmware problem. Check the PC maker’s support page for a BIOS (the basic startup software on the motherboard) or firmware update.
Run the Power troubleshooter
Windows 11 includes a built-in troubleshooter for power problems. It checks the power settings and can reset the ones that cause trouble.
- Open Settings. Press Win+I.
- Go to System Troubleshoot Other troubleshooters. A list of troubleshooters appears.
- Select Run next to Power. The troubleshooter scans and reports anything it fixes. Follow any prompt it shows, then check the system tray again.
Check Windows Update and the PC maker’s drivers
An outdated chipset driver (the software that controls the core parts of the motherboard) or power management driver can stop Windows from reading the battery. Open Settings Windows Update and select Check for updates. Install anything offered, including optional driver updates under Advanced options if they list battery or power drivers. Then restart the PC.
Work and school PCs
Check the icon after a restart or update
The battery icon should survive restarts. If it disappears again after a feature update or a driver change, repeat the Device Manager check first. A disabled battery device is the most common reason the icon vanishes after an update. The Battery percentage toggle is worth rechecking too, since it is a separate setting from the icon itself.
How to undo these changes
Each change here can be reversed:
- To hide the percentage again, go to Settings System Power & battery and turn off Battery percentage.
- If you dragged the icon out of the hidden icons flyout and want it back there, drag it onto the Show hidden icons arrow.
- If you disabled the battery device by mistake, return to Device Manager, right-click it under Batteries, and choose Enable device.
Tidy the rest of the system tray
The Taskbar settings page, at Settings Personalization Taskbar, controls the other icons beside the battery. If you use a pen or a touchscreen, show or hide the Pen menu icon on the taskbar. If you pair headphones or a mouse, add or remove the Bluetooth notification icon so the device status is in view next to the battery.
Two more icons worth a look are the notification bell icon and the Emoji panel icon. If an icon you did not expect stays lit in the tray, read why the Location service icon stays active in the taskbar. For a different kind of taskbar change, see how to add or remove the Mouse Keys icon.
What to do next
You should now see the battery icon beside the Wi-Fi and volume icons, with the charge level when you hover over it or open Quick Settings. If the icon is still missing and Device Manager shows no battery under Batteries, contact the PC maker, because the problem is likely in the hardware or firmware. A related change to try next is turning on Battery percentage, then adjusting your Battery saver settings in Settings System Power & battery.
Frequently asked questions
How to add multiple monitors to your 🪟 Windows 11 PC site:Microsoft.com?
Plug in the second monitor, then press Win+P and choose Extend. For more control, open Settings, go to System Display, and use the Multiple displays menu to pick Extend these displays. Click Identify to see which number belongs to which screen.
How to add multiple monitors to your 🪟 Windows 11 laptop?
Connect the external monitor with an HDMI, USB-C, or dock cable. Press Win+P and choose Extend to use both screens side by side. Choose Second screen only if you want the laptop display switched off. Windows detects most monitors without a restart.
How to pin apps to 🪟 Windows 11 taskbar efficiently?
Open Start, search for the app, right-click it, and choose Pin to taskbar. For an app that is already open, right-click its taskbar icon and pick Pin to taskbar. Drag pinned icons left or right to reorder them. Press Win+a number to open a pinned app by its position.
Why is my battery icon not showing on taskbar?
The battery icon only appears on devices with a battery, so desktop PCs never show it. On a laptop, click the up arrow in the system tray to check for hidden icons. Then open Settings Personalization Taskbar Other system tray icons and turn on Power. Restart the PC if it still does not appear.
How to show battery percentage 🪟 Windows 11?
Open Settings, go to System Power & battery, and turn on the battery percentage option. The number then appears next to the battery icon in the taskbar. If you cannot find the option, update Windows through Settings Windows Update and check again.
Still have a question?
Answered by AI from this guide. Good questions may be added to this page — please don't include personal details.
Did this guide fix your problem?

About the Author
Richard
Tech Writer, IT Professional
Richard is a writer at Geek Rewind who turns complex IT tasks into clear, step-by-step guides. He draws on years of hands-on experience in system administration and enterprise IT operations, focusing on Windows, Linux and WordPress: the problems people actually run into, and the fixes that work. His server and WordPress guides come from systems he runs himself. Richard builds and maintains the platform behind Geek Rewind, from its Ubuntu servers and Nginx configuration to its custom WordPress plugins. Many new tutorials start with readers' questions, and he's always glad to answer them in the comments.
No comments yet — be the first to share your thoughts!