How to Add or Remove Notification Bell Icon on Your Windows 11 Taskbar


The notification bell icon sits in the bottom-right corner of your Windows 11 taskbar, next to the clock. It shows when you have unread alerts and system messages.
Windows 11 version 22H2 and later includes this dedicated icon so you can see your notification state at a glance. A full bell means unread items are waiting for you. An empty bell means you are caught up. If you don’t see the bell or its setting, check Windows Update first. The feature arrived through updates, so a build that is behind may not have it.
You can turn the bell on or off whenever you want to clean up the taskbar. There are three ways to do it: the Settings app , a command, or the Registry Editor. The Settings app is the safest, so start there.
Open Settings System Notifications, expand the menu, and check or uncheck Show notification bell icon. The bell appears or disappears from your taskbar immediately without restart.
Option 1Use Settings (Easiest Method)
First, open the notification settings page:
- Press Win+I to open Settings . The Settings window appears.
- Click System in the left pane.
- Click Notifications in the right pane. The notification options for your PC open.
- Or use this link to go straight there: Open Notifications Settings
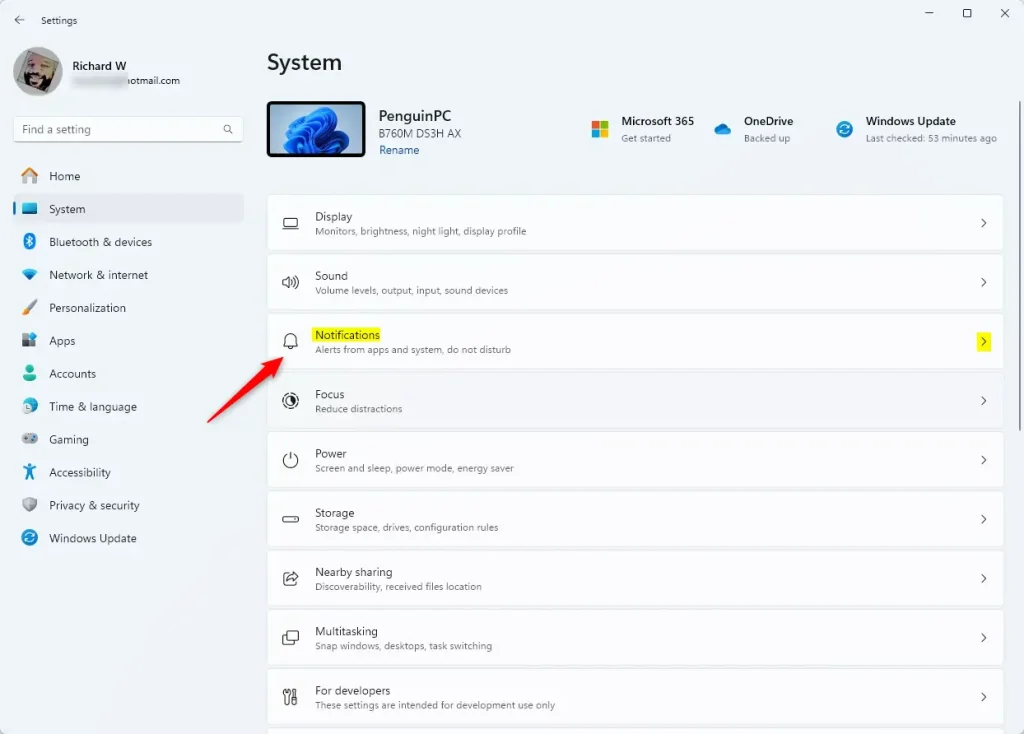
Settings is the easiest way to show or hide the bell, and it works on both Home and Pro. You open the notifications page, expand the options, and change one checkbox. The taskbar updates right away, with no restart.
- Click the arrow next to Notifications to expand all the options. A list of extra settings appears.
- Select the checkbox for Show notification bell icon to add the bell. The bell appears next to the clock.
- Clear the checkbox to remove the bell. The bell disappears from the taskbar .
If you can’t find Show notification bell icon, your build probably doesn’t include it yet. Install the latest updates and check again.
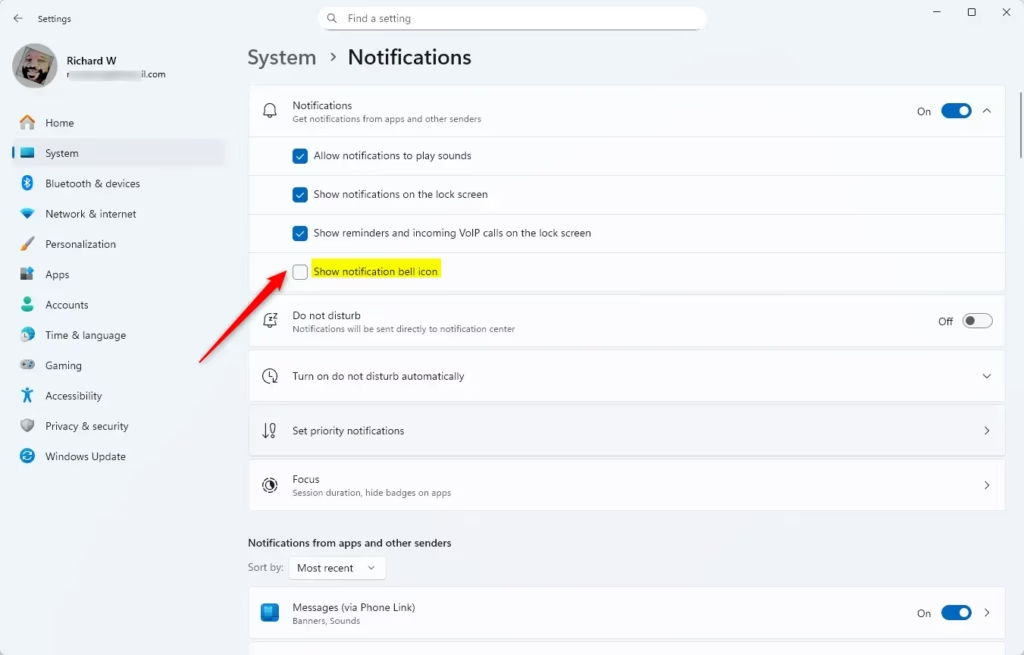
To add the bell, select the Show notification bell icon checkbox. To remove it, clear the same checkbox. Either way, the change shows on the taskbar immediately, and you don't need to click a separate Save or Apply button. Once you've seen the result, you can close the Settings app.
To undo the change, come back to the same page and flip the checkbox the other way.
Option 2Use Registry Commands (Advanced Users)
This skips the Settings menus and writes the registry value directly. Run it with admin rights. It's also handy if you manage several PCs and want to repeat the same change.
To add the notification bell:
reg add "HKEY_CURRENT_USER\Software\Microsoft\Windows\CurrentVersion\Explorer\Advanced" /v ShowNotificationIcon /t REG_DWORD /d 1 /fTo remove the notification bell:
reg add "HKEY_CURRENT_USER\Software\Microsoft\Windows\CurrentVersion\Explorer\Advanced" /v ShowNotificationIcon /t REG_DWORD /d 0 /f- Copy the command for the change you want.
- Open Command Prompt or PowerShell as administrator. These are the built-in Windows command-line tools. Right-click the Start button, or search for the tool, and choose the run-as-administrator option.
- Paste the command into the window and press Enter.
If the command succeeds, the tool reports that the operation completed. To undo it, run the other command.
Option 3Edit the Registry Manually (For Advanced Users)
You open the Registry Editor, go to the right key, and change one value. Be careful here. A wrong edit in the registry can cause problems, so change only the value described below. For safety, you can first right-click the key and choose Export to save a backup.
- Press Windows key + R. The Run box opens.
- Type
regeditand press Enter. If User Account Control asks for permission, click Yes. Registry Editor opens. - Find this location:
HKEY_CURRENT_USER\Software\Microsoft\Windows\CurrentVersion\Explorer\Advanced. You can expand the folders in the left pane, or paste the path into the address bar at the top of the window. - In the right pane, double-click ShowNotificationIcon. A small edit window opens.
- Change the value to:
- 1 to show the bell
- 0 to hide the bell
- Click OK. The new value shows in the right pane.
- Close Registry Editor.
To undo the change, open the same value and set it back to its old number.
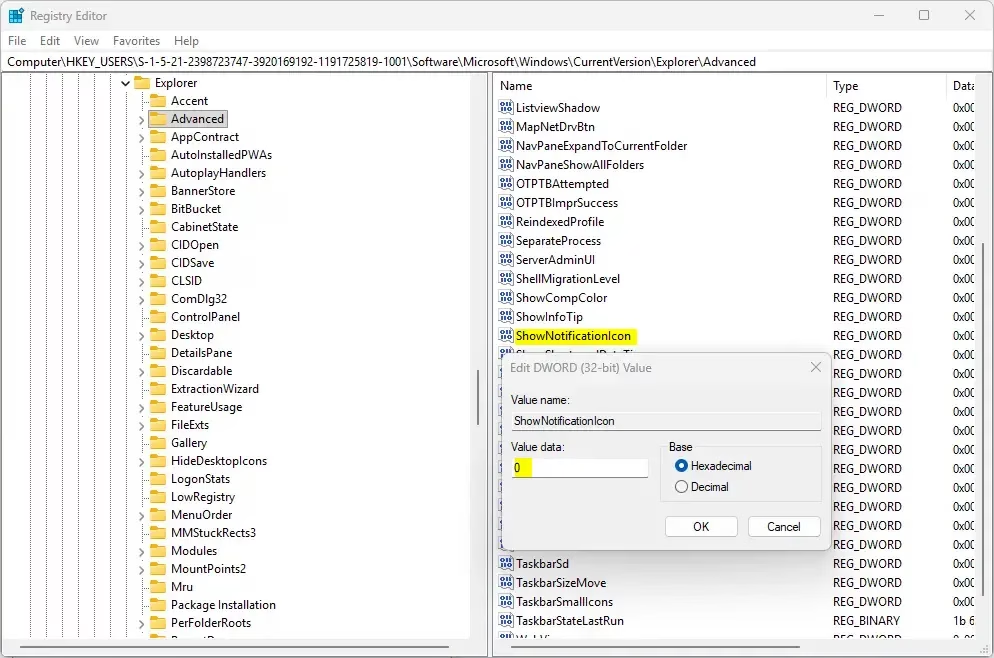
Your change takes effect right away. If the bell on the taskbar doesn't match what you set, sign out and back in, or restart your PC, and check again.
Summary
You have three ways to control the Windows 11 notification bell, depending on how comfortable you are with your PC. Use the Settings app for the quickest fix, run a command for a direct change, or edit the registry by hand.
- Settings Method: The easiest and fastest way. Just toggle one switch.
- Registry Commands: For advanced users. Requires admin rights. Fast and direct.
- Registry Editor: Manual control. Requires caution to avoid errors.
- Instant Results: All methods take effect immediately.
- Your Choice: Show or hide the bell based on what you prefer.
Choose the method that feels most comfortable for you. Your taskbar is now set up the way you want it, and you can switch the bell back any time.
Have a question about this guide?
Answered by AI from this guide. Good questions may be added to this page — please don't include personal details.
Did this guide fix your problem?

About the Author
Richard
Tech Writer, IT Professional
Richard is a writer at Geek Rewind who turns complex IT tasks into clear, step-by-step guides. He draws on years of hands-on experience in system administration and enterprise IT operations, focusing on Windows, Linux and WordPress: the problems people actually run into, and the fixes that work. His server and WordPress guides come from systems he runs himself. Richard builds and maintains the platform behind Geek Rewind, from its Ubuntu servers and Nginx configuration to its custom WordPress plugins. Many new tutorials start with readers' questions, and he's always glad to answer them in the comments.
No comments yet — be the first to share your thoughts!