Every Windows 11 Administrative Tool Explained

Administrative tools in Windows 11 are a collection of 44 advanced system utilities that let you check computer health, fix hardware problems, and manage user accounts from one central place on your PC. These built-in programs sit inside the Control Panel and give you deep control over how your operating system runs.
These tools often intimidate everyday computer users because a wrong click can change important system settings. However, you can open and use them safely without an IT background to troubleshoot crashes, speed up slow startup times, and keep your computer running smoothly.
Every Windows 11 administrative tool explained as a collection of built-in system utilities is found by opening the Control Panel , changing the view to large icons, and clicking Windows Tools. These advanced features let you monitor performance, manage hardware devices, and troubleshoot system problems safely.
What Are Windows Administrative Tools and Where to Find Them?
Windows administrative tools are built-in system utilities designed to help you monitor performance, manage settings, and troubleshoot hardware problems on your PC. You can find these tools by opening the Control Panel , clicking on Windows Tools, or typing the name of the specific tool directly into your Windows search bar .
The Windows Tools folder in Windows 11 brings together all administrative utilities in one central location, replacing the older Start Menu folder from past versions of the operating system. You can open the Windows Tools folder in just a few clicks by searching for it in the taskbar search box .
- Click the Start button on your taskbar .
- Type the word Control Panel into the search box and press the Enter key on your keyboard.

Control Panel - In the top right corner of the Control Panel window, change the “View by” setting from “Category” to Large icons or Small icons.
- Look through the list of icons and click on the one labeled Windows Tools.
A new window opens, showing every administrative tool available on your Windows 11 computer. Let us look at each tool individually to see how it can help you manage your PC.
Component Services
Component Services is an advanced administrative tool designed for software developers and system administrators. It manages COM+ components (the background code different software programs use to communicate with each other).
What it does
The Defragment and Optimize Drives tool in Windows 11 organizes the data on your storage drives to keep your computer running fast. For traditional hard disk drives, defragmentation reorganizes split files so the drive can read them faster, while optimization for solid-state drives sends trim commands to refresh storage blocks and maintain peak performance.
How to use it
Resource Monitor is a detailed diagnostic tool that shows you exactly how much processor power, memory, disk speed, and network bandwidth your active apps are using. You can open Resource Monitor from the Windows search bar, check the CPU, Memory, Disk, and Network tabs, and force unresponsive programs to close by ending their active processes.
Computer Management
Computer Management is one of the most useful tools in your Windows 11 toolkit. It acts as a master control panel that brings several smaller administrative tools together into one single window.
What it does
Computer Management lets you control almost every aspect of your computer hardware and operating system. From this single window, you can check system performance, manage user accounts, view system logs, configure hard drives, and see which hardware devices are working properly.
How to use it
- Open the Windows search bar, type Computer Management, and click the search result.
- Look at the left-hand side of the window to see a menu divided into three main sections: System Tools, Storage, and Services and Applications.
- Click on any item in the left menu to view detailed information and make changes on the right side of the window. For example, clicking on Device Manager under System Tools lets you check for outdated hardware drivers.
Windows will ask you to confirm your choice if you need an administrator account to make a change.
Task Scheduler
Have you ever wished your computer could automatically run a virus scan every Sunday night or empty your Recycle Bin without you having to remember? Task Scheduler makes that possible.
What it does
Task Scheduler acts as an automated digital assistant for your PC. It tells Windows to run specific programs, scripts, or maintenance tasks at exact times, on specific days, or when certain events happen on your computer.
How to use it
- Type Task Scheduler into your Windows search bar and select the app.
- Look at the left panel and click on Task Scheduler Library to see a list of automated tasks already running on your system.
- To create your own schedule, look at the right-hand panel and click on Create Basic Task...
- Follow the step-by-step wizard to name your task, choose when you want it to run, and pick the app or action you want Windows to perform.
Event Viewer
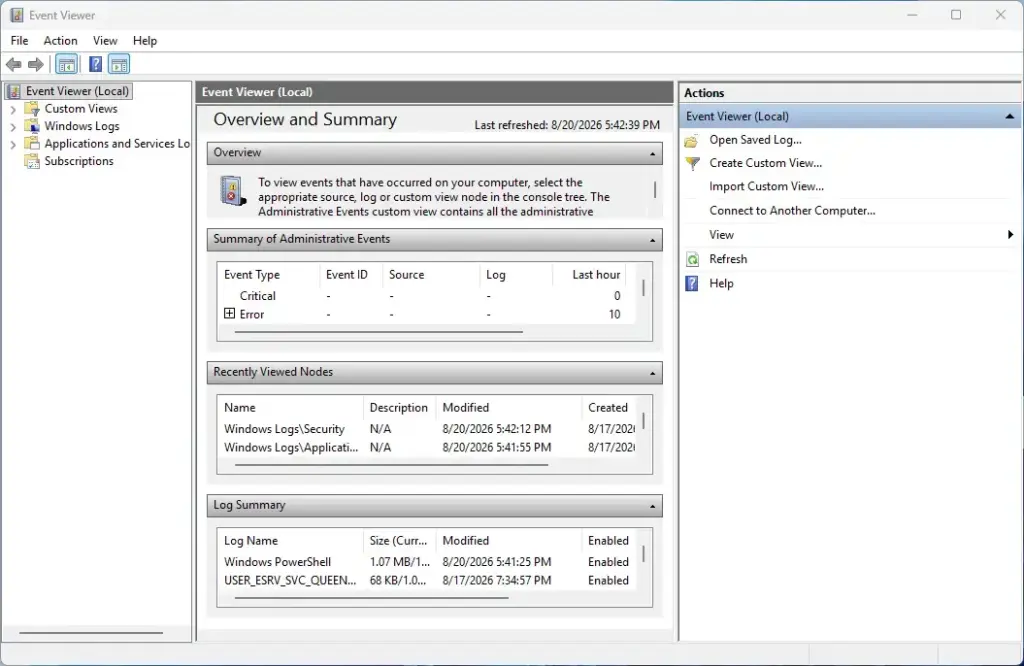
When your computer suddenly restarts on its own or a program crashes without warning, the Windows operating system leaves behind digital footprints known as system logs. Event Viewer is the built-in detective tool that reads those error footprints to help you find out why your computer crashed.
What it does
Event Viewer records a detailed history of everything that happens on your Windows 11 PC. It logs application errors, security warnings, system crashes, and successful software installations with exact timestamps.
How to use it
- Search for Event Viewer in your Windows search bar and open the application.
- In the left-hand column, click the arrow next to Windows Logs to expand the list.
- Click on System to see logs related to hardware and operating system operations, or click on Application to see logs related to installed software programs.
- Look at the middle column for icons marked with red error symbols or yellow warning triangles to diagnose what went wrong when your computer experienced a problem.
Performance Monitor
Is your computer dragging its feet while you try to browse the web or play a game? Performance Monitor helps you find out exactly which hardware component is struggling.
What it does
This tool tracks real-time data about your computer's hardware resource usage. It measures how hard your processor (CPU), memory (RAM), hard drive, and network connection are working.
How to use it
- Type Performance Monitor into the Windows search bar and open the tool.
- Under the Monitoring Tools section on the left, click on Performance Monitor.
- Watch the live line graph on your screen to see real-time fluctuations in your system activity. You can also click the green plus icon at the top of the window to add specific hardware counters, such as processor speed or memory availability.
Defragment and Optimize Drives
Over time, the files stored on your computer's hard drives can become scattered across different storage sectors. This scattering makes your computer work harder and run slower when opening files.
What it does
The "Defragment and Optimize Drives" administrative tool in Windows 11 organizes the data on your storage drives. For traditional hard disk drives, the defragmentation process reorganizes split files so the drive head can read the files faster. For modern solid-state drives, the optimization process sends a trim command to refresh storage blocks and maintain peak performance.
How to use it
- Type Defragment and Optimize Drives into your Windows search bar and open the tool.
- Review the list of drives connected to your computer and check their current status.
- Click on the drive you want to improve, then click the Optimize button.
- You can also click Change settings to turn on scheduled weekly or monthly optimization so your computer stays fast automatically.
Services
Windows runs hundreds of background programs—called services—even when you do not have any open windows on your screen. These background tasks handle things like audio playback, Wi-Fi connectivity, and automatic updates.
What it does
The Services manager lets you view all background processes running on Windows 11. It allows you to start, stop, or change how a service launches when you turn on your computer.
How to use it
- Type Services into your Windows search bar and open the app.
- Scroll through the alphabetical list to find a specific background service, such as Print Spooler or Windows Update.
- Double-click any service to open its properties window.
- Use the "Startup type" drop-down menu to choose whether the service starts automatically when Windows boots up, starts manually when needed, or stays disabled completely.
Only modify service settings if you are sure of what the service does.
System Configuration (MSConfig)
When too many apps try to open the moment you turn on your computer, your PC takes forever to boot up. System Configuration helps you clean up your startup process.
What it does
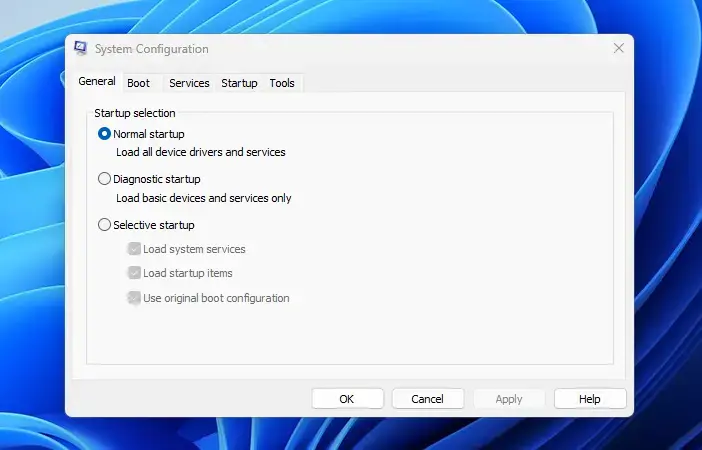
System Configuration—traditionally known as MSConfig—helps you troubleshoot startup problems, manage boot options, and control which programs launch automatically when Windows starts.
How to use it
- Press the Windows Key + R on your keyboard to open the Run dialog box.

Run dialog - Type msconfig into the box and press Enter. (This action requires administrator privileges).
- Click on the Services tab to hide Microsoft services and review third-party app services, or click the link to open Task Manager to manage startup apps.
- Use the Boot tab if you need to restart your computer in Safe Mode for advanced troubleshooting.
Resource Monitor
While Performance Monitor gives you high-level graphs, Resource Monitor gives you an up-close, granular look at how individual programs use your system resources.
What it does
Resource Monitor breaks down CPU, memory, disk, and network usage by individual software programs and background processes. If a program is freezing or hogging all your memory, this tool identifies the exact culprit.
How to use it
- Type Resource Monitor into your Windows search bar and open the tool.
- Click through the tabs at the top of the window: CPU, Memory, Disk, and Network.
- Expand any tab to see a detailed list of every active process and the exact percentage of system resources it consumes.
- If an app stops responding, right-click its name in the list and select End Process to force it to close.
Advanced Administrative Tools Missed by Competitors
Most online guides stop after listing the standard Control Panel tools. However, professional system administrators rely on several other advanced administrative utilities built straight into Windows 11 that everyday users rarely hear about. Let us explore two powerful tools that competitors often miss.
Reliability Monitor
Reliability Monitor is a built-in diagnostic tool that translates complex system error codes into a simple, visual timeline report graded on a scale from 1 to 10. Type the name into your Windows search bar to open the tool and review your daily stability scores, software crashes, driver failures, and recent Windows updates.
It grades your computer's stability on a scale from 1 to 10 every single day. Red X icons show days when software crashes, driver failures, or Windows updates caused problems. Blue info icons show successful software installations. By clicking on a specific day in the timeline, you can instantly see which app or driver caused your computer to glitch.
To open Reliability Monitor:
- Type Reliability into your Windows search bar.
- Click on the result labeled View reliability history.
- Review the daily stability chart and click View technical details under any red error flag to investigate the root cause of a system issue.
Local Group Policy Editor
Local Group Policy Editor is an advanced administrative tool available in Windows 11 Pro and Enterprise that lets you control security settings, enforce password rules, and configure system behavior beyond standard menus. Open this tool by typing gpedit.msc into the Run dialog box to change deep system configurations and stop unwanted software behaviors.
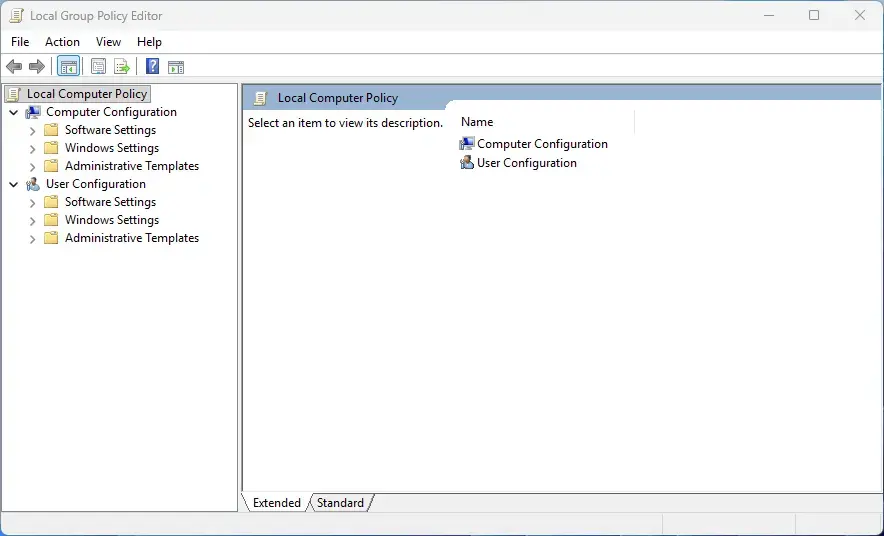
For example, you can use the Group Policy Editor to stop automatic Windows updates from restarting your computer while you work, disable specific hardware ports for security, or customize sign-in banners.
To open the Local Group Policy Editor:
- Press the Windows Key + R on your keyboard to open the Run dialog box.
- Type gpedit.msc into the field and press Enter. (This requires administrator privileges).
- Navigate through the folder tree on the left to adjust computer configuration or user configuration policies.
Summary
Windows 11 administrative tools are a collection of built-in system utilities designed to help you monitor performance, schedule automated tasks, review error logs, and optimize storage drives. Located inside the Windows Tools folder in the Control Panel, exploring these administrative tools gives you complete control over your computer's health and troubleshooting needs.
Was this guide helpful?

About the Author
Richard
Tech Writer, IT Professional
Richard is a writer at Geek Rewind who turns complex IT tasks into clear, step-by-step guides. He draws on years of hands-on experience in system administration and enterprise IT operations, focusing on Windows, Linux and WordPress: the problems people actually run into, and the fixes that work. His server and WordPress guides come from systems he runs himself. Richard builds and maintains the platform behind Geek Rewind, from its Ubuntu servers and Nginx configuration to its custom WordPress plugins. Many new tutorials start with readers' questions, and he's always glad to answer them in the comments.

No comments yet — be the first to share your thoughts!