How to Run a Virus Scan In Windows 11

- 25 steps
- Needs administrator rights
A virus scan in Windows 11 runs through Windows Security, the built-in app that controls Microsoft Defender Antivirus. The quickest route is Start Windows Security Virus & threat protection > Quick scan, which checks the places malware most often hides.
Microsoft Defender Antivirus is the malware-detection engine that ships with Windows 11, and it runs in the background by default. A manual scan is useful when the PC behaves oddly, after you download something you do not trust, or when you want a second check on a USB drive. The sections below cover every scan type and what to do when the buttons are missing.
Open Start, type Windows Security, then go to Virus & threat protection and click Quick scan under Current threats. Windows Security checks the folders where malware most often hides, and the result shows as “No current threats” or a list of threats found. No administrator rights are needed to start it.
How to run a virus scan in 🪟 Windows 11
These steps run a Quick scan, the fastest built-in virus scan in Windows 11. Standard user accounts can start a scan, so none of these steps need administrator rights.
- Open Start. Click the Start button on the taskbar or press the Win.
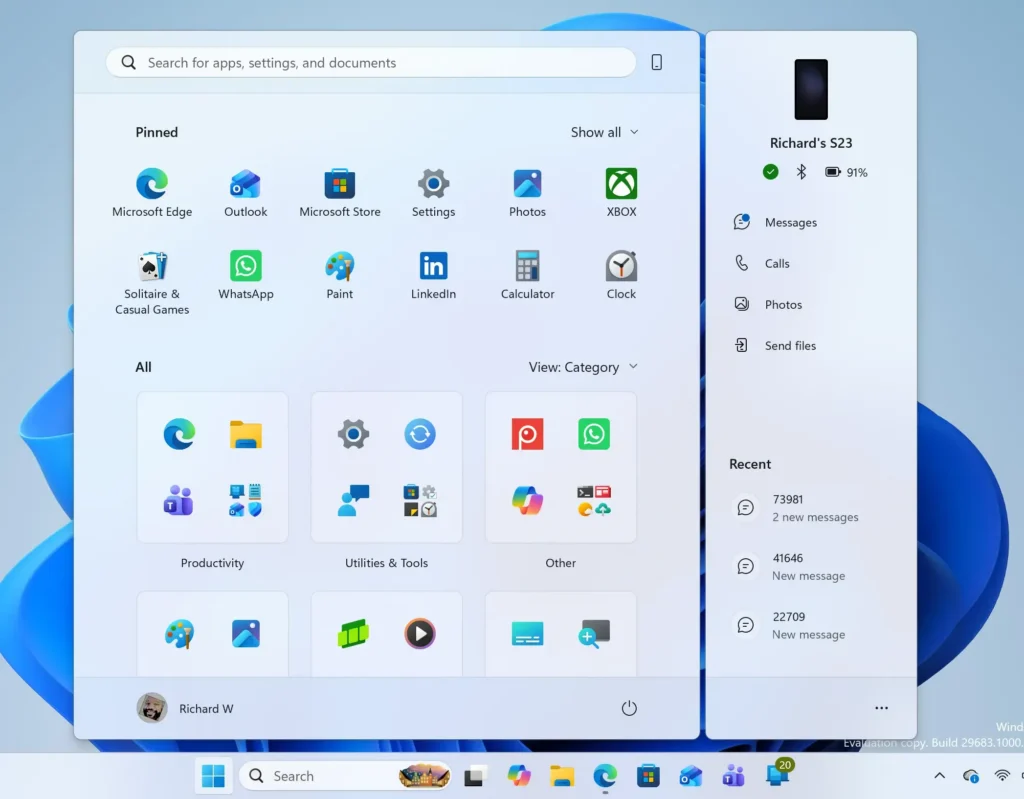
Windows 11 Start menu search panel for opening OpenSSH Client settings - Type Windows Security. The search results appear as you type, with Windows Security listed as the best match.
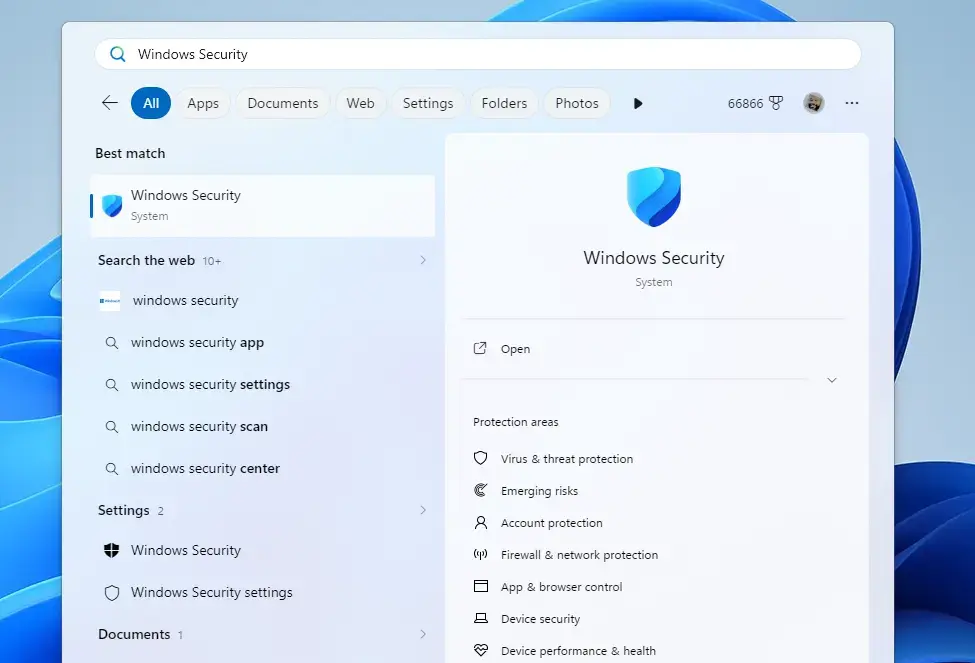
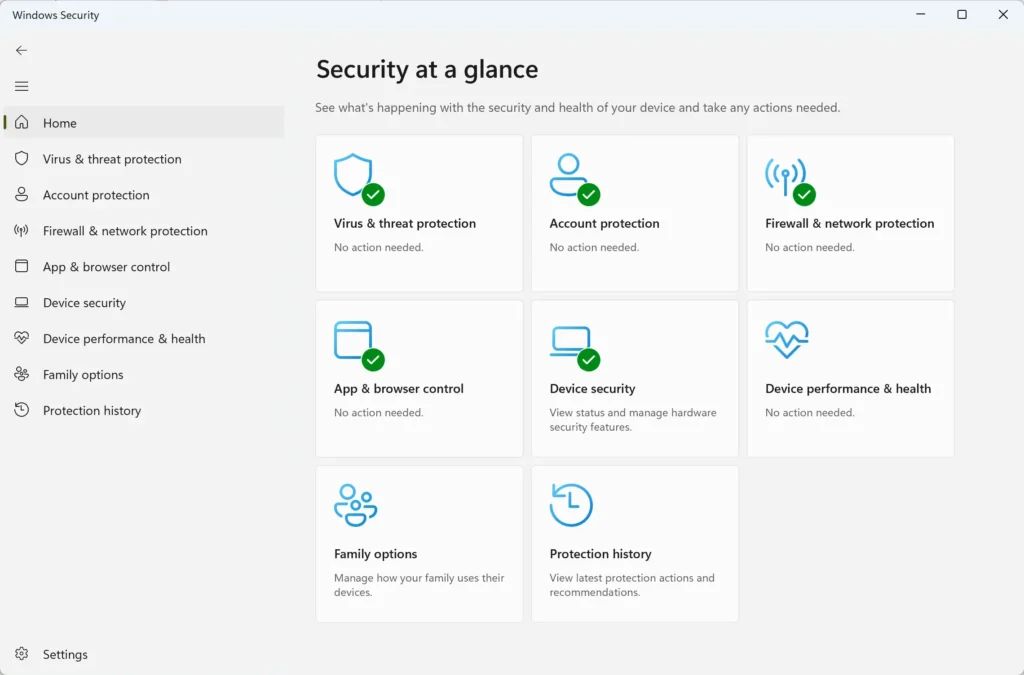
Windows Security - Select Windows Security. The Windows Security app opens with a left-hand menu and a Security at a glance page.
Windows Security - Click Virus & threat protection. It is the shield icon in the left menu, and also a tile on the home page. The page that opens has a Current threats section at the top.
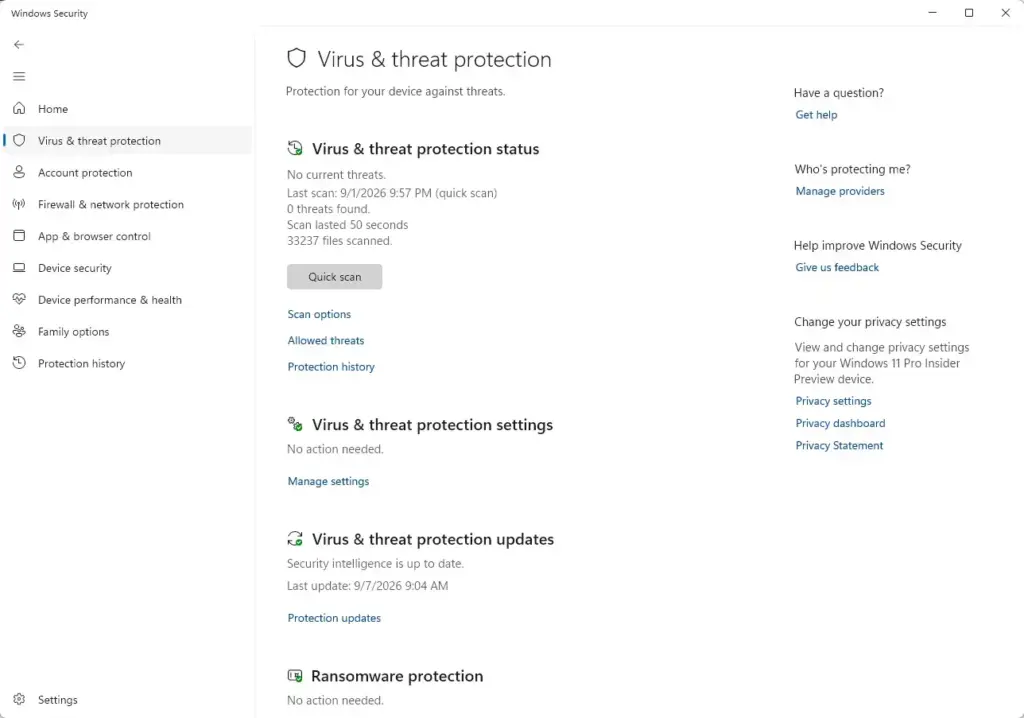
Windows Security › Virus & threat protection - Click Quick scan. The button sits under the Current threats heading. A progress bar and the text “Scanning…” appear, along with a time estimate.
- Keep working while the scan runs. You can use the PC normally, and the scan continues in the background. Click Cancel if you need to stop it.
- Read the result. When the scan finishes, the section shows either “No current threats” or a list of threats found. It also shows when the scan ran, how long it took and how many files it checked.
- Act on any threats. If Windows Security lists a threat, click Start actions. Windows may ask for administrator approval at this point. Approve it if you started the scan yourself.
You can also reach the same app from Settings Privacy & security Windows Security, then click Open Windows Security. Both routes lead to the same Virus & threat protection page.
For a longer walkthrough with screenshots of the removal stage, see How to Scan for Malware in Windows 11 with Defender.
Choose a Full scan, Custom scan or offline scan
A Quick scan skips most of your files, so it can miss malware stored in unusual places. The Scan options page lets you pick a deeper scan type. Use this list when the Quick scan finds nothing but the PC still behaves strangely.
- Open Virus & threat protection. Follow steps 1 to 4 above to reach the page.
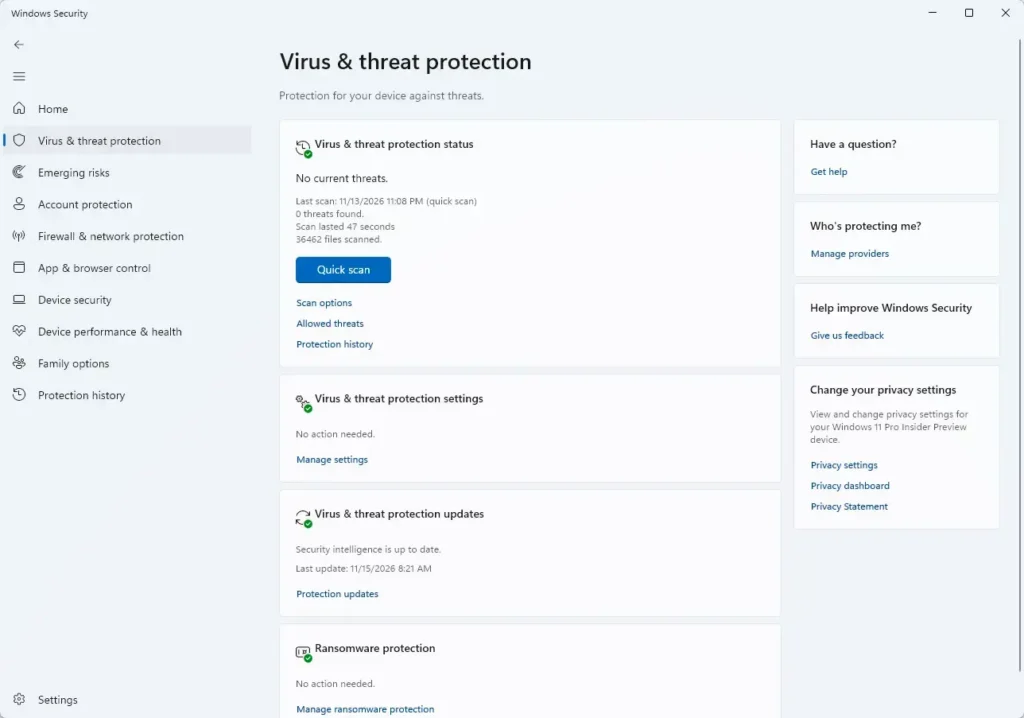
Windows Security - Click Scan options. The link sits under the Quick scan button. A page opens with four choices, each with a radio button.
- Select the scan type you want. The choices are described in the table below.
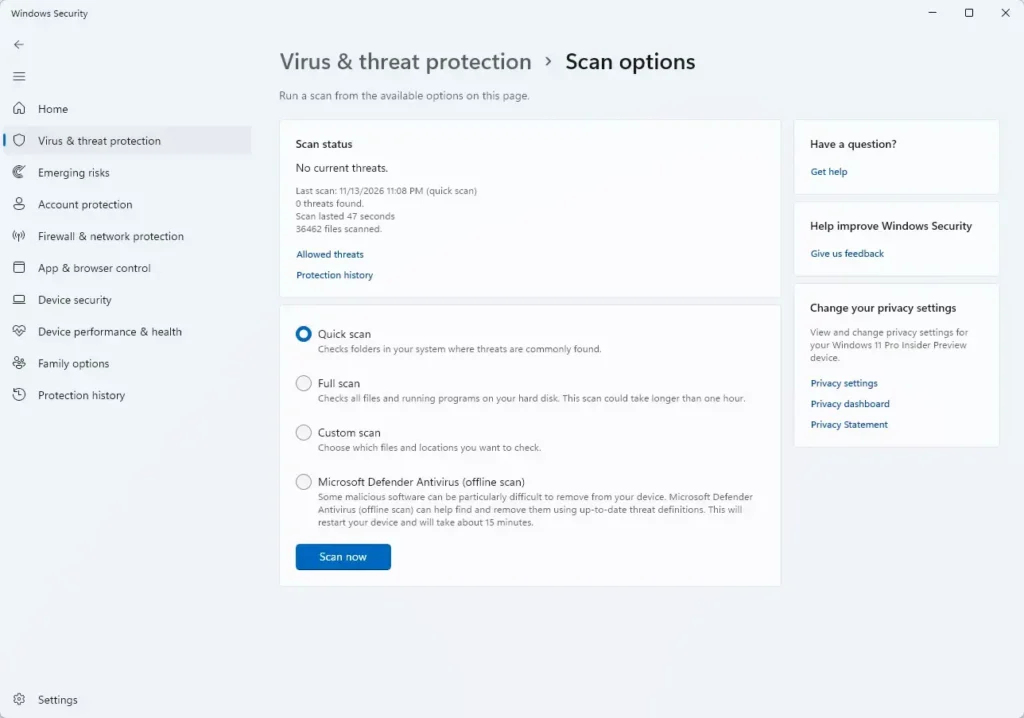
Windows Security - Click Scan now. The button is at the bottom of the options list. Windows Security starts the scan and shows its progress.
| Scan type | What it checks | When to use it |
|---|---|---|
| Quick scan | Folders and locations where threats are most often found | A routine check, or a fast look after a suspicious download |
| Full scan | Every file and running program on the PC | You suspect an infection that the Quick scan missed. Expect it to take a long time. |
| Custom scan | Only the files or folders you pick | A downloads folder, an external drive or a shared folder |
| Microsoft Defender Antivirus (offline scan) | The system before Windows fully loads | Malware that hides while Windows is running or resists removal |
A Full scan can take from tens of minutes to several hours, depending on how many files you have and how fast your drive is. Plug in a laptop before you start one. The scan slows the PC a little, so run it while you are away from the machine if you can.
Run a Custom scan on one folder or drive
A Custom scan is the right choice for a USB stick or a folder you downloaded recently. After you select Custom scan and click Scan now, a folder picker opens. Browse to the folder or drive, select it and click Select Folder. The scan starts straight away and covers only that location.
Run a Microsoft Defender Antivirus (offline scan)
Save your open work first, because Windows restarts as soon as you confirm. The restart is the part that catches people out, and the screen stays blue or black for several minutes during the scan. The full steps are in How to Run Microsoft Defender Offline Scan On Windows 11.
Scan a single file or folder from File Explorer
If you only distrust one file, you do not need to open Windows Security at all. This method scans the item you pick and nothing else.
- Open File Explorer. Press Win+E.
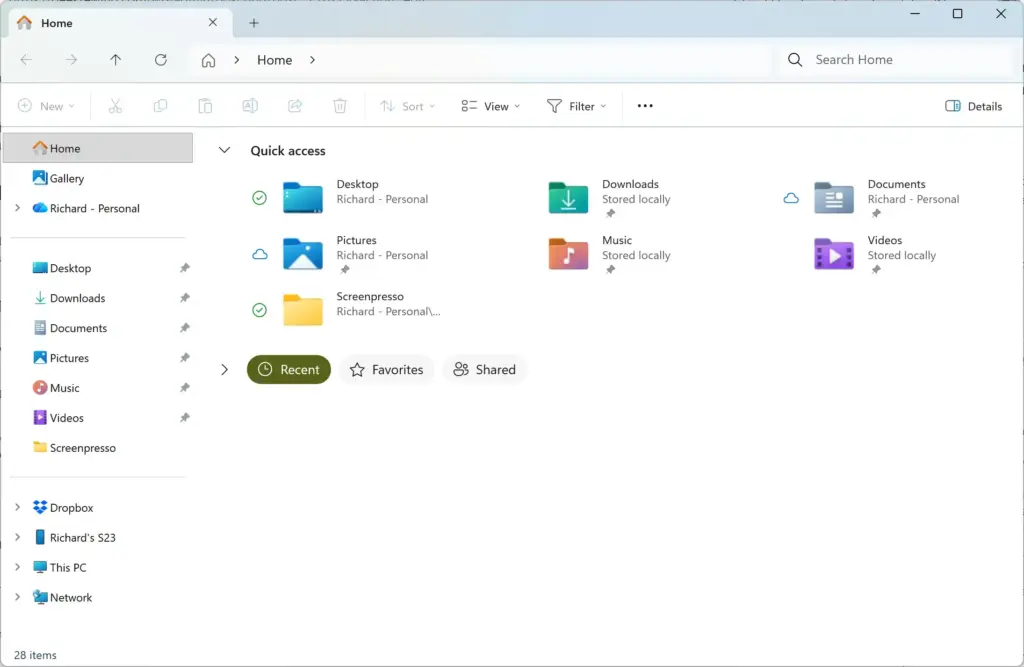
Windows 11 File Explorer showing Dropbox folder in sidebar. - Browse to the file or folder. Downloads is the usual place to look.
- Right-click the item. The context menu (the menu that appears when you right-click) opens.
- Click Show more options. Windows 11 hides some older entries behind this item. The classic menu opens.
- Click Scan with Microsoft Defender. A scan window opens and shows the result when it finishes.
If Scan with Microsoft Defender is missing from the menu, another antivirus program is probably active. Scan from that program instead, or follow the troubleshooting section below.
Update Microsoft Defender before you scan
Microsoft Defender detects threats by comparing files against security intelligence (a set of definitions describing known malware). Windows Update normally refreshes these definitions on its own. An out-of-date set can miss recent threats, so check for an update yourself before a Full scan or any scan you run because of a real concern. The steps below show where to do this.
- Open Virus & threat protection. Use the same route as in the main steps.
- Scroll to Virus & threat protection updates. It sits near the bottom of the page, and a line shows when the definitions were last updated.
- Click Protection updates. A page opens that lists the current security intelligence version.
- Click Check for updates. Windows downloads any new definitions and shows the updated date and time.
If the update fails, check that the PC is online and that Windows Update is not paused in Settings Windows Update. Try the button again after a restart.
Check the results and deal with threats
- Click Start actions. Windows Security applies its recommended action to every listed threat.
- Review each threat if you prefer. Click See details under a threat to see the file path and the recommended action.
- Pick Remove or Quarantine. Remove deletes the threat from the PC. Quarantine moves it to a locked area where it cannot run.
- Approve the administrator prompt if it appears. This step needs administrator permission, so sign in with an administrator account if you are using a standard one.
Before you choose Allow on device, know that it lets a real threat run freely. Choose it only when you are certain the file is safe, such as a legitimate tool your own team wrote. If you want to reverse an action later, open Protection history under the Current threats heading, select the item and use the action menu to restore it.
Protection history also records every detection and every action Defender has taken. It is the best place to look when a scan finishes quickly and you want to know what happened.
If the scan buttons are missing, greyed out or stuck
Most problems fall into one of the groups below. Find the one that matches what you see on the Virus & threat protection page.
Another antivirus program is installed
Windows 11 turns off Microsoft Defender Antivirus when it detects another antivirus product. In that case, the Virus & threat protection page names the other program and shows only its status, not the Quick scan button. Run scans from the other program instead.
If you want an occasional second opinion from Defender, look for Microsoft Defender Antivirus options on the same page. A Periodic scanning toggle lets Defender run limited scans alongside the other product. This option appears only when another company’s antivirus program is active.
The Virus & threat protection section is missing
An administrator can hide this section of the app, which is common on work and school PCs. On a personal PC, someone may have hidden it earlier by changing a setting. See How to Hide the Virus & Threat Protection Section in Windows 11 Security App to check whether that is the cause and how to bring it back. Changing it needs administrator rights.
Options show “Managed by your organization”
This message means your IT department has set a rule that controls this setting. You cannot change it from the app. Contact your IT team, because the rule may also limit which scans you can start.
Real-time protection is off
Real-time protection is the part of Defender that checks files as you open or download them. Windows turns real-time protection off for a short time when you flip the switch. It then turns it back on by itself. To check it, click Manage settings under the Virus & threat protection settings heading and look at the Real-time protection toggle. Turn it on if it is off.
The same Manage settings pane holds Tamper Protection, which stops other programs and users from changing Defender’s settings. Leave Tamper Protection on. Switching it off weakens your PC, and malware often tries to do exactly that.
The scan hangs or never finishes
A scan that sits at the same percentage for a long time may be blocked by a damaged file or a slow drive. Wait at least half an hour before assuming it is stuck, since Full scans pause while the PC is busy. If it stays frozen, follow What to Do When Settings Privacy and Security Windows Security Virus Scan Hangs.
Check that your protection is switched on
A scan only helps if Defender is active the rest of the time. The home page of Windows Security shows a green check mark on each protection area that is healthy. A yellow warning or a red cross means something needs attention, and the tile tells you which setting to review. For a full explanation of those status icons, read Show Your Virus Protection Status in Windows 11.
Other ways to start a scan
Windows Security is the main route, but there are two more. The first is the offline scan covered above, which needs a restart. The second is a scan you start by typing a command in Command Prompt. It suits people who automate tasks or manage PCs from another location. The steps are in Run a Microsoft Defender Scan from Command Prompt in Windows 11.
What to do next
If the Quick scan came back clean but the PC still behaves oddly, run a Full scan and then an offline scan. Malware that runs with Windows can hide from the first two. Review Protection history afterwards to confirm what Defender found and what it did. If a scan hangs or the buttons are missing, work through the troubleshooting section above before you switch to a different antivirus product.
Have a question about this guide?
Answered by AI from this guide. Good questions may be added to this page — please don't include personal details.
Did this guide fix your problem?

About the Author
Richard
Tech Writer, IT Professional
Richard is a writer at Geek Rewind who turns complex IT tasks into clear, step-by-step guides. He draws on years of hands-on experience in system administration and enterprise IT operations, focusing on Windows, Linux and WordPress: the problems people actually run into, and the fixes that work. His server and WordPress guides come from systems he runs himself. Richard builds and maintains the platform behind Geek Rewind, from its Ubuntu servers and Nginx configuration to its custom WordPress plugins. Many new tutorials start with readers' questions, and he's always glad to answer them in the comments.
No comments yet — be the first to share your thoughts!