How to Install TPM Diagnostics Tool in Windows 11

The TPM Diagnostics Tool in Windows 11 checks your computer’s security hardware for errors and confirms it is working properly. The Trusted Platform Module (TPM) is a small security chip, or a firmware equivalent built into the processor. It stores things like your passwords, certificates and file encryption keys. Windows 11 requires TPM version 2.0.
Running the tool confirms the security chip responds correctly. It also helps when you troubleshoot BitLocker drive encryption, because BitLocker depends on the TPM to release its keys at startup. The tool is an optional Windows feature, so it is not installed by default. You add it yourself, and you can remove it again later.
Open Settings Apps Optional features, click View features, search for TPM, check TPM Diagnostics, and click Install. Windows downloads and installs the tool from Microsoft’s servers; restart if prompted before using it.
Installation Methods Comparison
| Method | Difficulty | Best For |
|---|---|---|
| Settings App | Easy | General users |
| Command Prompt | Medium | Power users |
| PowerShell | Medium | IT Administrators |
Using the Settings App
Installing the TPM Diagnostics Tool through the Settings app is the quickest method because you download nothing from outside Windows. You open Settings, go to the optional features page, and pick the tool from the list of available components. This way you get the official Microsoft version and avoid third-party downloads.
This works on both Home and Pro editions. You need an administrator account, and you need an internet connection, because Windows fetches the feature from Microsoft’s servers. If the tool is missing from the list, your Windows 11 build may not offer it yet. Run Windows Update , restart, and check again.
- Open the Start menu and select Windows Settings app. The Settings window should open.
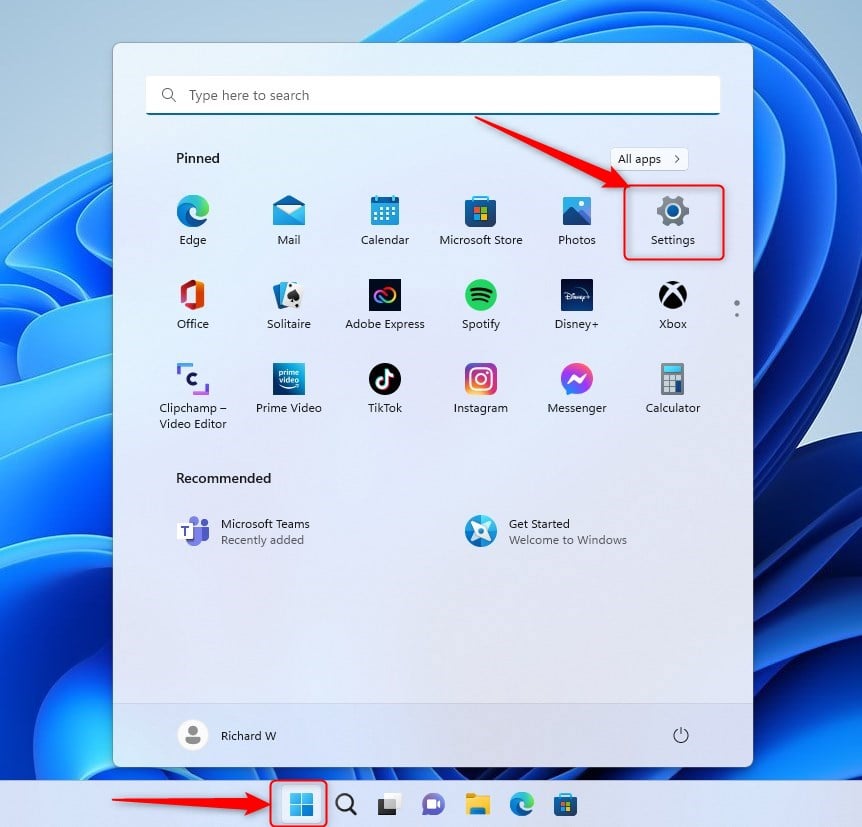
windows 11 new settings button - Click the Apps button on the left side. The list of app settings appears on the right. On some newer Windows 11 builds, Optional features sits under System instead. If you do not see it under Apps, look there.
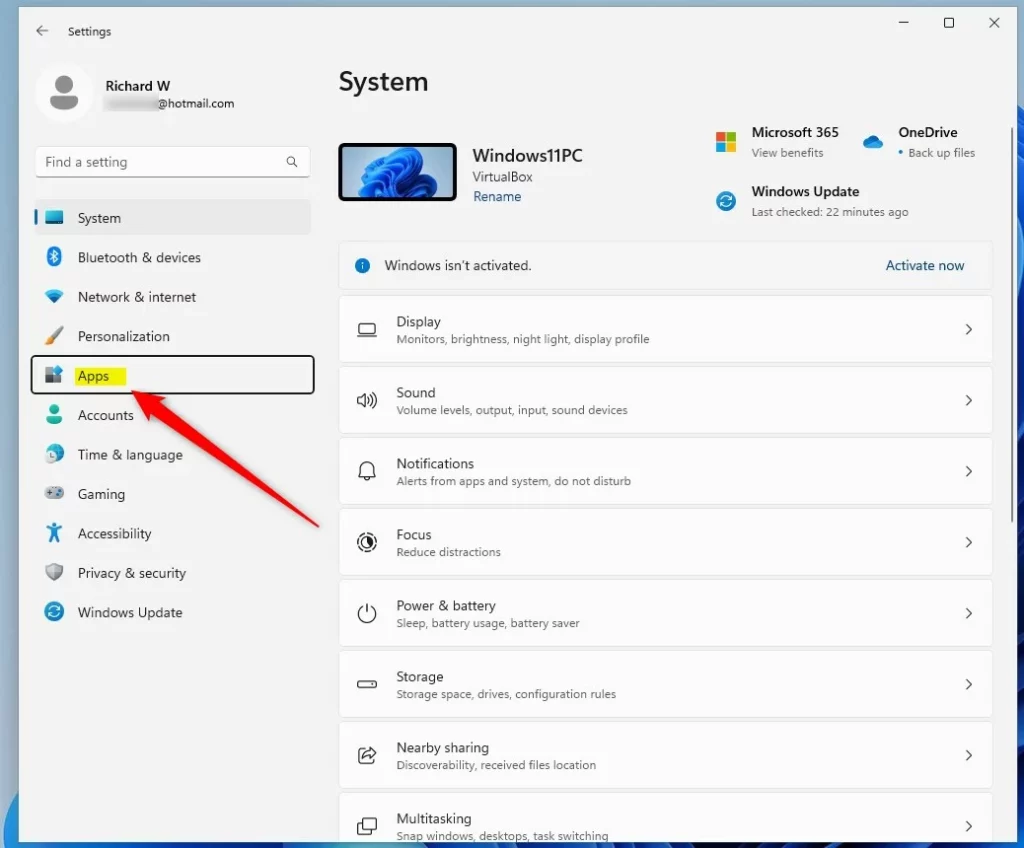
windows 11 settings apps on menu - Click the Optional features box. You will see the features already installed on your PC.
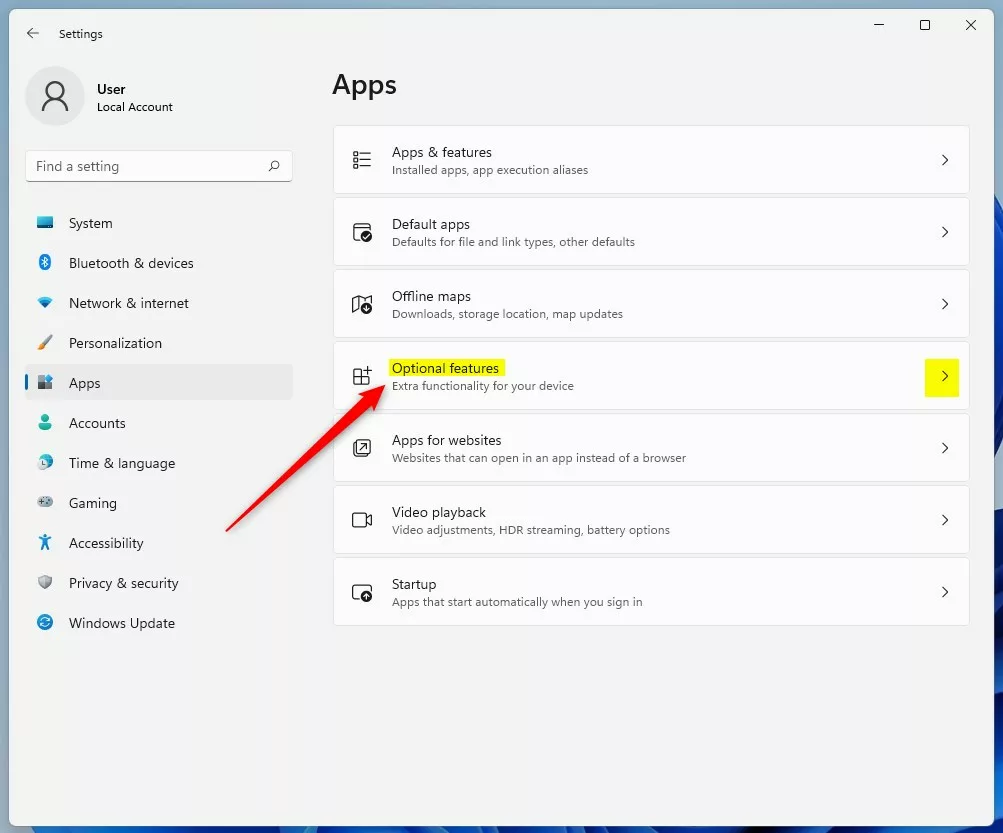
windows 11 optional features tile - Click the View features button. A window opens with the features Windows can add.
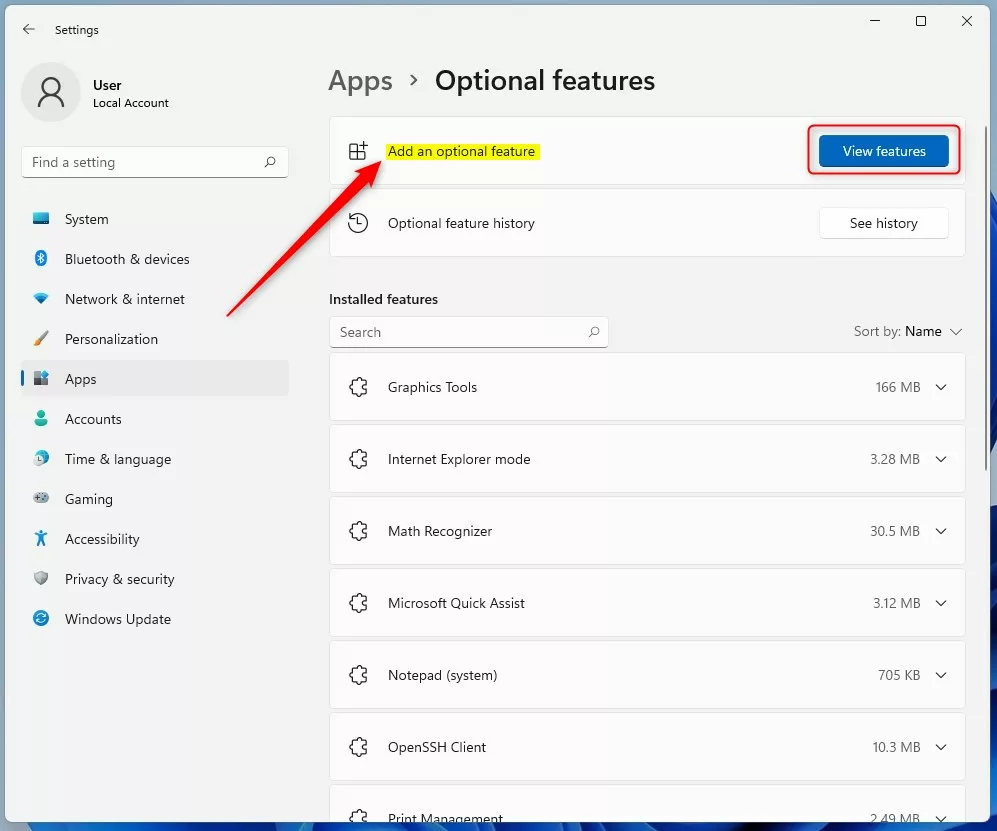
windows 11 optional features view features button - Type “TPM” into the search box. The list narrows to matching features.
- Check the box next to TPM Diagnostics and click Next. If nothing matches your search, the feature is not available on your build or is already installed. Check your installed features list first.
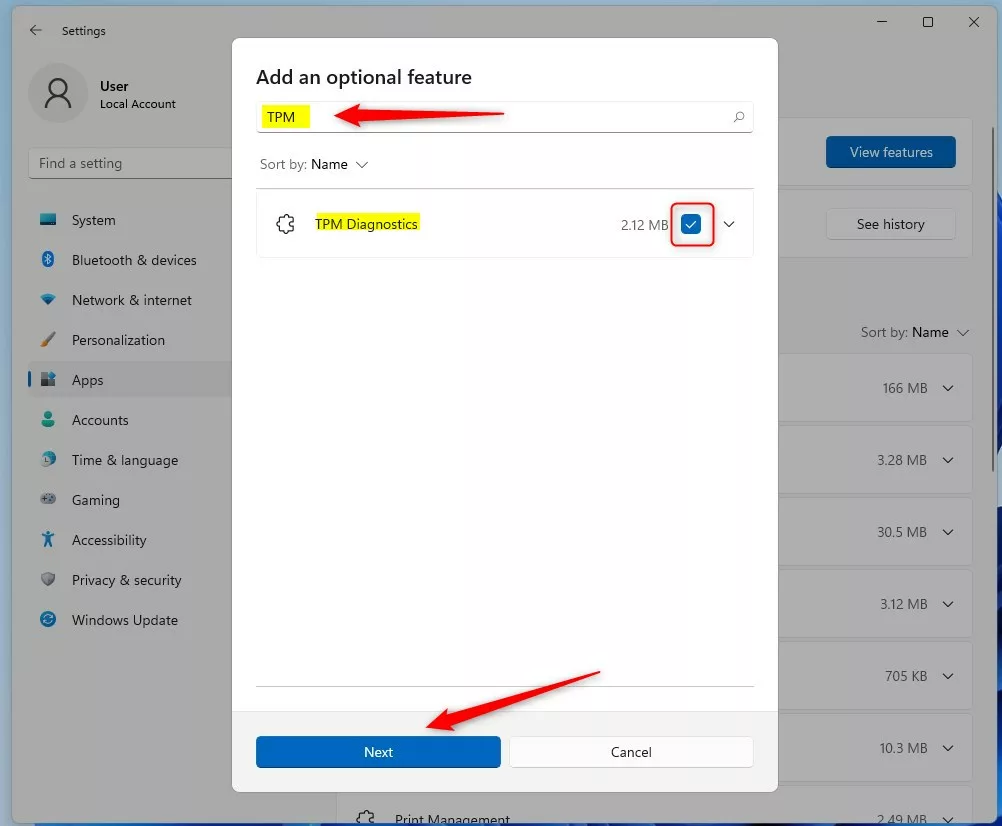
windows 11 add an optional feature window - Click Install. Windows starts downloading and adding the feature. You can leave the page open while it works.
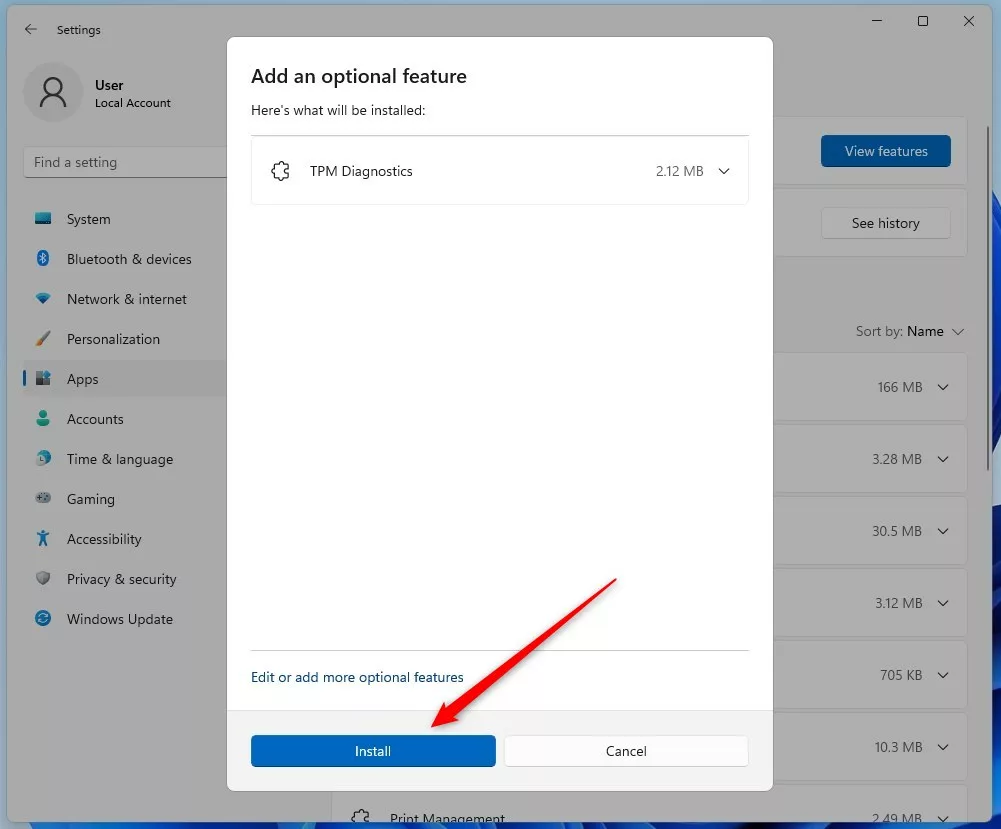
windows 11 add an optional feature install button
To undo it, open the same Optional features page, select the tool in the installed list, and choose to uninstall it. If Windows asks for a restart, save your work and restart before using the tool.
Using Command Prompt or PowerShell
Without admin rights the install fails with an access error.
- Right-click the Start button.
- Select Terminal (Admin). Windows Terminal opens with PowerShell by default. If you prefer Command Prompt, use the Terminal's tab dropdown to open a Command Prompt tab, or search for it in Start and choose Run as administrator.
- Click Yes if User Account Control asks for permission. The window title should include "Administrator".
To install via Command Prompt:DISM /Online /Add-Capability /CapabilityName:Tpm.TpmDiagnostics~~~~0.0.1.0
Paste the command exactly as shown and press Enter. Wait for the prompt to return before you close the window.
To install via PowerShell, use the following command:Add-WindowsCapability -Online -Name Tpm.TpmDiagnostics~~~~0.0.1.0
Press Enter and let it finish. Any red error text means the install failed. Check that the window is elevated and that you are online, then try again.
Troubleshooting and Enterprise Context
If the TPM Diagnostics Tool in Windows 11 doesn't install correctly, check your internet connection first, as it needs to download updates. Then try these checks in order:
- Open Settings Windows Update and install any pending updates, then restart the PC.
- Confirm you are signed in with an administrator account.
- If you are on a metered or work network, try another connection. Some policies block optional feature downloads.
- Try the other install method. If the Settings app fails, try the command line, and the reverse.
If the tool still does not appear, your Windows 11 version may not include it. In that case you can still check basic TPM status in Settings Privacy & security > Windows Security Device security Security processor details
Summary
The TPM Diagnostics tool for Windows 11 is a handy utility that helps you check your computer's security chip, making sure your system is protected. Install it once and it is there when you need to troubleshoot BitLocker or confirm your TPM 2.0 chip is healthy.
Have a question about this guide?
Answered by AI from this guide. Good questions may be added to this page — please don't include personal details.
Did this guide fix your problem?

About the Author
Richard
Tech Writer, IT Professional
Richard is a writer at Geek Rewind who turns complex IT tasks into clear, step-by-step guides. He draws on years of hands-on experience in system administration and enterprise IT operations, focusing on Windows, Linux and WordPress: the problems people actually run into, and the fixes that work. His server and WordPress guides come from systems he runs himself. Richard builds and maintains the platform behind Geek Rewind, from its Ubuntu servers and Nginx configuration to its custom WordPress plugins. Many new tutorials start with readers' questions, and he's always glad to answer them in the comments.
[…] As mentioned above, one of Windows 11’s requirements is to have TPM 2.0 enabled and CPUs that support it. The easiest way to determine if your PC supports TPM 2.0 is to run the Windows 11 PC Health Check app. […]