How to Clear Windows 11 Event Viewer Logs Automatically

Event Viewer logs in Windows 11 record every error, warning, and startup event on your computer, slowly filling up your hard drive over time.
Automated log clearing runs tasks in the background to delete these old files on a set schedule so you do not have to do it by hand.
Open the Event Viewer, right-click any log category, choose Properties, and set the archival option to overwrite events as needed. This automation keeps your system logs clean, protects your privacy, and saves valuable storage space on your hard drive without requiring daily manual cleanups.
What Are Windows Event Logs?
Windows Event Logs are built-in system files that record background activities, application crashes, and hardware warnings on your computer. When programs fail or drivers stop working, Windows saves these details in log files. These files help technicians diagnose computer problems, but they stay saved on your hard drive forever unless you delete them.
What Is Windows Event Viewer?
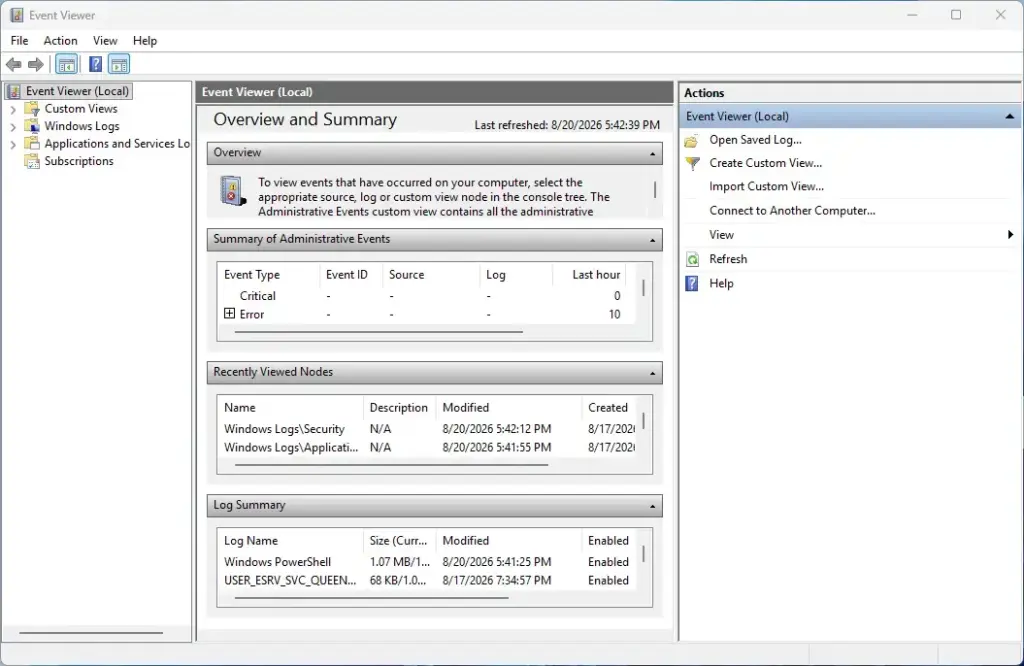
Windows Event Viewer is a built-in program that lets you open and read your system log files. You can think of it as a digital diary for your operating system where you view categorized records of application errors, security warnings, and system events. Most everyday users never need to open it, but the app runs constantly in the background.
Why You Should Clear Windows Event Logs Regularly
Leaving your event logs to grow forever causes several problems. Here are the main reasons why you should clear them out regularly.
1Freeing Up Disk Space
Clearing Windows Event Viewer logs helps free up valuable disk space on your computer hard drive. Although individual log files start out small, they quickly grow to several gigabytes over a few months of normal computer use. Deleting these old system records gives you back storage space for personal photos, video games, and everyday apps, especially on smaller solid-state drives.
2Improving Security
Clearing your Windows 11 event logs improves computer security by removing detailed records of your software and system activity. If someone gains unauthorized access to your computer or local network, that person can read the event logs to learn about your user accounts and habits. Clearing or automatically managing these logs helps keep your private details secure from prying eyes.
3Fixing Event Viewer Issues
Corrupted event log files can sometimes cause the Event Viewer application to freeze, run slowly, or fail to open completely in Windows 11. Clearing out these corrupted log files gives the Windows Event Viewer application a fresh start and keeps the system tool running smoothly.
4Better System Monitoring
When you need to fix a current computer problem, digging through thousands of old log files from months ago makes your job harder. Clearing old logs ensures that when you open the Event Viewer, you only see fresh, relevant errors happening right now.
Methods to Clear Windows Event Logs
You can clear your event logs using a few different methods. We start with manual options and then move on to advanced automation techniques.
Method 1Clear Logs Using the Event Viewer Interface
Clearing event logs through the Event Viewer interface is a simple manual method for deleting individual system files. You can open the built-in Windows tool, expand the log categories in the left sidebar, select a specific file like Application or System, and choose the clear option from the right-hand actions menu. This approach lets you clean out specific problem areas without affecting other logs.
- Click the Start button, type Event Viewer, and press Enter.
- In the left window pane, click the arrow next to Windows Logs to expand the list.
- Click on the specific log you want to clear, such as Application or System.
- Look at the right-hand actions pane and click on Clear Log...
- A small confirmation window will pop up. Choose whether you want to save a backup copy of the log before clearing it, or simply click Clear to delete everything inside that log immediately.
Method 2Clear All Event Logs Using Command Prompt
Clearing all Windows event logs at once using Command Prompt is a fast method that requires administrator privileges. By opening the command line tool as an administrator and running a simple built-in command, you can wipe out every single log file across your entire system simultaneously. This saves you from having to click through individual categories one by one in the graphical menu.
- Click the Start button and type cmd.
- Right-click on Command Prompt in the search results and select Run as administrator.

Command Prompt - If a confirmation window appears asking if you want to allow the app to make changes, click Yes.
- Type the following command into the black window and press Enter:Code
FOR /F "tokens=*" %1 IN ('wevtutil el') DO wevtutil cl "%1" - Windows will cycle through all the event logs and clear them one by one. You will see text scrolling past quickly on your screen. Once it stops, all your logs are wiped clean.
Method 3Clear All Event Logs Using a Batch File
Creating a batch file to clear all event logs lets you automate the cleaning process with a single double-click. Instead of typing commands into the terminal every time, you can paste a short script into a simple text document and save it with a special extension. Running this file instantly wipes out your system logs without requiring you to open the Command Prompt manually.
- Right-click on an empty space on your desktop, hover over New, and select Text Document.
- Open the new text file with Notepad.
- Copy and paste the following lines into the document:Code
@echo off
FOR /F "tokens=*" %%G IN ('wevtutil el') DO (wevtutil cl "%%G")
echo All Event Logs have been cleared!
timeout /t 5 - Click File in the top left corner, then click Save As.
- Change the "Save as type" dropdown menu to All Files (*.*).
- Name your file something simple like
ClearLogs.batand save it to your desktop. - To run your new script, right-click the
ClearLogs.batfile on your desktop and select Run as administrator.
How to Clear 🪟 Windows 11 Event Viewer Logs Automatically
Clearing Windows 11 Event Viewer logs automatically involves setting up a recurring schedule using the built-in Task Scheduler tool. By pairing your log-cleaning script with an automated task, Windows runs the cleanup process on a regular schedule without needing your help. This set-and-forget approach keeps your hard drive clean and saves you from performing manual maintenance.
- Click the Start button, type Task Scheduler, and press Enter.
- In the right-hand pane, click on Create Task... (not "Create Basic Task"). Note: This action requires administrator privileges.
- In the General tab, type a name for your task, such as
Automatic Event Log Cleaner. - Check the box at the bottom that says Run with highest privileges. This step is critical because clearing logs requires administrator rights.
- Click on the Triggers tab near the top, then click the New... button at the bottom.
- In the "Begin the task" dropdown menu, choose how often you want the cleaning to happen (for example, weekly or monthly). Click OK.
- Click on the Actions tab, then click the New... button.
- Keep "Action" set to Start a program. Click the Browse button and find your
ClearLogs.batfile that you created earlier. Click Open, then click OK. - Click OK at the bottom of the main Create Task window to save your new automated task.
Your computer will now run the cleaning script automatically based on the schedule you chose. You will never have to manually clear your event logs again.
Advanced Tip: Automatically Overwriting Old Logs Without Scripts
Automatically overwriting old event logs in Windows 11 is a built-in feature that saves you from using scripts or task schedules. By default, some system logs save indefinitely until your computer runs out of space. You can change your Event Viewer settings so Windows automatically deletes the oldest recorded events whenever a log file reaches a specific size limit.
- Open the Event Viewer by searching for it in the Start menu.
- In the left pane, expand Windows Logs and click on the log you want to manage, such as Application.
- Right-click on the log name and select Properties.
- Look for the section labeled "Log size maximum". You can type a specific size limit here in kilobytes.
- Below that, select the radio button next to Overwrite events as needed (oldest events first).
- Click Apply and then click OK.
When you set your logs to overwrite automatically, you no longer need to worry about them filling up your hard drive. Windows will handle the cleanup behind the scenes in a continuous loop.
Summary
Windows 11 Event Viewer logs record important system errors and background actions, but they can grow large and waste disk space over time. While you can clear these files manually using the graphical interface or the Command Prompt, you can also automate the entire cleaning process using batch files and task schedules. Managing your logs keeps your computer running smoothly and frees up valuable storage.
Was this guide helpful?

About the Author
Richard
Tech Writer, IT Professional
Richard is a writer at Geek Rewind who turns complex IT tasks into clear, step-by-step guides. He draws on years of hands-on experience in system administration and enterprise IT operations, focusing on Windows, Linux and WordPress: the problems people actually run into, and the fixes that work. His server and WordPress guides come from systems he runs himself. Richard builds and maintains the platform behind Geek Rewind, from its Ubuntu servers and Nginx configuration to its custom WordPress plugins. Many new tutorials start with readers' questions, and he's always glad to answer them in the comments.


No comments yet — be the first to share your thoughts!