How to Purge Diagnostic Data Logs Stored Locally in Windows 11 Privacy Settings

Diagnostic data logs stored locally in Windows 11 are system files that record how your apps and device perform. Windows keeps these copies on your hard drive to help troubleshoot problems, but you can delete them at any time to free up space and protect your privacy.
You do not need special tools or technical skills to clear local diagnostic data logs in Windows 11. The built-in Settings app lets you delete all stored diagnostic information with a single click. The steps are the same on Windows 11 Home and Pro. This guide also covers the related privacy settings that decide what gets collected in the future.
Open Settings , go to Privacy & security, select Diagnostics & feedback, scroll to Delete diagnostic data, and click the Delete button. Windows removes all stored diagnostic logs immediately. This does not stop future data collection.
How to Clear Stored Diagnostic Data Logs in 🪟 Windows 11
Clearing stored diagnostic data in Windows 11 deletes the diagnostic information your computer has already saved and sent to Microsoft. The path is Settings, then Privacy & security, then Diagnostics & feedback, then the Delete button under Delete diagnostic data. Deleting does not stop new data from being collected. Use the next section for that.
- Open the Start menu from the taskbar and select the gear-shaped Settings app. You can also press the Win+I to open it directly. The Settings window opens with a list of categories on the left.

- In the left sidebar of the Settings window, click Privacy & security. The privacy options appear on the right.
- On the right side of the screen, click Diagnostics & feedback. This page controls the settings for the data your computer shares and stores.
- Scroll down the page until you see the section labeled Delete diagnostic data. If you only see the heading, click it to expand the section.
- Click the Delete button next to this option. Windows starts erasing the diagnostic data logs stored for your device right away.
You should see a small confirmation, such as a check mark or a short message, letting you know the data has been deleted. This cannot be undone, but Windows will start collecting new diagnostic data again unless you change the settings in the next section.
Stopping Future Diagnostic Data Collection
Stopping future diagnostic data collection in Windows 11 limits the information your computer gathers and sends to Microsoft. Open Settings , click Privacy & security, select Diagnostics & feedback, and turn off the Send optional diagnostic data switch. On Home and Pro you cannot turn off diagnostic data entirely. A basic level called required diagnostic data always stays on, because Windows needs it to stay secure and up to date. Optional data is the part you can switch off.
- Press the Win+I to open the Settings app.

- Click Privacy & security in the left menu.
- Select Diagnostics & feedback.
- Look for the top section labeled Diagnostic data.
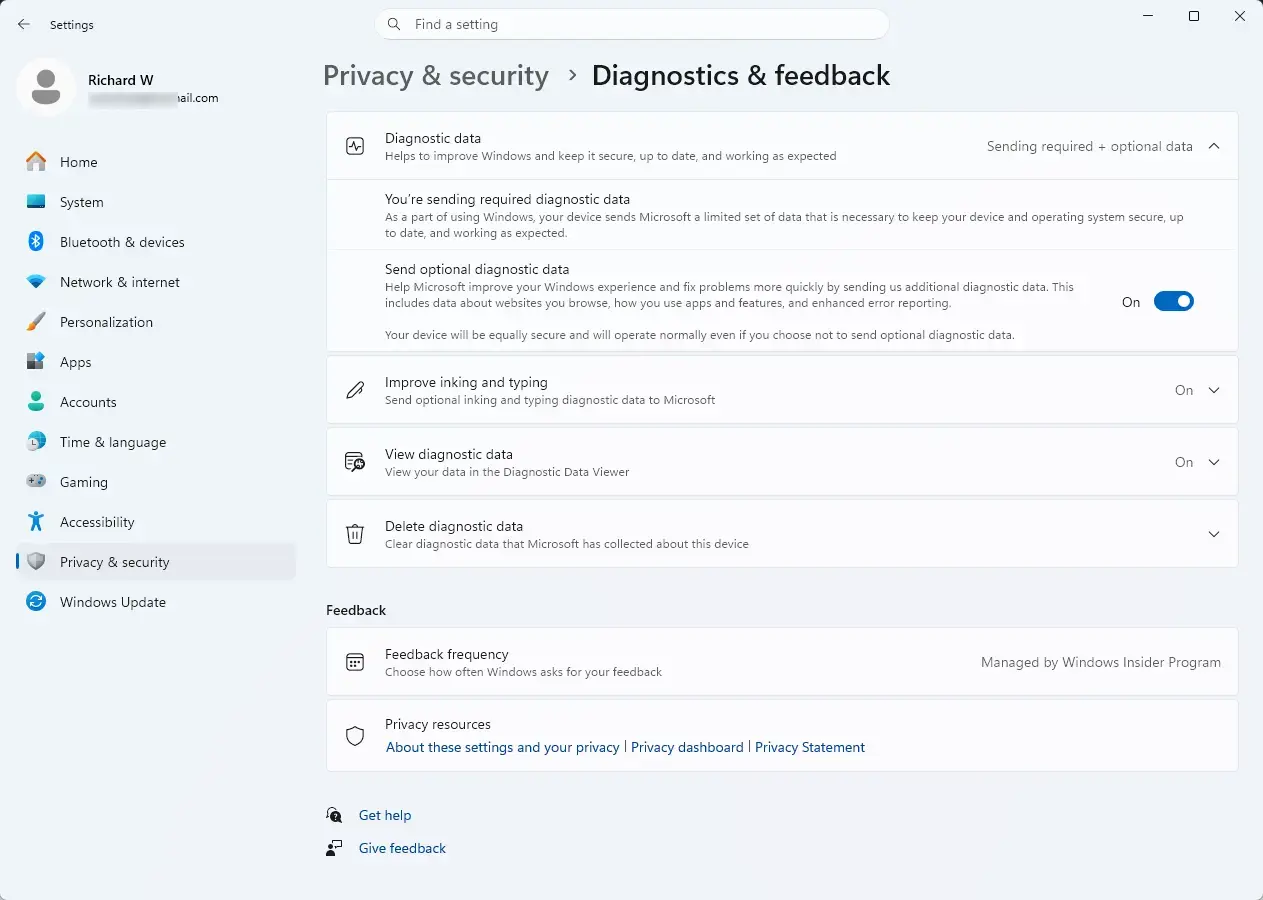
Change your selection from optional diagnostic data to required diagnostic data. In Windows 11 you do this by turning the Send optional diagnostic data switch to Off. Some older builds show this as a choice between Optional diagnostic data and Required diagnostic data instead. Required data only sends the basic information needed to keep your device secure and up to date. Optional data includes more detail about your app usage and websites you visit.
By switching to the required setting, you reduce the amount of information your computer gathers and stores. To go back, turn the same switch on again. Changing it does not remove data that was already collected, so run the delete step from the previous section afterwards. If the switch is greyed out, or a message says some settings are managed by your organization, a work or school policy controls it and you will need to ask your administrator.
Taking Control of App Permissions and Location Services
Managing app permissions and location services in Windows 11 stops programs from tracking your activity, using your camera, or monitoring your location without your knowledge. Open Settings , click Privacy & security, and review the App permissions list.
- Open the Settings app and click Privacy & security.
- Scroll down to the App permissions section. It lists categories such as Location, Camera, Microphone and Contacts.
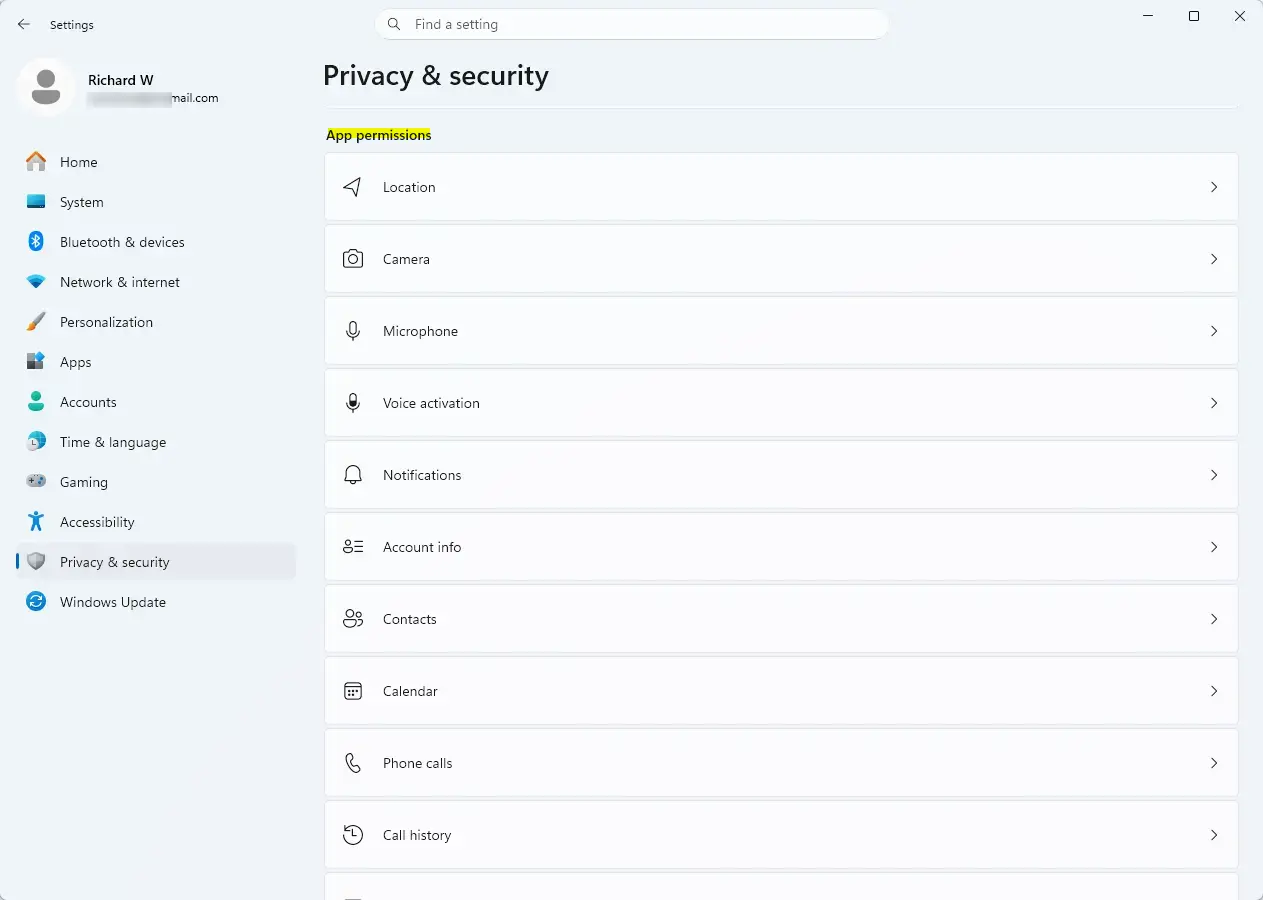
- Click through categories like Location, Camera, Microphone and Contacts. Each page shows the main access switch at the top and a list of apps below it.
- Toggle off access for any app or feature that you do not want using your personal information. Turn it back on later if an app stops working because it needs the permission.
You can completely turn off location tracking in Windows 11 by opening Settings Privacy & security Location and switching Location services to Off. Turning off the Location services setting stops apps from tracking your physical location. Some apps, such as maps and weather, will then ask you to enter your location by hand.
Managing General Privacy and Personalization Settings
Managing general privacy and personalization settings in Windows 11 stops the system from tracking your daily habits to show targeted ads and suggested content. Open Settings , go to Privacy & security, click General, and turn off the tracking switches. Newer builds of Windows 11 also have a Recommendations & offers page in the same area with extra personalization switches.
- Open the Settings app and go to Privacy & security.
- Click General. If your version of Windows 11 also shows Recommendations & offers, open that page as well and turn off any personalization switches you find there.
- Toggle off the switch that says Let apps show me personalized ads by using my advertising ID. The switch should now read Off.
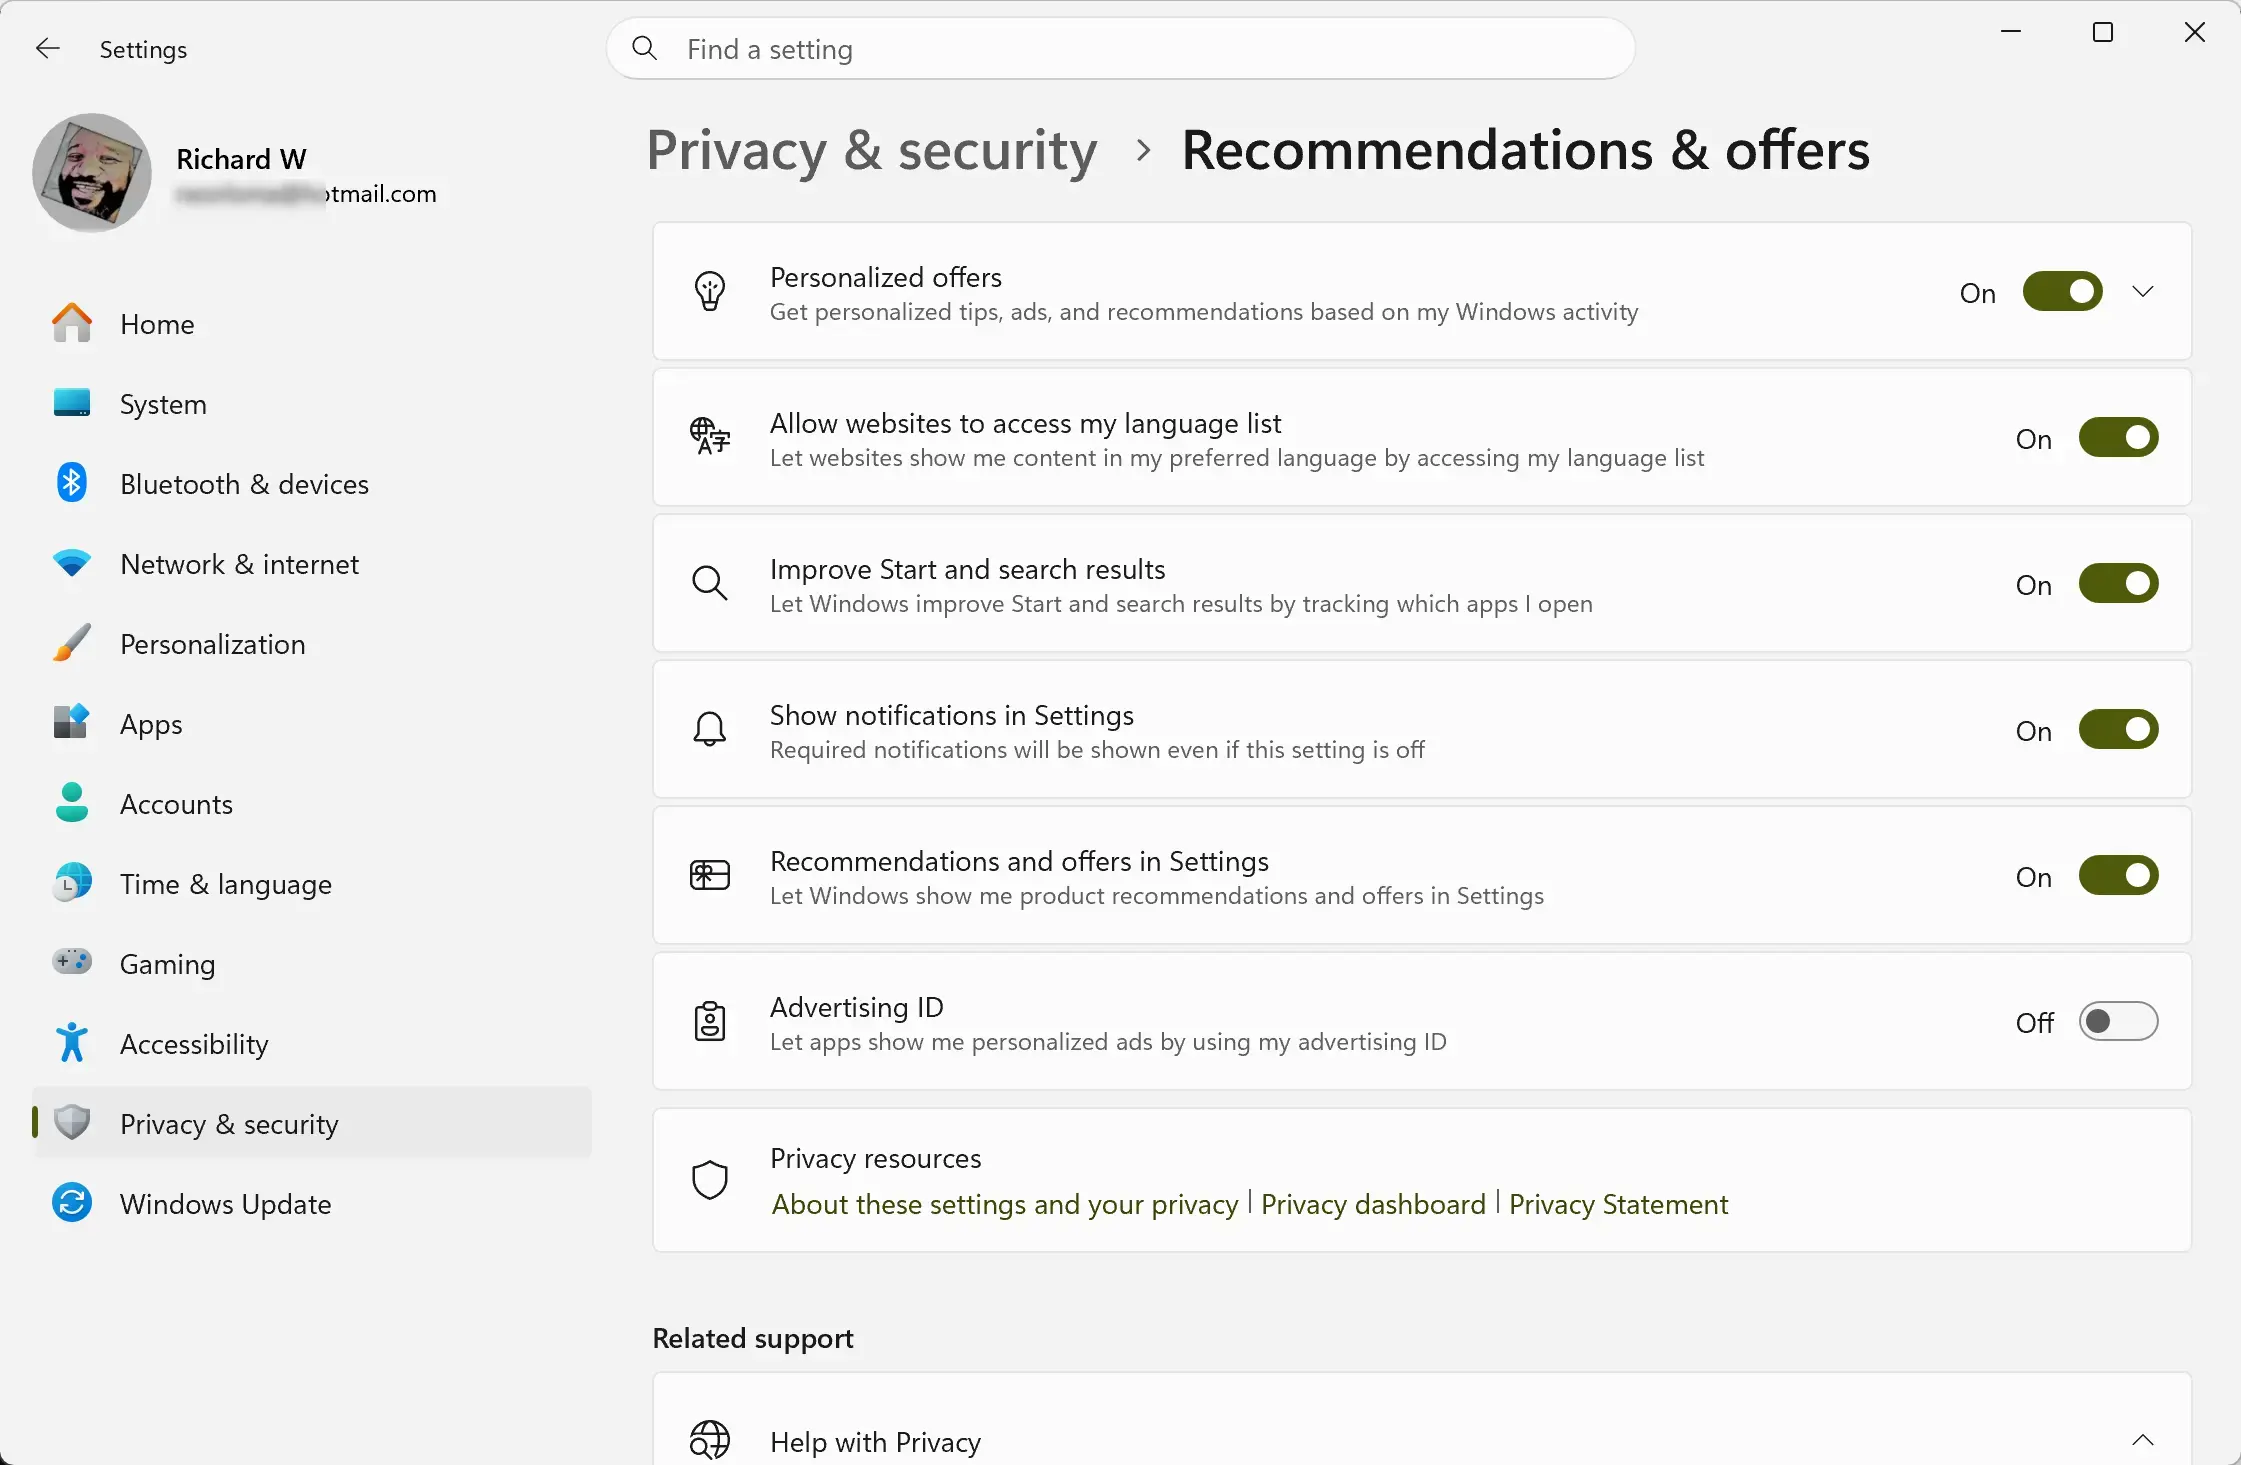
Turn off any other tracking options on this page to prevent apps and websites from using your language preferences and local content habits. The exact list of switches differs slightly between Windows 11 versions, so go through each one and turn off what you do not need.
Reviewing your general privacy settings gives Microsoft and third-party apps fewer ways to track your daily computer use. Turning off these background data-sharing options reduces the personal information collected about your device activity. It also means fewer personalized ads and suggestions.
Reviewing Clipboard History and Sync Settings
Reviewing clipboard history and sync settings in Windows 11 stops your computer from keeping sensitive copied text, passwords and images in memory. Open Settings , click System, select Clipboard, and turn off the Clipboard history switch.
- Open the Settings app and click System in the left menu.
- Select Clipboard from the list of options.
- Toggle off Clipboard history so your computer stops saving everything you copy. Only the most recent item stays available for pasting.
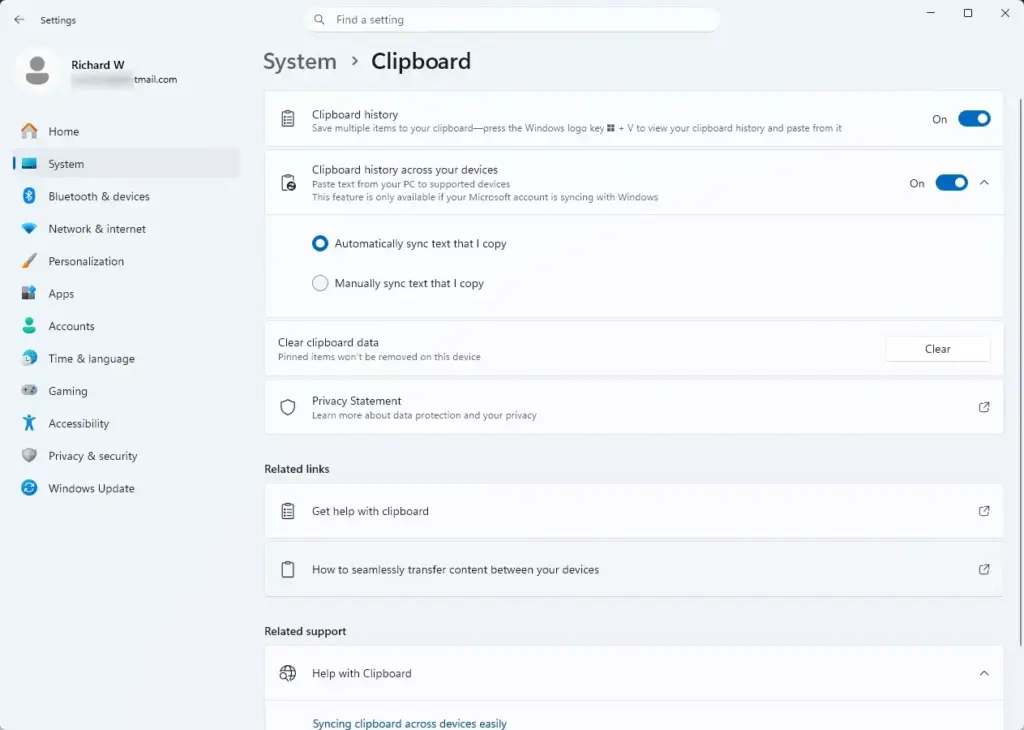
If you see an option for Sync across devices, turn that off as well to keep your copied items on your local machine only. This option usually appears only when you are signed in with a Microsoft account.
Use the Clear button under Clear clipboard data on the same page to wipe anything already saved. Clearing and turning off clipboard history prevents sensitive text from sitting in a temporary log where other users or background apps might access it.
Switching to a Local Account for Maximum Privacy
Open Settings , click Accounts, select Your info, and click the link to sign in with a local account instead. Before you start, save your work, because Windows signs you out at the end of the process. Also make sure you have a copy of your device encryption or BitLocker recovery key if your device uses one. You can usually find it in your Microsoft account online.
- Open the Settings app and click Accounts in the left menu.
- Select Your info.
- Scroll down and click the link that says Sign in with a local account instead. If the link is missing, you are probably already using a local account, or the account is managed by a work or school organization.
- Follow the on-screen prompts to confirm your choice, enter your current password or PIN, and create a local username and password.
- Finish the prompts and sign in again with your new local credentials.
Using a local account means your computer no longer links your sign-in and desktop preferences to your Microsoft account. Features that depend on that account, such as settings sync and OneDrive, stop syncing until you sign in again. To reverse the change later, return to Your info and choose to sign in with a Microsoft account instead.
Advanced Privacy: Managing Web Privacy in Microsoft Edge
Managing web privacy in Microsoft Edge prevents the built-in browser from tracking your search history, visited websites and browsing habits. Open Edge, click the three-dot menu, select Settings, and adjust your tracking prevention options. Edge updates often, so menu labels may differ slightly from those below.
- Open Microsoft Edge on your computer.
- Click the three dots in the top-right corner of the window and select Settings.
- Click Privacy, search, and services in the left menu.
- Review the Tracking prevention section and choose the level you want. Balanced is the default and Strict blocks more trackers but can break some websites.
- Toggle off options like Allow Microsoft to save your browsing history for personalized search and ads. If you cannot find that exact wording, look for similar personalization or optional diagnostic data switches on the same page.
- Clear your browsing data regularly. Under the clear browsing data section, click Choose what to clear, select what to remove and the time range, then confirm.
Securing your web browser is just as important as changing your Windows system privacy settings, because browsers collect a lot of personal data every day.
Summary
Protecting your privacy on Windows 11 is straightforward once you know how to clear diagnostic logs, manage app permissions and adjust your tracking settings. Reviewing these key privacy areas helps keep your computer secure and stops unwanted data collection. Check them again after major Windows updates, because updates can sometimes add new options.
Have a question about this guide?
Answered by AI from this guide. Good questions may be added to this page — please don't include personal details.
Did this guide fix your problem?

About the Author
Richard
Tech Writer, IT Professional
Richard is a writer at Geek Rewind who turns complex IT tasks into clear, step-by-step guides. He draws on years of hands-on experience in system administration and enterprise IT operations, focusing on Windows, Linux and WordPress: the problems people actually run into, and the fixes that work. His server and WordPress guides come from systems he runs himself. Richard builds and maintains the platform behind Geek Rewind, from its Ubuntu servers and Nginx configuration to its custom WordPress plugins. Many new tutorials start with readers' questions, and he's always glad to answer them in the comments.
No comments yet — be the first to share your thoughts!