Control How Many OneDrive Version History Copies Are Kept in Windows 11

- 18 steps
- Needs administrator rights
OneDrive on a personal Microsoft account has no setting for how many copies it keeps. You control the history by deleting or restoring versions in the OneDrive website, while an administrator sets the limit on work or school accounts.
Version history is the list of earlier saved states of a file that OneDrive stores each time you change and sync it. The history lives in the cloud, so the steps are the same on Windows 11 Home and Pro, and nothing needs a restart.
This post shows how to reach version history, how to remove copies you no longer need, and where an administrator changes the version limit.
On a personal Microsoft account, OneDrive has no setting for how many version history copies it keeps, so you control them by hand. Go to onedrive.live.com, right-click the file, select Version history, then open the three-dot menu beside an older version and select Delete version. Work or school accounts are limited by an administrator.
How OneDrive version history works
When you edit a file in your OneDrive folder, the sync app uploads the change. OneDrive keeps the previous state as a version instead of overwriting it. That is why you can open an old draft of a Word document or roll back a spreadsheet you broke.
Windows 11 does not store or manage these copies. File Explorer only gives you a shortcut to the OneDrive website, where the list actually appears. Nothing in Settings Accounts or Settings System Storage changes how many versions are kept.
How long OneDrive keeps versions, and how many, depends on your account type and plan. Microsoft has changed these limits over time, so check Microsoft’s current OneDrive documentation for your plan instead of relying on a number from a blog post. This article does not quote retention figures for that reason.
What you can and cannot control
Your options depend on the kind of account you sign in with. The two account types work differently. Check which one you use before you follow the steps.
- Personal Microsoft accountYou cannot set a version count or retention period. You can view versions, restore one, download one, and delete individual older versions.
- Work or school accountYour organization sets the version limit, usually on the SharePoint library (Microsoft’s service for storing team files) behind your OneDrive. You can restore versions and may be able to delete them, depending on permissions.
If you are looking for a “keep 10 versions” switch in the OneDrive app, it does not exist. Skip the app settings and go straight to the website.
Check which type of OneDrive account you use
Open File Explorer and look at the navigation pane on the left. A personal account shows OneDrive – Personal. A work or school account shows OneDrive – followed by your organization’s name. This tells you whether to follow the personal steps or ask your administrator.
If you need to set up or switch accounts first, see how to set up OneDrive on Windows 11.
How to review and delete old versions of a file
Use these steps to open the file’s version history and delete the older copies you no longer want:
- Open a web browser. Go to onedrive.live.com for a personal account, or sign in through your organization’s Microsoft 365 page for a work or school account.
- Sign in with the same account OneDrive uses on your PC. The page shows your files and folders.
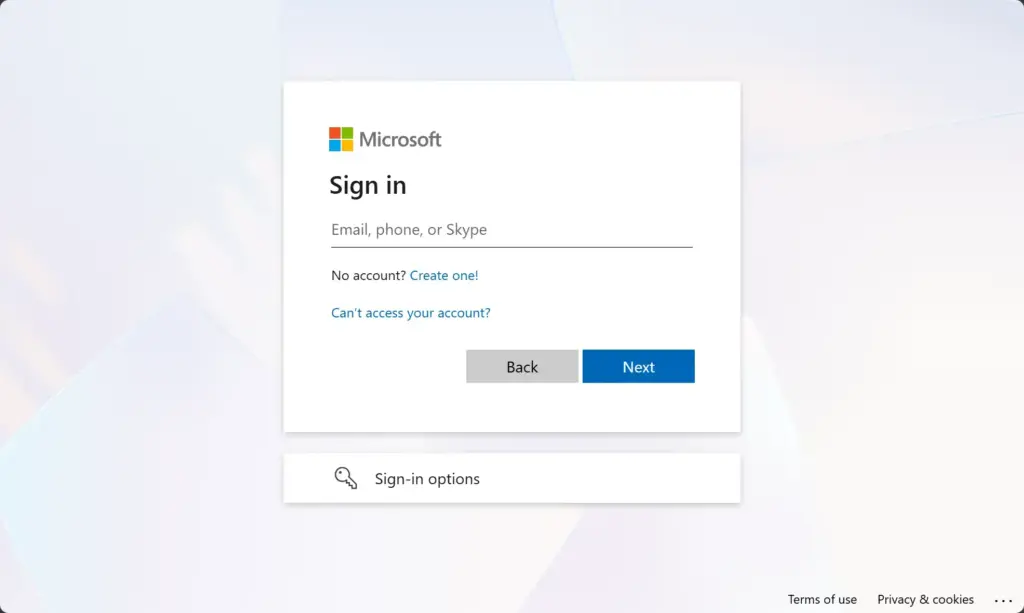
Microsoft account login page for signing in with email and password. - Browse to the file whose history you want to trim. Version history applies to files, not folders.
- Right-click the file. A context menu opens with options such as Share, Download and Delete.
- Select Version history. A panel or page opens listing each saved version with its date and time, newest first.
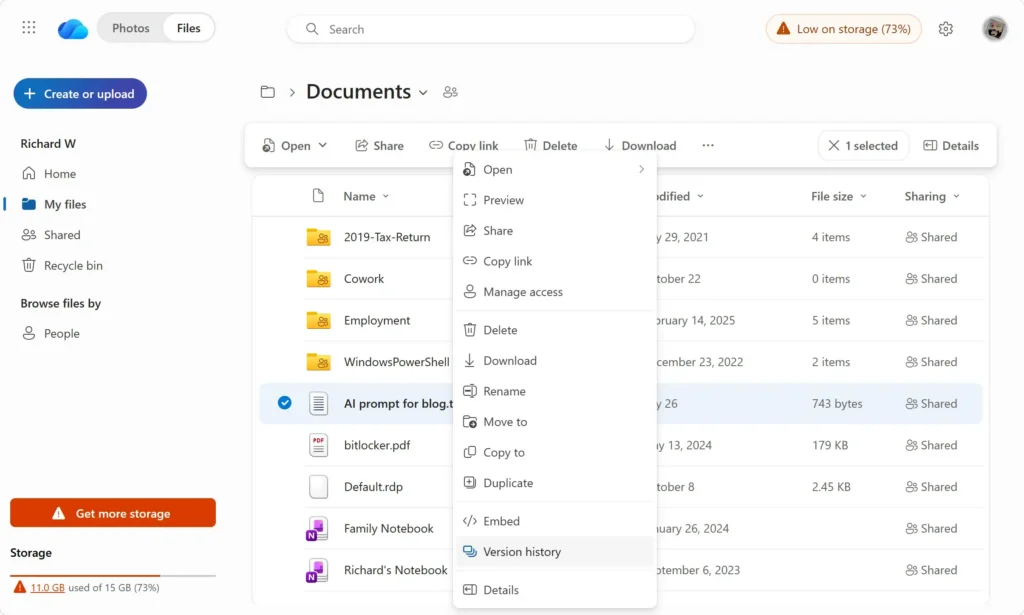
Context menu - Find the older version you want to remove. If you are unsure which one it is, select Download from that version’s menu first and open the copy.
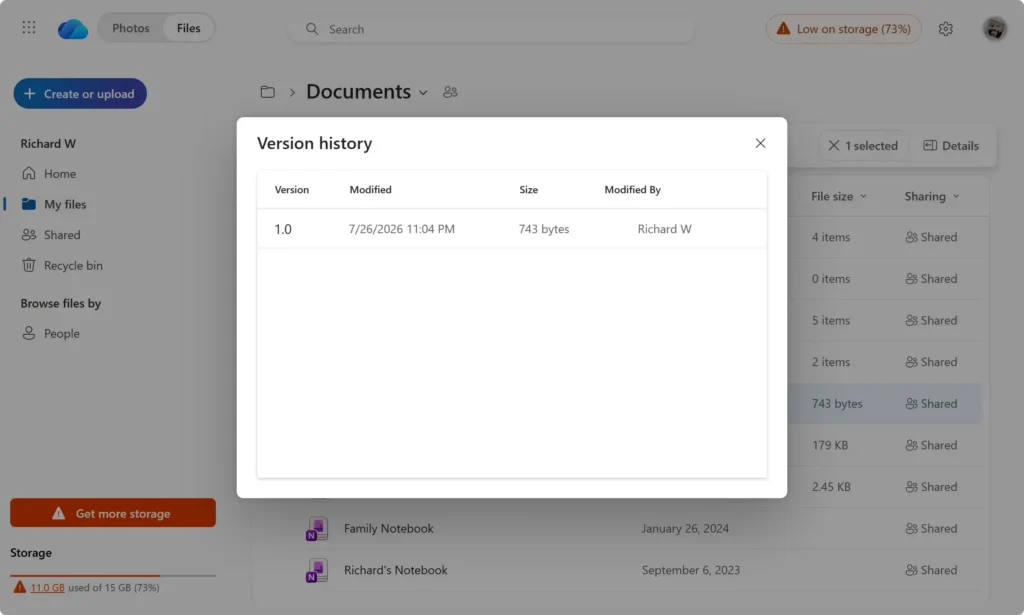
- Open the options menu beside that version. It is usually a three-dot icon or appears when you point to the version.
- Select Delete version. OneDrive asks you to confirm, because a deleted version generally cannot be brought back.
- Select Delete to confirm. The version disappears from the list.
- Repeat for each version you want to remove. Close the panel when the list shows only the copies you want to keep.
The layout differs slightly between file types, between personal and work accounts, and between OneDrive web updates. Some Office files open a version panel inside Word, Excel or PowerPoint for the web instead. The current version never has a delete option, only the older ones.
You can also start from your PC. In File Explorer, right-click a file inside your OneDrive folder. In Windows 11, select Show more options if you do not see a OneDrive entry, then choose OneDrive Version history.
This opens the same page in your browser. If the entry is missing, see the troubleshooting section below.
How to restore an earlier version
Open the version list using the steps in the deletion section above, open the menu beside the version you want, and select Restore. The file in your OneDrive folder updates after the next sync. For a full walkthrough with screenshots, see how to view, delete, or restore files from OneDrive version history.
How an administrator sets the version limit
On work or school accounts, OneDrive storage sits on SharePoint, and your administrator sets the number of versions kept in the library settings. These steps need administrator or site owner permissions. If you cannot see the menus below, you do not have permission, and you need to ask your IT team.
Lowering a limit can remove older versions beyond the new number, and you cannot reverse that. The steps below cover a standard SharePoint document library. This article does not cover the menu for a single person’s OneDrive library. Check Microsoft’s current SharePoint and OneDrive admin documentation for that case.
- Sign in to Microsoft 365 as an administrator or site owner. This requires administrator privileges.
- Open the SharePoint site that holds the library. Select the document library from the site’s navigation.
- Select Settings (the gear icon) in the top-right corner. A menu opens.
- Select Library settings. The settings page for that library opens.
- Select Versioning settings under General Settings.
- Find the Document Version History section. Choose the option that creates major versions.
- Select Keep the following number of major versions. Enter the number you want in the box.
- Select OK to save. The new limit applies to the library.
Some organizations see automatic and manual version limit options, or defaults that apply to the whole organization in the SharePoint admin center. Labels can differ from the ones above, so match what your screen shows rather than the exact wording here.
Why Version history is missing or greyed out
Most “missing option” problems come from one of a few causes. Check these in order.
- The file is not in OneDrive. Right-click menus only show OneDrive entries for files inside your OneDrive folder. A file on the Desktop or in 📁C:\
Users\ that is not backed up by OneDrive has no history.USERNAME\ Documents - The file has not finished syncing. A new file has no earlier versions until you change and sync it at least once. Look for the green check or blue sync arrows on the file icon.
- You selected a folder. Versions belong to files. Open the folder and right-click a file inside.
- The classic menu is hiding the entry. In Windows 11, the shortened right-click menu may not show the OneDrive entry. Select Show more options.
- Your organization restricts it. On work or school accounts, admins can limit what you can delete or restore. Ask them if the delete option never appears.
- OneDrive is signed out or paused. The sync app must be running. See how to turn OneDrive on or off in Windows 11 if the icon is missing from the taskbar.
Tips for keeping the versions that matter
You cannot set how big the history gets, but you can protect the copies that matter. These habits help.
- Download a copy before you delete versions. A downloaded file sits outside OneDrive, so deleting versions never touches it.
- Save milestones under a new name. A file called Budget-final-2025.xlsx is a separate file with its own history, so it survives any clean-up of the original.
- Trim only large files. Documents with many saved states and big attachments, such as large presentations, hold the most history. Small text files rarely need attention.
- Keep sensitive files in a protected spot. OneDrive Personal Vault asks you to confirm who you are before you open those files.
- Keep a second backup. Version history is not a full backup. For a local copy of everything, use the steps to download all files from OneDrive to Windows.
For day-to-day sorting, syncing and file handling in the same folder, the guide to managing OneDrive files on Windows 11 covers the related options.
How to undo what you changed
Restoring a version is reversible if you downloaded the current copy first: upload it again or restore the version from the list. Deleting a version is not reversible on a personal account, so no step brings it back. On a work or school account, deleted items may sit in a recycle bin that your administrator can reach, but do not count on it.
A lowered library limit cannot be raised to bring back trimmed versions. Raising it again only lets future versions accumulate.
If this didn’t work
If the version list is empty, change the file and let it sync once, then reopen the list. If the right-click entry is missing for a file that is syncing, sign out of OneDrive and back in, or ask your administrator whether an organization rule hides it. For local, drive-based versions that sit outside OneDrive, see how to reset File History in Windows 11.
Have a question about this guide?
Answered by AI from this guide. Good questions may be added to this page — please don't include personal details.
Did this guide fix your problem?

About the Author
Richard
Tech Writer, IT Professional
Richard is a writer at Geek Rewind who turns complex IT tasks into clear, step-by-step guides. He draws on years of hands-on experience in system administration and enterprise IT operations, focusing on Windows, Linux and WordPress: the problems people actually run into, and the fixes that work. His server and WordPress guides come from systems he runs himself. Richard builds and maintains the platform behind Geek Rewind, from its Ubuntu servers and Nginx configuration to its custom WordPress plugins. Many new tutorials start with readers' questions, and he's always glad to answer them in the comments.
No comments yet — be the first to share your thoughts!