Select Provider for Secure DNS in Google Chrome

Secure DNS in Google Chrome is a built-in privacy feature. It hides the websites you visit from your internet service provider and anyone else watching the network. Every time you open a site, your browser has to turn the web address into an IP number. Secure DNS encrypts that lookup using DNS-over-HTTPS (DoH), so it can’t be read in transit.
You can also force Chrome to use a specific provider by setting the DnsOverHttpsTemplates policy on your system. This keeps the browser locked to the lookup service you chose, so users can’t switch it by accident. This guide covers two methods. The first uses Chrome’s own settings and suits one user on one browser. The second uses the Windows Registry and suits a whole PC or a managed setup.
To select a secure DNS provider in Chrome, open Settings , click Privacy and security, then Security. Scroll to Use secure DNS, toggle it on, and choose your provider from the drop-down list. Chrome saves the change.
Enable/Disable DNS Over HTTPS in Chrome
The Chrome settings page is the easiest route. You don’t need any special tools or administrator rights. You can turn secure DNS on or off and choose a provider from the list Chrome offers. The change applies to your Chrome profile only. If the option is greyed out or shows “Managed by your organization,” a policy is already controlling it. In that case, use the registry method below to change or remove the policy.
Launch the Google Chrome browser.
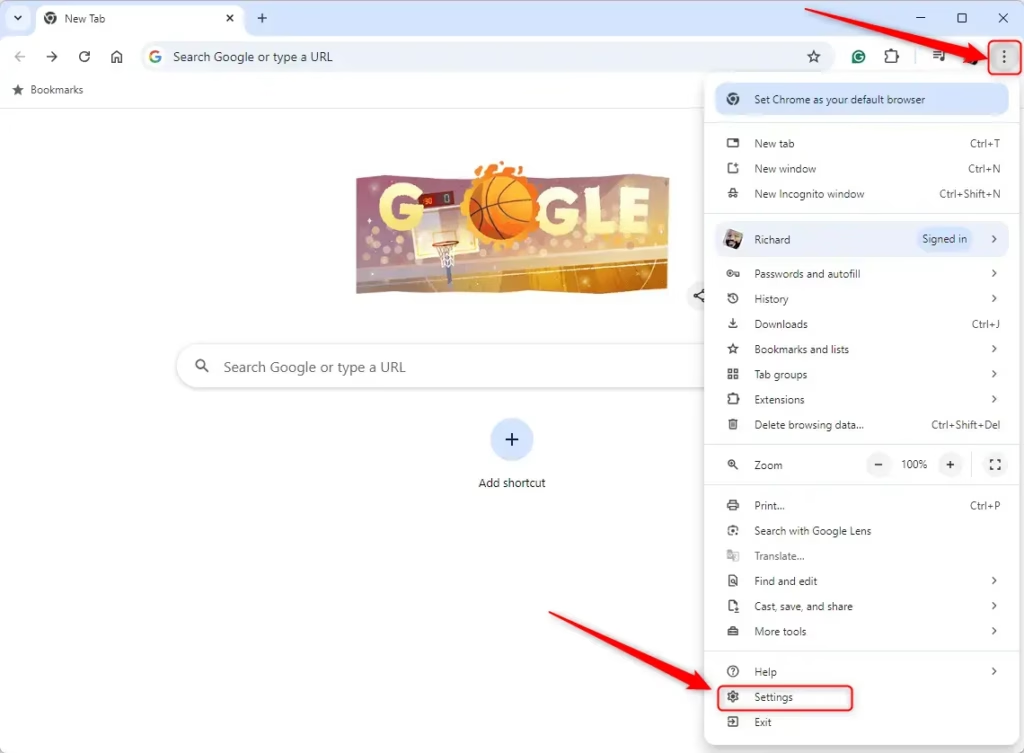
Click the Customize and Control button (the three vertical dots) in the top-right corner, then select Settings. The Settings page opens in a new tab.
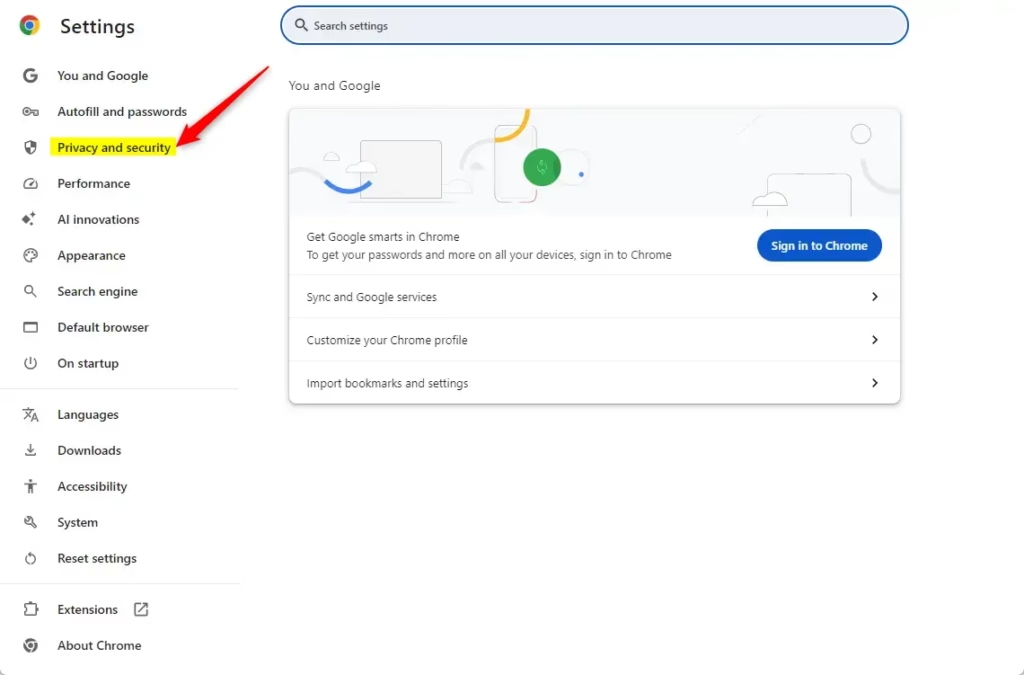
Click Privacy and security in the left menu of the Settings page. The privacy options appear on the right.
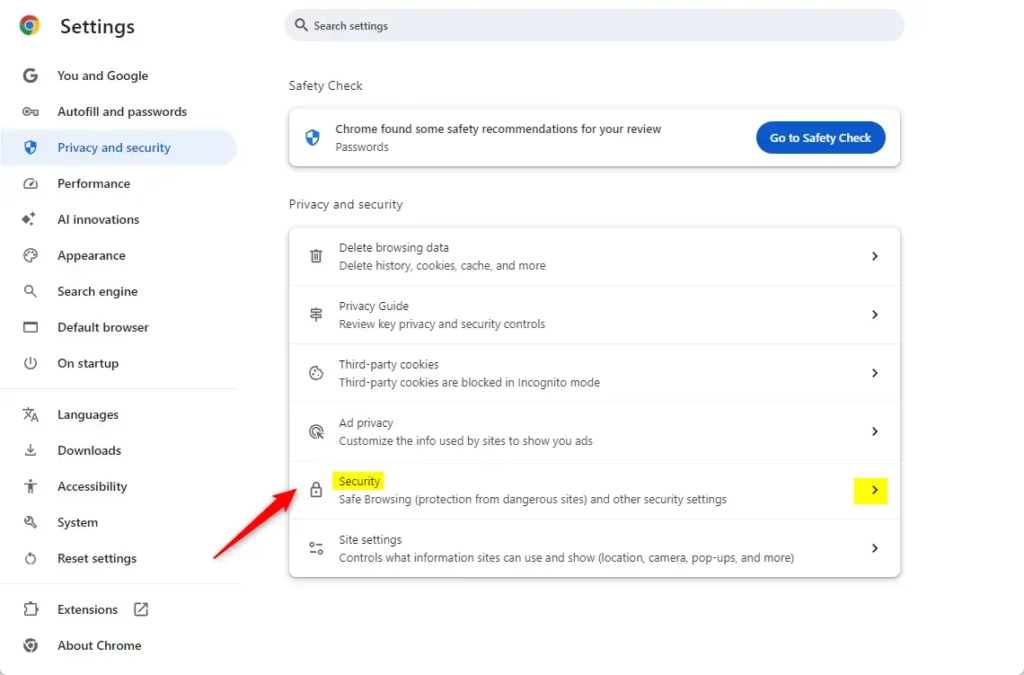
On the right, click the Security tile to open it. The security options load on a new page.
Scroll down to the Advanced section and find Use secure DNS.
Move the toggle to turn it on or off. When it is on, Chrome shows extra choices. You can keep your current service provider if it supports secure DNS. You can also pick another provider from the drop-down list.
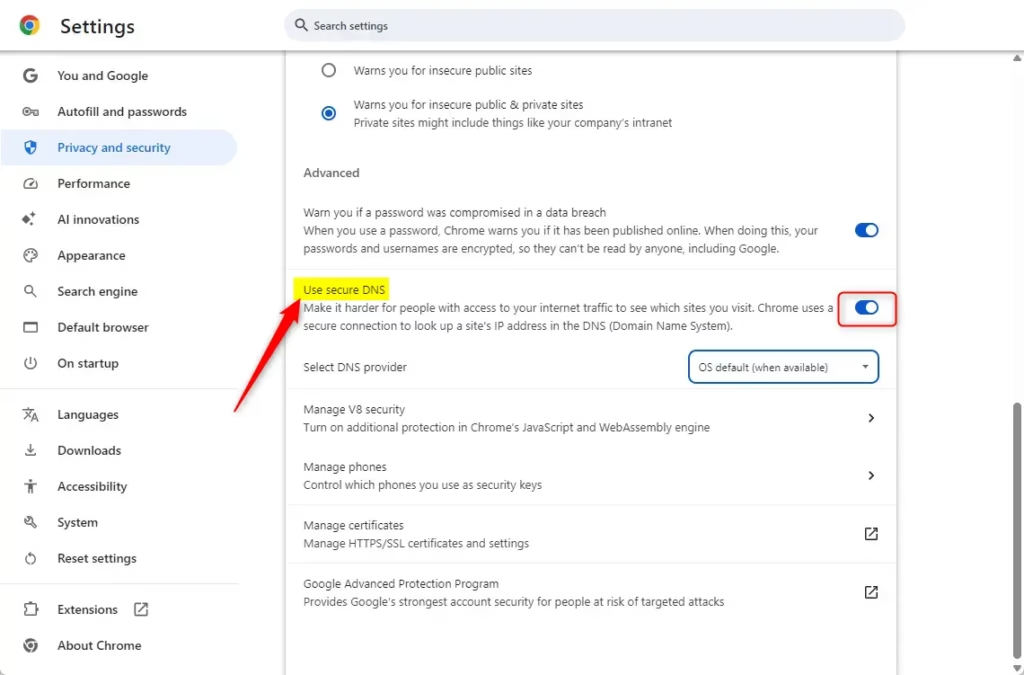
Chrome saves the change as soon as you make it. You can simply close the Settings tab. There is nothing to apply and no restart is needed. To undo the change, return to the same page and switch the toggle back.
Enable / Disable Secure DNS in Chrome using the Registry
The Windows Registry method lets you enforce the rule across the whole computer. It works on both Windows 11 Home and Pro, and you need an administrator account. The Registry Editor is a database tool that stores Windows and application settings. The Chrome policies live under HKEY_LOCAL_MACHINE\SOFTWARE\Policies\Google\Chrome. A bad edit here can cause problems, so make a backup first.
Open the Windows Registry and navigate to the path below. Approve the User Account Control prompt if it appears.
- ⚠️WarningBefore you change anything, always back up your registry or create a System Restore point as a precaution.
Then you can roll back if something goes wrong.
ComputerHKEY_LOCAL_MACHINESOFTWAREPoliciesGoogleChrome
If the Google folder is missing under the registry path, that is normal. Chrome policies don't exist until someone creates them. Create the keys like this:
Right-click the Policies key and select New Key.
Name the new key Google.
Right-click Google, select New Key, and name it Chrome. Skip any key that already exists.
Next, add the policy value:
Right-click Chrome > New > String Value. The new entry is a REG_SZ value.
Name the new value
DnsOverHttpsMode. Spell it exactly as shown, because Chrome ignores names it doesn't recognize.Double-click the
DnsOverHttpsModeentry to open it.Type one of the values listed below in the Value data box, then click OK.
- off = Disable DNS-over-HTTPS
- automatic = Enable DNS-over-HTTPS with insecure fallback. If the secure lookup fails, Chrome falls back to normal DNS.
- secure = Enable DNS-over-HTTPS without insecure fallback. If the secure lookup fails, the page does not load.
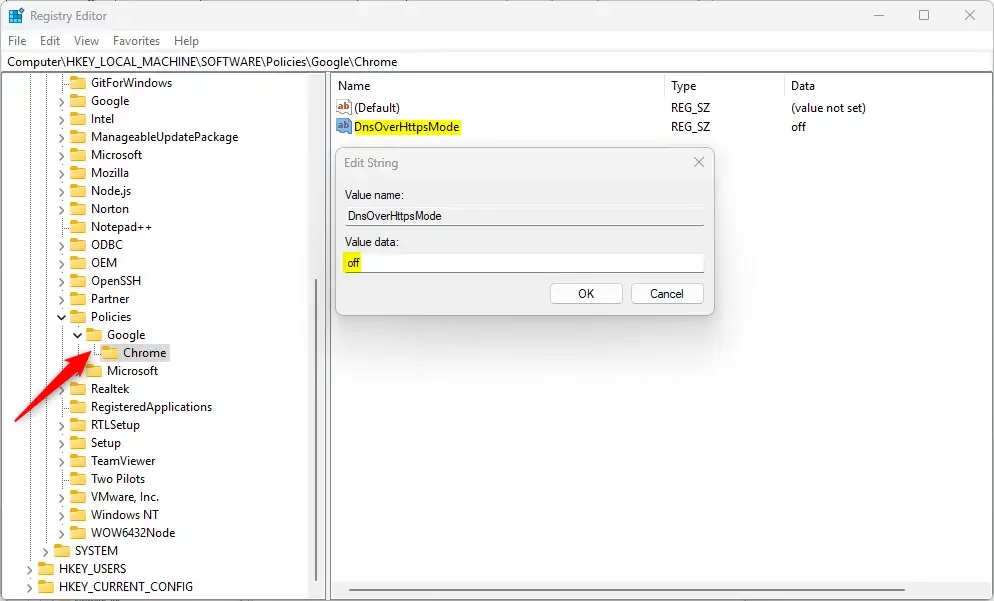
Once a policy sets this value, Chrome's secure DNS toggle in Settings is locked. It may also show a "Managed by your organization" message. That is expected on a PC that isn't part of a company network.
To revert to the default settings and get control of the Chrome interface back, delete the DnsOverHttpsMode entry. Right-click it in the Registry Editor, select Delete, and confirm. If you restored a registry backup instead, that works too.
DnsOverHttpsMode
At minimum, close all Chrome windows and open the browser again, because Chrome reads policies at startup. A full restart is the safest way to make sure the change takes effect.
Be careful with "secure" mode. It requires every lookup to go through DNS-over-HTTPS, with no fallback. If the provider is blocked, down, or unreachable on your network, sites will fail to resolve. If you see that, switch to "automatic" or delete the entry to test.
To pick a specific provider, set a DnsOverHttpsTemplates value alongside the mode setting. It tells Chrome which secure lookup service to use, and it only takes effect when the mode is "automatic" or "secure." Use the address template your chosen provider publishes.
That completes the configuration.
Reference:
Conclusion:
Managing secure DNS in Google Chrome happens through the built-in browser settings or the Windows Registry. Review the key points below:
- Multiple Options: You can select from "off," "automatic," or "secure" modes based on your privacy needs.
- Ease of Access: Adjustments can be made quickly in the Chrome settings or via Registry Editor for more advanced users.
- Backup Precaution: Always remember to back up your registry before making changes to avoid potential issues.
- Restore Defaults: Deleting the "DnsOverHttpsMode" entry will revert Chrome to its default settings, allowing user-configurable options.
- Reboot Required: A computer restart may be necessary for changes to take effect fully.
- Dedicated Support: For enterprise environments, refer to the Chrome Enterprise Policy for additional configuration options.
Understanding these options enhances browsing privacy and security effectively.
Have a question about this guide?
Answered by AI from this guide. Good questions may be added to this page — please don't include personal details.
Did this guide fix your problem?

About the Author
Richard
Tech Writer, IT Professional
Richard is a writer at Geek Rewind who turns complex IT tasks into clear, step-by-step guides. He draws on years of hands-on experience in system administration and enterprise IT operations, focusing on Windows, Linux and WordPress: the problems people actually run into, and the fixes that work. His server and WordPress guides come from systems he runs himself. Richard builds and maintains the platform behind Geek Rewind, from its Ubuntu servers and Nginx configuration to its custom WordPress plugins. Many new tutorials start with readers' questions, and he's always glad to answer them in the comments.
No comments yet — be the first to share your thoughts!