How to Set Google Chrome to Use System Default Printer

Google Chrome can be set to always use your computer’s default printer, instead of the last printer you selected.
Chrome normally remembers the last printer you used. This feature, called “print destination persistence,” gets in the way if you switch between printers, for example a main office printer and a smaller one at home. You change your Windows default, but Chrome keeps offering the old printer.
If you turn off Chrome’s printer memory, the browser uses whatever printer Windows has set as the default. You no longer have to pick a printer every time you print. The steps below apply to Windows 10 and Windows 11.
Open Settings Bluetooth & devices Printers & scanners, click your preferred printer, and select Set as default. Then open Registry Editor, navigate to 🗝️HKEY_LOCAL_MACHINE\
How to change the default printer in Windows
Start by making sure Windows itself has the right default printer. Chrome can only follow the system default if that default is the one you want.
- Open Settings and go to Bluetooth & devices Printers & scanners (on Windows 10, Devices Printers & scanners). You should see a list of installed printers.
- Click the printer you prefer. Its settings page opens.
- Click the Set as default button. The printer is now marked as Default in the list.
If Set as default is missing or greyed out, turn off Let Windows manage my default printer at the top of the Printers & scanners page. While that option is on, Windows changes the default to the last printer you used, which is the same problem you are trying to fix in Chrome. Once it is off, the button appears.
Force Chrome to use the system default printer
You can force this behavior through the Windows Registry, so Chrome picks your default printer automatically. You open the Registry Editor, go to 🗝️HKEY_LOCAL_MACHINE\
Editing the registry can break things if you change the wrong entry, so follow the steps in order and make a backup first. This method works on both Home and Pro editions, because it edits the registry directly and does not need the Group Policy editor.
- Press the Windows key, type Registry Editor, and open it. Approve the User Account Control prompt.
- Click File Export, choose a location, and save the backup file.
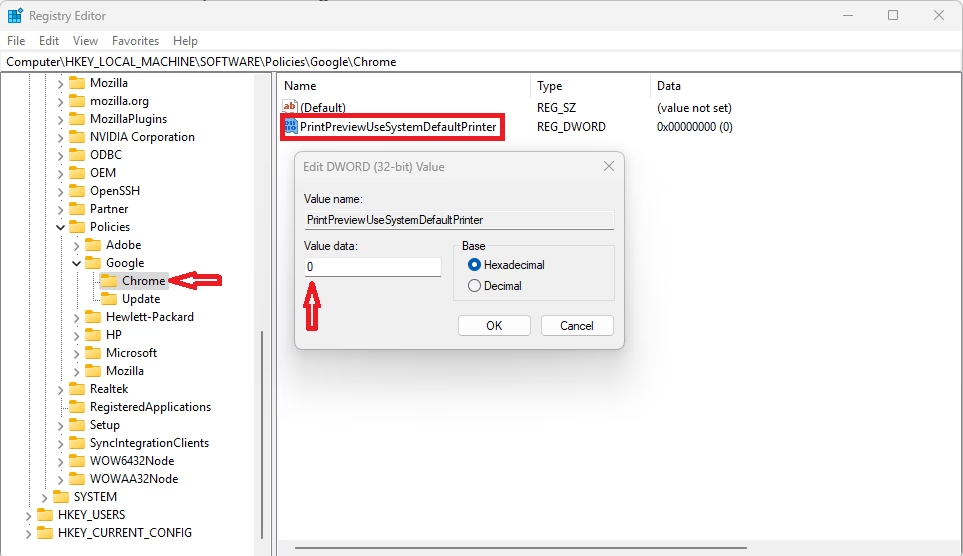
- Go to the following location:
Chrome's policy key often does not exist on a home PC. If you do not see the Google or Chrome folders under Policies, right-click the parent key, choose New Key, and name it exactly Google. Then repeat inside it to create a key named Chrome.
Next, add the setting that makes Chrome use the system default printer. A registry value is a single named setting stored inside a key. The registry is the database Windows uses for system settings.
- Right-click the Chrome key and select New DWORD (32-bit) Value. A new entry appears in the right pane with its name highlighted.
- Name it PrintPreviewUseSystemDefaultPrinter, spelled and capitalized exactly like that, and press Enter.
- Double-click the new value. The Edit DWORD (32-bit) Value window opens.
- Type 1 in the Value data box and click OK. The list now shows the value as 0x00000001 (1).
Close the Registry Editor and fully close Chrome, including any windows still running in the background. Open it again and try to print. Chrome should now offer your Windows default printer.
To undo the change, return to the same key and delete the value, or set it to 0. You can also double-click the backup file you exported to restore the earlier state.
Troubleshooting 'Save as PDF' persistence
If Chrome still defaults to "Save as PDF" instead of your printer, the 'PrintPreviewUseSystemDefaultPrinter' registry setting is the first thing to check. Go through this list:
- Confirm the value name is spelled exactly right, that it is a DWORD (32-bit) value, and that its data is 1.
- Confirm it sits in the Chrome key under Policies\Google, and not in a similar-looking key elsewhere.
- Close every Chrome window and reopen the browser. Chrome only reads the setting at startup.
- Check that Windows really has a default printer set. If no printer is marked as default, Chrome has nothing to fall back on.
Enterprise and Domain-joined environments
Office IT departments often manage Chrome printer settings through Group Policy. This central control can stop individual users from changing which printer Chrome selects, and it can overwrite a registry value you set yourself the next time policies refresh.
On a work computer, your IT team can adjust these Chrome printer settings for all company machines using the specialized Chrome policy templates. If the setting will not stick, or you cannot edit the registry, ask IT to apply it centrally instead of working around it.
Summary
By default, Chrome picks the last printer you used and not your system's default. To change that, set the right default printer in Windows, turn off Let Windows manage my default printer if it is on, and add the registry value described above. Then restart Chrome so the new behavior takes effect.
Did this guide fix your problem?

About the Author
Richard
Tech Writer, IT Professional
Richard is a writer at Geek Rewind who turns complex IT tasks into clear, step-by-step guides. He draws on years of hands-on experience in system administration and enterprise IT operations, focusing on Windows, Linux and WordPress: the problems people actually run into, and the fixes that work. His server and WordPress guides come from systems he runs himself. Richard builds and maintains the platform behind Geek Rewind, from its Ubuntu servers and Nginx configuration to its custom WordPress plugins. Many new tutorials start with readers' questions, and he's always glad to answer them in the comments.
No comments yet — be the first to share your thoughts!