How to Block External Extensions in Google Chrome


Blocking external extensions in Google Chrome stops add-ons that are installed from outside the browser’s own install flow, such as by other software on the PC. The policy that controls this is called BlockExternalExtensions. It protects the browser from potentially harmful software.
Some unofficial extensions can track your online activity or contain malware. Turning this policy on is a simple way to keep them off the machine.
You can set the policy in the Windows Registry Editor, a tool for changing advanced system settings, or in the Group Policy Editor. This tutorial uses the Registry Editor. It works on Windows 10 and Windows 11, in both Home and Pro editions. Home does not include the Group Policy Editor, so the registry is the practical route there.
Enable the BlockExternalExtensions policy in Chrome. This is done by creating a DWORD value named BlockExternalExtensions in the Windows Registry at 🗝️HKEY_LOCAL_MACHINESOFTWAREGoogleChrome and setting its value to 1. This prevents installing extensions from outside the Chrome Web Store.
Block external extensions in Chrome
The method is to add one entry to the registry. Chrome reads that entry every time it starts and follows it as a rule. Once the rule is in place, outside software can no longer install extensions into Chrome without your permission. You need an administrator account to make the change.
- Open the Windows Registry with an administrator account.
- Click Yes if User Account Control asks whether to allow the app to make changes. The Registry Editor window should now be open, with a folder tree on the left.
- Navigate to the key path shown below. You can expand the folders in the left pane one by one, or paste the path into the address bar at the top of the window.
Back up the registry before you change anything. The registry stores important Windows and application settings, and a wrong edit can cause problems. A backup lets you restore the previous state if something goes wrong.
- In the Registry Editor, click File Export.
- Set Export range to All, pick a location, and give the file a name.
- Click Save. To restore later, double-click the saved file and confirm the merge.
A System Restore point gives you even more protection, because it can roll back the whole system rather than just the registry.
The Google and Chrome keys often do not exist yet. If they are already there, skip the step that creates them.
- Right-click the Policies key and choose New Key. Name the new key Google.
- Right-click the Google key and choose New Key. Name the new key Chrome.
- Select the Chrome key. Right-click an empty area in the right pane and choose New DWORD (32-bit) Value.
- Name the value BlockExternalExtensions. The new entry should appear in the right pane with a data value of 0.
Use a DWORD (32-bit) value even on a 64-bit system. Chrome will ignore other value types for this policy.
- Double-click BlockExternalExtensions. The Edit DWORD (32-bit) Value box opens.
- Enter the number in the Value data field, using the list below.
- Click OK. The new number should show in the Data column.
0= Default - Allow users to install external extensions.1= Block external extensions from being installed.
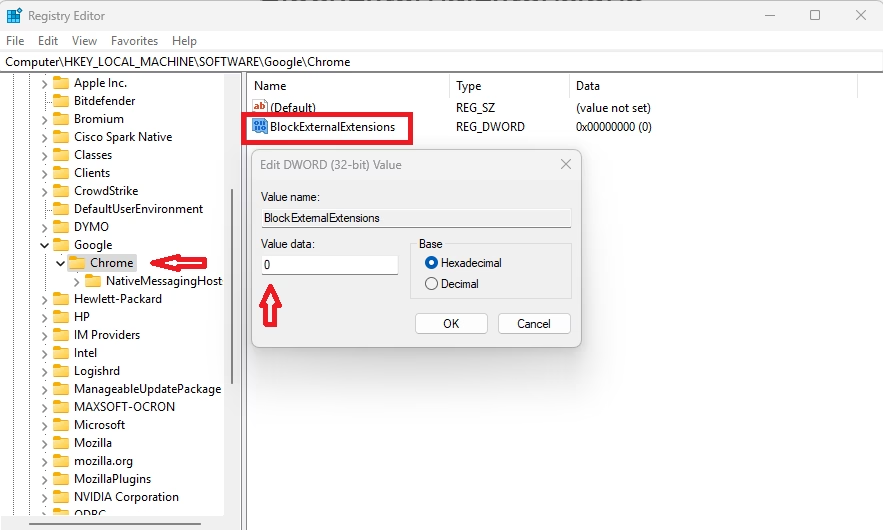
To undo the change and restore Chrome's default behavior, delete the value you created.
- Go back to the Chrome key in the Registry Editor.
- Right-click BlockExternalExtensions and choose Delete.
- Click Yes to confirm. The entry should disappear from the right pane.
Setting the value to the default number from the list above has the same effect. Deleting it is cleaner, because it leaves no policy behind.
BlockExternalExtensions
Close the Registry Editor and fully close every Chrome window, so Chrome reads the new setting when it starts again. If the policy does not seem to apply, restart the computer. This applies whether you added the value or deleted it.
That should do it! Chrome will now follow the rule you set.
Reference:
Conclusion:
Blocking external extensions in Google Chrome is a simple way to improve your device's security. Here are the main points:
- Using the BlockExternalExtensions policy helps prevent the installation of potentially harmful extensions.
- Modifying the Windows Registry is necessary to implement this policy; ensure you back up your registry before making changes.
- After updating the registry, close and reopen Chrome. A system reboot may be required to activate the new settings.
- Always stay informed about the security implications of third-party extensions in your web browser.
- Regularly review and update your browser settings to maintain optimal security.
Blocking external extensions in Google Chrome protects your computer from harmful software. Third-party extensions can contain viruses or steal your personal information. By following these steps, you reduce those risks and secure your device. If you ever need the default behavior back, delete the value and restart Chrome.
Have a question about this guide?
Answered by AI from this guide. Good questions may be added to this page — please don't include personal details.
Did this guide fix your problem?

About the Author
Richard
Tech Writer, IT Professional
Richard is a writer at Geek Rewind who turns complex IT tasks into clear, step-by-step guides. He draws on years of hands-on experience in system administration and enterprise IT operations, focusing on Windows, Linux and WordPress: the problems people actually run into, and the fixes that work. His server and WordPress guides come from systems he runs himself. Richard builds and maintains the platform behind Geek Rewind, from its Ubuntu servers and Nginx configuration to its custom WordPress plugins. Many new tutorials start with readers' questions, and he's always glad to answer them in the comments.
No comments yet — be the first to share your thoughts!