How to Uninstall Voice Access Language in Windows 11

Voice Access language packs in Windows 11 let you control your computer by speech in regional variants such as English (UK) or English (India). Each extra pack takes up storage space and adds another entry to the language list, so removing the ones you don’t use frees disk space and keeps your settings tidy. Voice Access is built into Windows 11 version 22H2 and later.
You turn Voice Access on under Settings Accessibility Speech The language files themselves are removed in a different place: the Installed apps list in Settings, or a command in Windows Terminal. Both methods are covered below.
Open Settings Apps Installed apps, search for “Speech Pack”, click the three dots next to the language you want to remove, and select Uninstall. Confirm the removal, then sign out and back in if it still appears in Voice Access settings.
What is Voice Access?
Voice Access is a built-in tool that lets you control your computer using spoken commands. It supports several regional variants of English:
- English – US
- English – UK
- English – India
- English – New Zealand
- English – Canada
- English – Australia
Switch between them in Voice Access Settings Languages If you only use one variant, the others are safe to remove. You can download a language again from the same Voice Access language settings if you change your mind.
How to Uninstall Voice Access Languages
Voice Access languages can be removed in two ways: using the Windows Settings app or using the Windows Terminal app. Let’s go through both. The Settings method works the same on Windows 11 Home and Pro, and it is the safer choice if you don’t use the command line often.
1Using Windows Settings
Use the Settings app if you prefer a graphical menu over commands. The language packs are listed with your other installed apps, so you remove them the same way you would remove any program. This deletes the unwanted speech files and frees up storage without any extra tools.
Switch to another language first under Voice Access Settings Languages
- Click the Start button (Windows icon) at the bottom-left corner, or in the center of the taskbar if you use the default layout.
- Select Settings (gear icon). The Settings window opens.
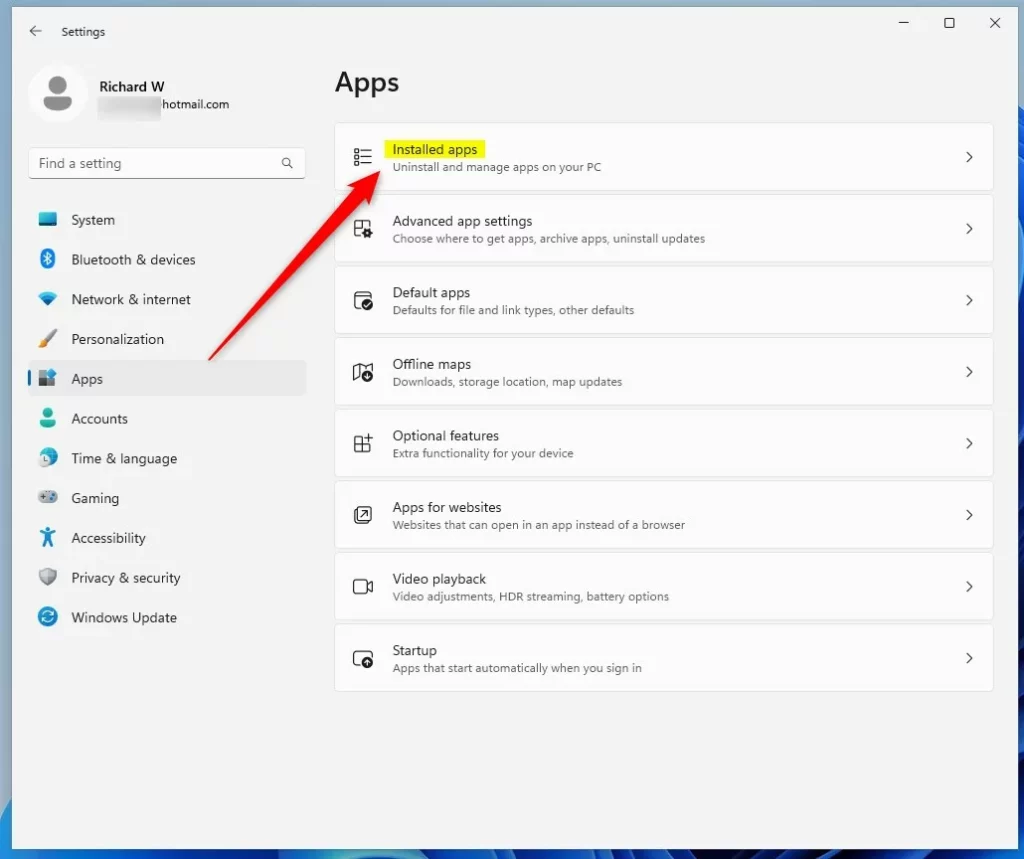
- From the left menu, click Apps.
- Click Installed apps. You now see a list of everything installed on the PC.
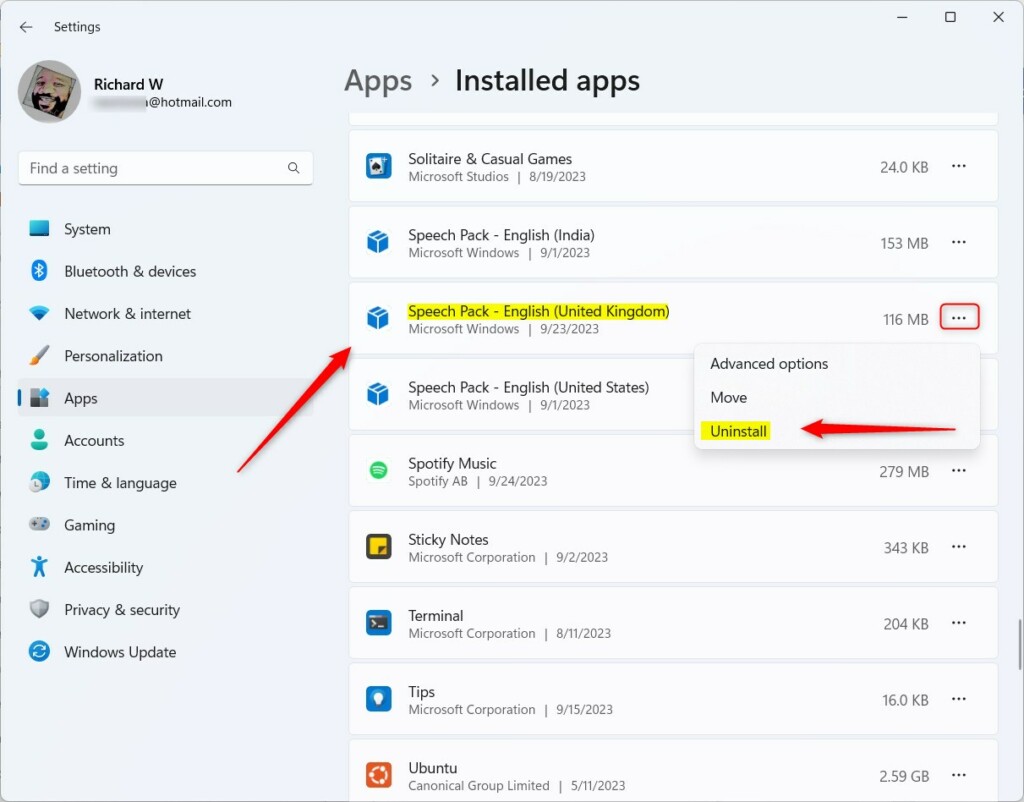
- Scroll through the list and find the language pack you want to remove. It will be named something like Speech Pack (English United Kingdom). The exact wording can vary, so you can also type a word such as "speech" in the search box above the list to narrow it down.
- Click the three dots (the more options button) at the right of that entry and choose Uninstall.
- When Windows asks, click Uninstall again to confirm. The pack disappears from the list. If it still shows up in the Voice Access language list, sign out and back in, or restart the PC.
2Using Windows Terminal
You list the installed language packages, copy the full name of the one you want to remove, and run a second command on it. This is quicker than clicking through menus, and it helps when you need to remove several packs or when a pack doesn't show up clearly in Installed apps.
⚠️ Admin Required: This method requires administrator privileges. If you are on a work PC or a standard user account, you will be asked for an administrator password, or the command may be blocked.
Steps:
- Open Windows Terminal as an administrator. To do this:
- Click Start, type Terminal, right-click on Windows Terminal, and select Run as administrator. When the User Account Control prompt appears, click Yes. A Terminal window opens, and its title bar shows "Administrator".
- Type this command to see a list of installed Voice Access languages, then press Enter:
Get-AppxPackage *MicrosoftWindows.Speech* | Select Name, PackageFullName - You will see a list like this:
Name                            PackageFullName
----                            ---------------
MicrosoftWindows.Speech.en-US.1 MicrosoftWindows.Speech.en-US.1_1.0.16.0_x64__cw5n1h2txyewy
MicrosoftWindows.Speech.en-IN.1 MicrosoftWindows.Speech.en-IN.1_1.0.7.0_x64__cw5n1h2txyewy
MicrosoftWindows.Speech.en-GB.1 MicrosoftWindows.Speech.en-GB.1_1.0.7.0_x64__cw5n1h2txyewy - Find the PackageFullName of the language you want to uninstall. Check the name carefully, because each language has its own entry. You can select the text with the mouse and press Ctrl+C to copy it.
- Then run this command, replacing the package name with the one you want to remove. Paste the copied name with Ctrl+V to avoid typing mistakes:
Remove-AppxPackage -Package 'MicrosoftWindows.Speech.en-GB.1_1.0.7.0_x64__cw5n1h2txyewy' - After running the command, the language pack will be removed from your PC. If you get an access error, close the window and reopen Terminal as an administrator. To check the result, run the list command from the earlier step again and confirm the language is gone.
Summary
You can uninstall Voice Access languages in Windows 11 using either the Settings app or Windows Terminal, depending on your preference. The Settings app suits a traditional click-based workflow, while Windows Terminal is a faster way to clean up using commands. Both remove unused speech packs and reclaim disk space.
- Using Settings is easier if you prefer clicking through menus.
- Using Terminal is faster if you're comfortable with commands.
- Removing languages you don't need helps keep your PC clean and organized.
Learn more about turning Voice Access on or off or installing new Voice Access languages in these helpful guides.
Share any questions or tips in the comments below.
Have a question about this guide?
Answered by AI from this guide. Good questions may be added to this page — please don't include personal details.
Did this guide fix your problem?

About the Author
Richard
Tech Writer, IT Professional
Richard is a writer at Geek Rewind who turns complex IT tasks into clear, step-by-step guides. He draws on years of hands-on experience in system administration and enterprise IT operations, focusing on Windows, Linux and WordPress: the problems people actually run into, and the fixes that work. His server and WordPress guides come from systems he runs himself. Richard builds and maintains the platform behind Geek Rewind, from its Ubuntu servers and Nginx configuration to its custom WordPress plugins. Many new tutorials start with readers' questions, and he's always glad to answer them in the comments.
No comments yet — be the first to share your thoughts!