How to Disable Voice Access Auto Start in Windows 11
Disabling Voice Access auto-start in Windows 11 stops the voice control feature from launching automatically when you turn on your PC.
Voice Access lets you control your computer using only your voice, which is handy, but you might not always want it running in the background.
Starting with Windows 11 version 22H2, you can stop Voice Access from starting automatically. This frees up your computer’s resources for the programs you actually want to use right away.
By preventing Voice Access from starting on its own, you keep your system running smoothly and ensure it only launches when you need it.
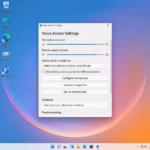
Go to Settings Accessibility Speech Voice access and uncheck “Start voice access after you sign in to your PC”. You can also disable it in Task Manager under Startup apps.
Disable via Accessibility Settings
You can manage the Voice Access auto-start feature through the Windows 11 accessibility settings, which is the safest method for everyone. Changing this setting prevents Voice Access from starting automatically when you turn on your computer, offering you more control over your device’s startup behavior.
- Press Windows key + I to open Settings.
- Click Accessibility in the left sidebar.
- Select Speech.
- Click Voice access.
- Uncheck Start voice access after you sign in to your PC.


Disable via Task Manager
You can disable Voice Access from starting automatically when you turn on your computer by using the Task Manager. This tool lets you control which apps begin when Windows starts, preventing Voice Access from launching if you don’t want it to.
- Press Ctrl + Shift + Esc to open Task Manager.
- Click the Startup apps tab on the left.
- Look for any entry related to Voice access or Speech Recognition.
- Right-click the item and select Disable.
For more details, see our guide on how to manage Windows 11 startup apps.
Advanced: Registry Editor
If you're comfortable with advanced system settings, you can disable Voice Access from starting automatically by making a change in the Windows Registry Editor (a powerful tool for configuring Windows). This method involves finding and removing a specific entry that tells Voice Access to launch when you log in.
- Press Windows key + R, type regedit, and press Enter.
- Navigate to:
HKEY_CURRENT_USER\Software\Microsoft\Windows\CurrentVersion\Explorer\Startup\Approved\Run - If you find a key related to Voice access, you can delete it or modify its value to prevent it from launching.
Summary
You've learned how to disable Voice Access startup using Settings, Task Manager, and the Registry, helping your computer run more efficiently.
How do I stop Voice Access from starting when I sign in to 🪟 Windows 11?
Navigate to Settings > Accessibility > Speech > Voice access and uncheck the box labeled 'Start voice access after you sign in to your PC'. This ensures the service remains inactive until you manually launch it from your app list.
Can I completely uninstall Voice Access from 🪟 Windows 11?
Voice access is a core feature of Windows 11 accessibility. While you cannot fully uninstall it like a standard app, you can effectively disable it by turning off the startup setting and ensuring it is not active in your background processes or startup folder.
Was this guide helpful?

About the Author
Richard
Tech Writer, IT Professional
Richard, a writer for Geek Rewind, is a tech enthusiast who loves breaking down complex IT topics into simple, easy-to-understand ideas. With years of hands-on experience in system administration and enterprise IT operations, he’s developed a knack for offering practical tips and solutions. Richard aims to make technology more accessible and actionable. He's deeply committed to the Geek Rewind community, always ready to answer questions and engage in discussions.


No comments yet — be the first to share your thoughts!