How to Enable or Disable Profanity Filter in Windows 11 Captions


Live Captions is a Windows 11 feature that shows on-screen text for any spoken audio playing on your PC. It works with video, music, calls and anything else that produces speech. If you would rather not see offensive language in those captions, you can turn on a profanity filter.
Press Win+Ctrl+L to open Live Captions, click the Settings gear icon on the captions bar, select Preferences, then toggle Filter profanity on or off. The change applies immediately without restart.
Live captioning is a newer accessibility feature released with Windows 11 build 22557. It helps everyone, including people who are deaf or hard of hearing, follow audio by displaying captions of the spoken content. The first time you use it, Windows may ask to download language files for speech recognition. Let it finish, or the captions will not appear.
You can turn on Live Captions in two ways:
- Press the Win+Ctrl+L keyboard shortcut.
- Use the Accessibility flyout under Quick Settings.
Once it is running, you can enable or disable it, move the Live Captions bar, enable Live Captions in different languages, switch languages, include microphone audio, and more.
Live Captions also has a “Filter profanity” option. It masks inappropriate language in the captions instead of showing the words as spoken.
With the filter on, profanity is automatically masked for the whole captioning session. This helps in classrooms, meetings, shared offices or anywhere a stray word might offend someone.
If you need an accurate record of exactly what was said, leave the filter off. Masked words are not shown, so you will not see what was actually spoken.
Turn on or off “Filter profanity” in Live Captions on Windows
The quickest way to change the filter is from the Live Captions bar itself. Here is how to get to it.
- Press Win+Ctrl+L to turn on Live Captions. The captions bar appears, usually at the top of the screen. If Windows asks to download language support first, let it finish and the bar will appear afterwards.
- Click the Settings (gear) icon on the Live Captions bar. A small menu opens.
- Select Preferences. A list of caption options appears.
- Toggle Filter profanity on to mask offensive words, or off to show everything as spoken.
The change applies right away, so you do not need to restart anything. To undo it, open the same menu and flip the toggle back.
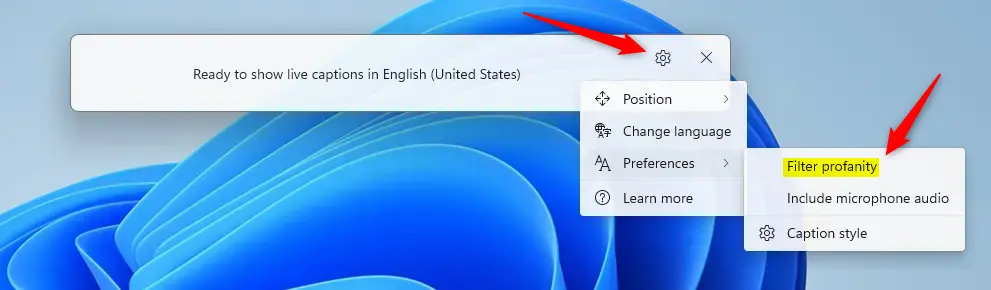
This method filters profanity during your live captioning sessions, and it is the one most people should use.
Turn on or off “Filter profanity” with Live Captions using Registry Editor
This works on both Home and Pro editions. It is useful if you want to check the current setting or the toggle in the app is not behaving. Editing the registry can cause problems if you change the wrong value, so back up the registry or create a restore point first.
- Open the Windows Registry editor as an administrator. Approve the User Account Control prompt if one appears.
- Navigate to this registry key:
ComputerHKEY_CURRENT_USERSoftwareMicrosoftLiveCaptionsUI
- In the right pane of the UI key, double-click the ProfanityFilterOn value. Its properties window opens.
- In the Value data box, type 1 to turn the profanity filter on, or 0 to turn it off.
- Click OK.
If you don’t see the ‘ProfanityFilterOn‘ item, you need to create it:
- Right-click a blank space in the right pane and choose New.
- Select DWORD (32-bit) Value.
- Name it ‘ProfanityFilterOn‘. Spell it exactly as shown.
- Double-click the new item and enter 1 to enable the filter or 0 to disable it. Then click OK.
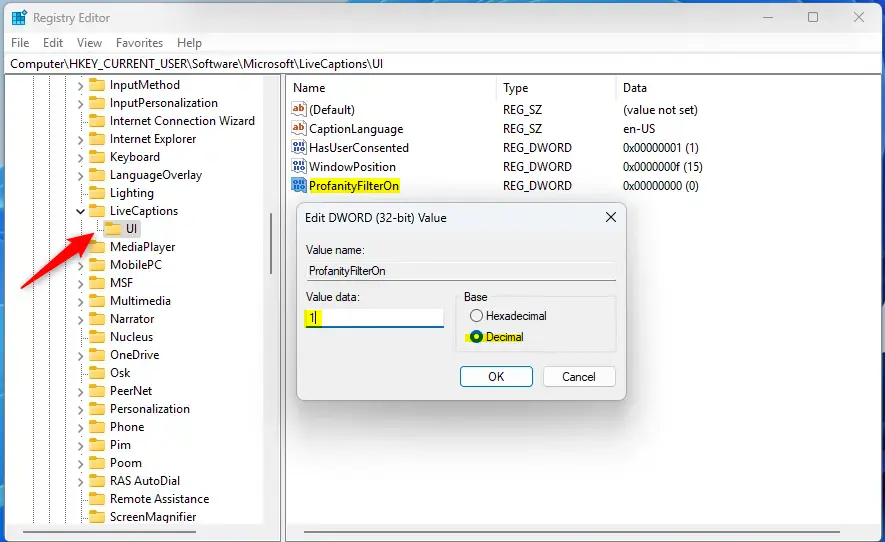
If Live Captions was already running, close it and start it again first. If the setting still does not change, sign out and back in, or restart the PC.
To undo the change, set the value back to its previous number, or delete the value you created.
And that’s it!
Conclusion:
- Live Captions in Windows 11 is a useful accessibility tool that helps everyone follow spoken content.
- The "Filter profanity" option masks profanity during live captioning sessions, which suits settings where such language is inappropriate or offensive. You can change it from the Live Captions bar or with the registry.
- If you need an accurate record of spoken words, profanity included, leave the filter off.
Have a question about this guide?
Answered by AI from this guide. Good questions may be added to this page — please don't include personal details.
Did this guide fix your problem?

About the Author
Richard
Tech Writer, IT Professional
Richard is a writer at Geek Rewind who turns complex IT tasks into clear, step-by-step guides. He draws on years of hands-on experience in system administration and enterprise IT operations, focusing on Windows, Linux and WordPress: the problems people actually run into, and the fixes that work. His server and WordPress guides come from systems he runs himself. Richard builds and maintains the platform behind Geek Rewind, from its Ubuntu servers and Nginx configuration to its custom WordPress plugins. Many new tutorials start with readers' questions, and he's always glad to answer them in the comments.
No comments yet — be the first to share your thoughts!