How to Use Live Captions with Microphone Audio in Windows 11

Windows 11 Live Captions turns spoken words into text right on your screen, and it can now listen to your microphone.
This accessibility tool shows exactly what’s being said, perfect for understanding calls, videos, or even conversations near your PC. You can see a written version of anything you hear in real-time.
For instance, Live Captions with microphone audio can help you follow a meeting if you have trouble hearing or want to check what someone is saying during a video call. You can turn this handy feature on and choose your microphone as the sound source in Windows 11 settings.
Enable Live Captions by pressing Windows key + Ctrl+L, then click the gear icon in the Live Captions bar. Go to Preferences and turn on “Include microphone audio” to transcribe your microphone input.
What Are Live Captions?
Live Captions turn spoken words into text that appears on your screen in real-time. They work with most audio from your device, like videos, calls, or apps. Microsoft added this feature in Windows 11 build 22557.
How to Turn On Live Captions
Live captions in Windows 11 can be turned on with a keyboard shortcut or by using the Quick Settings menu. Pressing Windows key + Ctrl+L is the quickest way to get live captions working for any audio on your PC.
Windows key + Ctrl + LAlternatively, you can access it through Windows Quick Settings. Here’s how:
- Click the Quick Settings area at the bottom-right of your screen (near the clock).
- Click the Accessibility button. It looks like a person inside a circle.
- Find and turn on Live Captions.
How to Include Microphone Audio with Live Captions
To make live captions in Windows 11 hear your voice from the microphone, you need to change one setting in the Live Captions preferences. After turning on live captions, click the gear icon and select Preferences to find the option to ‘Include microphone audio’.
- Turn on Live Captions by pressing
Windows key + Ctrl + L. - In the Live Captions bar that appears on your screen, click the Settings button. It looks like a gear icon.
- Choose Preferences.
- Find the option called Include microphone audio and turn it on.
Here’s an example of what the settings look like:
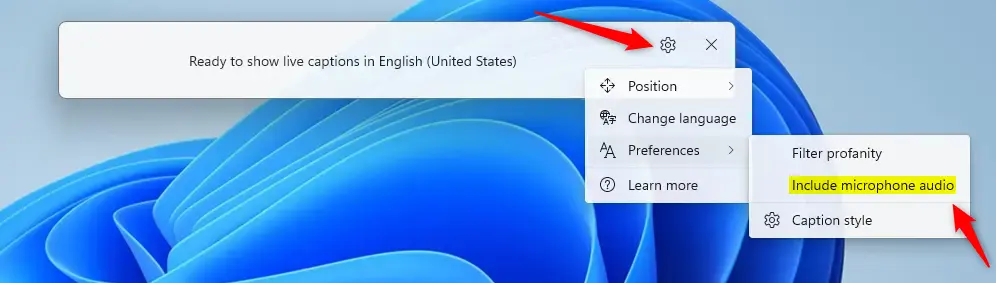
Windows 11 Live Captions will display text for sounds your microphone picks up, as well as for all other audio playing on the computer. The Live Captions feature began with Windows 11, version 22000, and provides real-time transcription.
Extra Tips
Windows 11 live captions have helpful features to make them more useful. You can move the caption bar anywhere on your screen by dragging it, change the caption language if you need to understand different languages, or quickly turn them off.- You can move the Live Captions bar anywhere on your screen by dragging it.
- Change the caption language if you want to see captions in a different language.
- Turn off Live Captions anytime by pressing
Windows key + Ctrl + Lagain. - For more info about Live Captions and how to customize them, check out this Microsoft Support page.
Summary
Live captions in Windows 11 instantly turn spoken words into text on your screen, helping you follow along with audio or conversations. Including sound from your microphone allows captions to capture what you say. Turning them on and off is quick using a keyboard shortcut or Quick Settings.- Live Captions help you see spoken words as text on your screen in real time.
- You can include your microphone’s audio. This captions sounds around you or your voice.
- It’s easy to turn on and off. Use a keyboard shortcut or Quick Settings.
- You can customize captions to fit your needs. This includes moving the caption bar and changing languages.
Was this guide helpful?

About the Author
Richard
Tech Writer, IT Professional
Richard, a writer for Geek Rewind, is a tech enthusiast who loves breaking down complex IT topics into simple, easy-to-understand ideas. With years of hands-on experience in system administration and enterprise IT operations, he’s developed a knack for offering practical tips and solutions. Richard aims to make technology more accessible and actionable. He's deeply committed to the Geek Rewind community, always ready to answer questions and engage in discussions.

No comments yet — be the first to share your thoughts!