How to Enable or Disable DEP in Windows 11


Data Execution Prevention (DEP) is a built-in security feature in Windows 11. It stops harmful code from running in areas of memory that are meant to hold data, not programs. Most modern Windows 11 PCs have DEP turned on for essential Windows programs and services by default, which helps protect you from viruses and other malware.
This guide shows where the DEP setting lives and how to change it. You can also turn DEP off for one specific program if a trusted app stops working properly. Turning it off for a single app is usually safer than turning it off for the whole system.
Open Windows Security, go to App & browser control, click Exploit protection settings, select the System settings tab, find Data Execution Prevention (DEP), and choose your preferred option from the dropdown menu. Click Apply and restart your PC for changes to take effect.
How to Turn DEP On or Off in 🪟 Windows 11
Go to App & browser control, open the exploit protection settings, then use the System settings tab. You need an administrator account to save changes. On a standard account, you will be asked for an administrator password, or the options will not apply. The steps are the same on Windows 11 Home and Pro. Keeping DEP turned on protects your computer memory from malicious code and malware attacks.
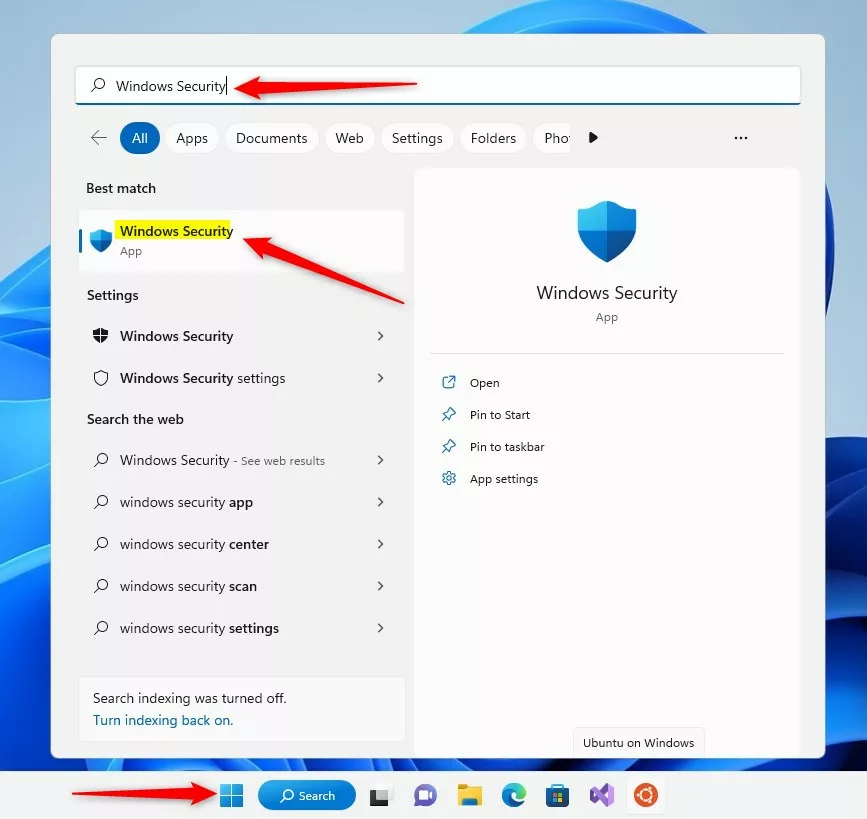
windows security app search on start menu - Go to App & Browser Control
In the Windows Security app, look at the menu on the left side and click App & browser control. The page on the right should change to show settings such as Smart App Control and Reputation-based protection. 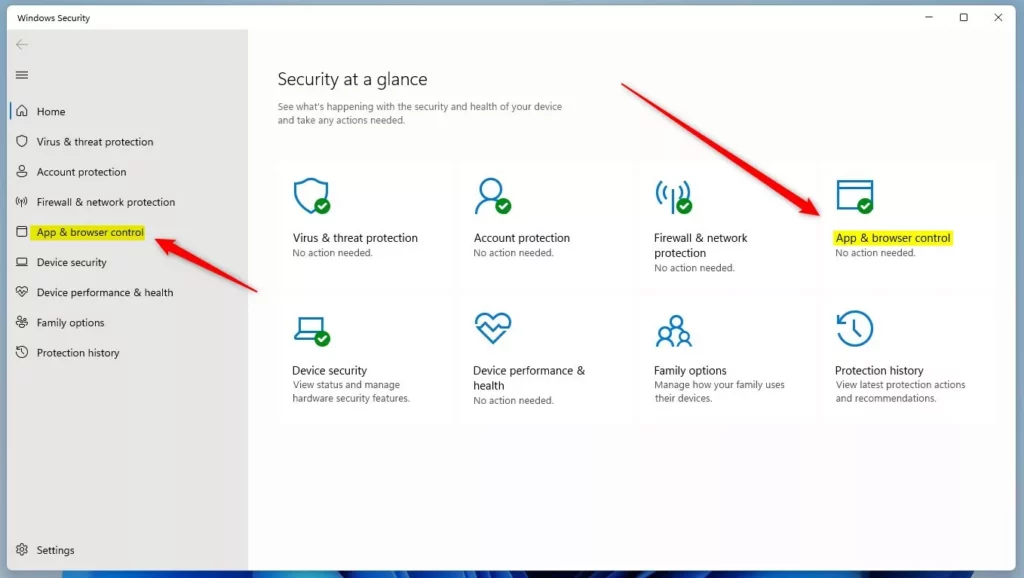
windows 11 app and browser control section windows security app - Open Exploit Protection Settings
Scroll down the page until you see the Exploit protection section. Click the link that says Exploit protection settings. If you are asked by User Account Control whether to allow changes, click Yes or enter an administrator password. The Exploit protection page should open. 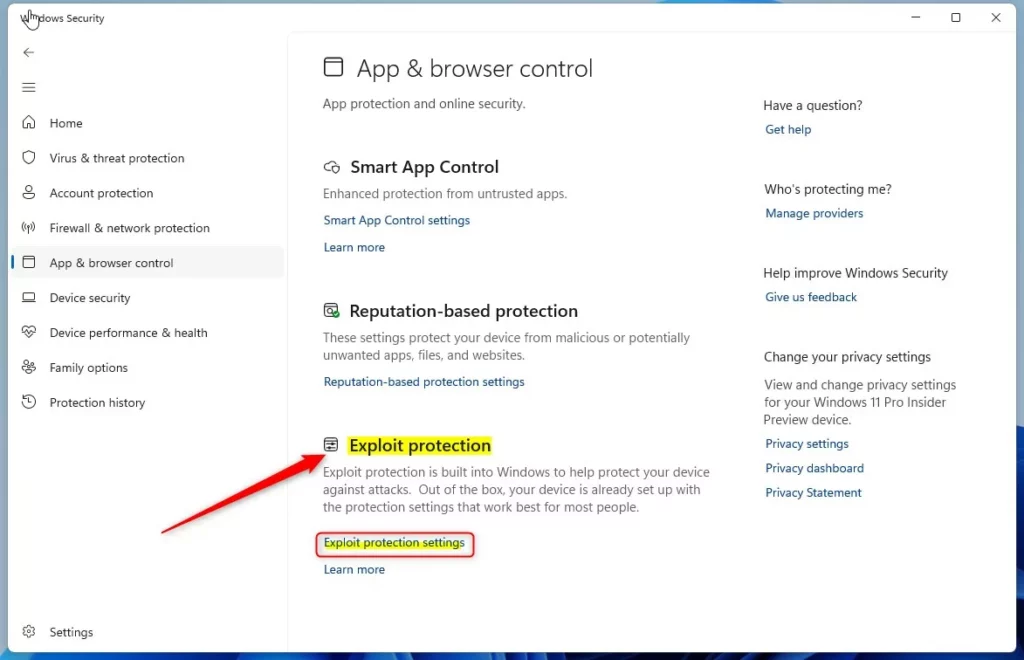
Windows Exploit protection settings - Find Data Execution Prevention (DEP)
On the Exploit protection page, click the System settings tab at the top. Look through the list of mitigations until you find Data Execution Prevention (DEP). This tab controls DEP for the whole system. The Program settings tab next to it is where you would change DEP for a single app instead. - Choose Your DEP Setting
Click the dropdown menu next to Data Execution Prevention (DEP) and pick one of these options. If the option is greyed out, you are probably not signed in as an administrator, or your organization manages the setting through policy.- On by default – DEP is turned on (recommended)
- Off by default – DEP is turned off
- Use default (On) – Uses the system’s default setting, which is usually on. Pick this one if you want to undo an earlier change.
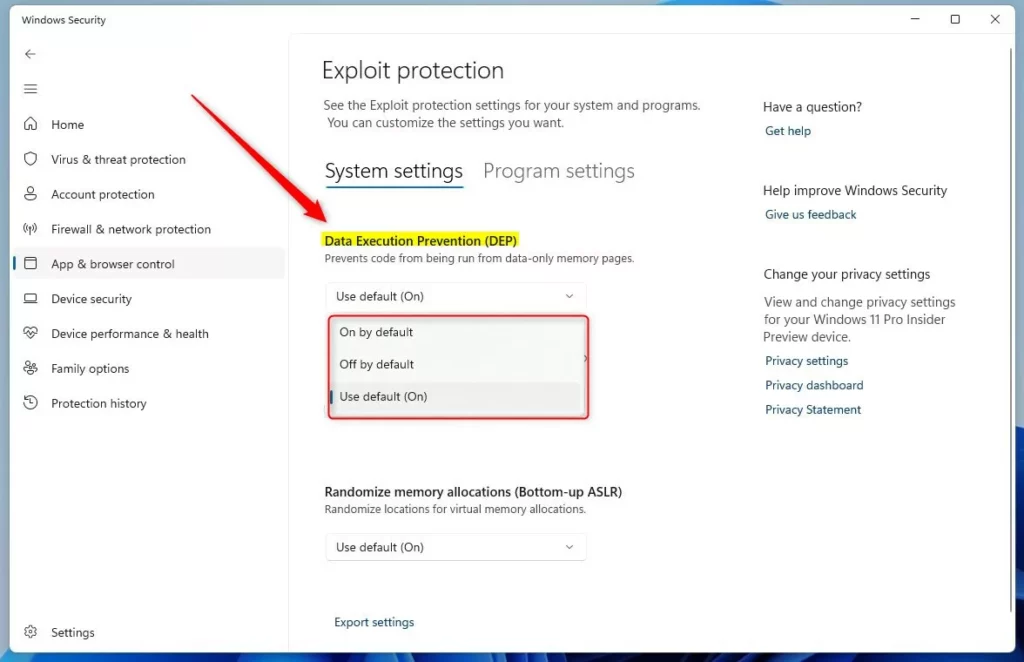
Windows Exploit protection settings options
Then close the Windows Security app. Changes to system-wide DEP settings usually only take effect after a restart, so restart your PC before testing the app that gave you trouble. To go back, open the same setting again, choose Use default (On), and restart once more.
Why Does DEP Matter?
DEP matters because it monitors your computer memory and blocks harmful programs from running in areas reserved for data and safe system files. This stops a common trick used by malware to take control of your PC. It also prevents sudden crashes caused by malicious code. Leaving DEP enabled gives your computer an essential layer of defense against modern online threats.
In almost every case, you want DEP turned on to protect your PC.
If you have special software that doesn’t work well with DEP, such as an older program that runs code from data areas of memory, you might need to turn it off temporarily. Try the per-app option on the Program settings tab first, so the rest of your system stays protected. Turn DEP back on once you no longer need the exception.
For more details about DEP, you can visit the official Microsoft support page: What is Data Execution Prevention (DEP)?
Summary
DEP in Windows 11 is a built-in security feature that protects your system memory from malicious code and unauthorized access. It runs automatically in the background to keep your PC safe from common security threats and software crashes. You can check your current protection status or change settings at any time through the Windows Security app.
It’s usually on by default and helps keep your PC safe. If you never opened these settings before, the value you see is most likely Use default (On).
You can easily check or change DEP settings using the Windows Security app. Use an administrator account, and restart the PC after a system-wide change.
Keep DEP on unless you have a special reason to turn it off. If you do turn it off for a trusted app, switch it back to the default setting when you are done.
Have a question about this guide?
Answered by AI from this guide. Good questions may be added to this page — please don't include personal details.
Did this guide fix your problem?

About the Author
Richard
Tech Writer, IT Professional
Richard is a writer at Geek Rewind who turns complex IT tasks into clear, step-by-step guides. He draws on years of hands-on experience in system administration and enterprise IT operations, focusing on Windows, Linux and WordPress: the problems people actually run into, and the fixes that work. His server and WordPress guides come from systems he runs himself. Richard builds and maintains the platform behind Geek Rewind, from its Ubuntu servers and Nginx configuration to its custom WordPress plugins. Many new tutorials start with readers' questions, and he's always glad to answer them in the comments.
No comments yet — be the first to share your thoughts!