Data Execution Prevention (DEP) is a security feature in Windows 11 that stops malicious code from running in memory areas meant only for storing data. Processors use memory for two main jobs: holding data and running program instructions. DEP tells the central processing unit (CPU) to refuse any code it finds in data regions.
Advertisement
Windows 11 enforces this with hardware built into the processor. If the hardware lacks native support, it falls back on software-level checks. Turning DEP off leaves your system open to buffer overflow attacks, where an attacker tricks a program into running harmful code from ordinary memory.
In practice, what “breaks” when DEP is off is mostly your protection, not your apps. The only things that gain from turning it off are a few old programs that misbehave under DEP. There are safer ways to handle those, covered below. This guide shows you how to check your current DEP policy and how to exclude a single program instead of disabling DEP for the whole system.
⚡ Quick Answer
Data Execution Prevention is a Windows 11 security feature that stops malicious code from running in memory reserved for data, and it is on by default on any Windows 11 PC. Turning it off mainly removes your protection against buffer overflow attacks. To check your current policy, open PowerShell and run Get-CimInstance Win32_OperatingSystem | Select-Object DataExecutionPrevention_SupportPolicy.
Advertisement
How Data Execution Prevention Works
DEP stops malicious code from running inside memory areas reserved for regular data. Windows and the processor work together to mark specific memory blocks as non-executable. That blocks buffer overflow attacks and stops unauthorized code from taking control of a program.
Here is what happens when an exploit tries to get around this:
The exploit injects malicious instructions into a data buffer.
It then tries to redirect the program’s execution flow to that buffer.
The processor checks the memory page permissions first. The page has no execute permission, so the processor raises an access violation exception.
Windows catches the exception and terminates the offending application immediately. It shows a notification that Data Execution Prevention closed the program.
Advertisement
⚠️WarningIf you disable DEP, that check no longer happens for the affected programs.
The same exploit that would have ended in a closed program and a warning message can instead run its injected code with that program’s permissions. If the program runs as an administrator, the injected code does too.
Hardware-Enforced vs. Software-Enforced DEP
Hardware-enforced DEP uses your processor to block unauthorized code execution at the chip level, which gives the strongest protection. Software-enforced DEP relies on the operating system to handle memory protection when the processor lacks built-in support.
Hardware-enforced DEP: This mode relies on the CPU to mark memory locations as non-executable. That means either an AMD processor with the NX (No-Execute) bit, marketed as Enhanced Virus Protection, or an Intel processor with Execute Disable (XD) Bit technology. The processor blocks code execution directly, so this is the most secure option.
Software-enforced DEP: When the processor does not support hardware DEP, Windows applies a software-based mitigation. It intercepts exception handling routines to give basic protection for 32-bit applications. It lacks the strict security boundaries the CPU enforces directly.
Windows 11 only installs on 64-bit processors, and those processors support hardware DEP. On a Windows 11 PC you will almost certainly be running the hardware-enforced mode. The software-enforced mode is mainly a concern on very old hardware, which Windows 11 does not support.
Advertisement
Checking Your DEP Status in Windows
You can check your DEP status with one query in Windows PowerShell. It returns a number that tells you which policy is active. You don’t need to change anything to run it, and a standard user account is usually enough.
Open the Start menu, type powershell, and press Enter. A PowerShell window opens.
Type the following command into the window and press Enter: Get-CimInstance Win32_OperatingSystem | Select-Object DataExecutionPrevention_SupportPolicy. A single number appears in the output.
Compare that number with the list below to see your current policy:
0 means DEP is completely disabled.
1 means DEP is enabled for essential Windows programs and services only.
2 means DEP is enabled for all programs and services.
3 means DEP is always on.
The query only reads the setting, so you can run it as often as you like. If you see the value for “completely disabled” and you didn’t set it yourself, treat that as a problem. Someone or something changed the boot configuration, and you should find out why before doing anything else.
Configuring Data Execution Prevention Settings
If one older app keeps getting closed by DEP, don’t turn DEP off for the whole system. Add an exception for just that program. The steps are the same on Windows 11 Home and Pro.
Advertisement
Before you start: changing the DEP policy requires administrator rights and a restart. The change does not take effect until you restart, so save your work first.
⚠️Cautiononly exclude programs from a source you trust.
An excluded program loses DEP’s exploit protection, so a flaw in it is easier to attack. Try the easier fixes first. Check whether the vendor has released an update. You can also right-click the program’s .exe file, choose Properties, open the Compatibility tab, and try compatibility mode. Use an exception only if neither works.
Press Win+R to open the Run dialog box.
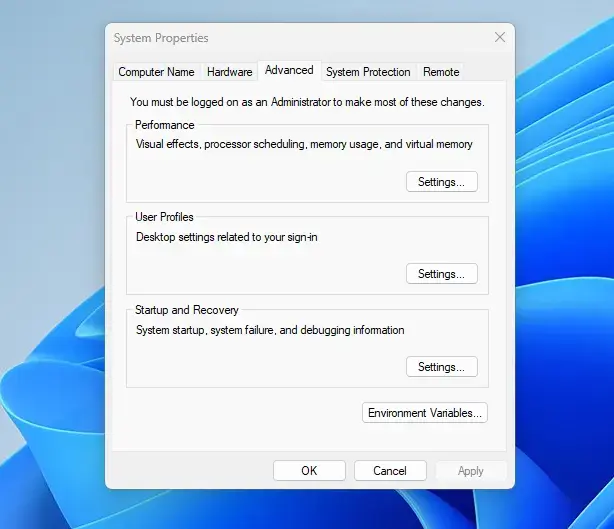
Type sysdm.cpl and press Enter. The System Properties window opens.
System Properties
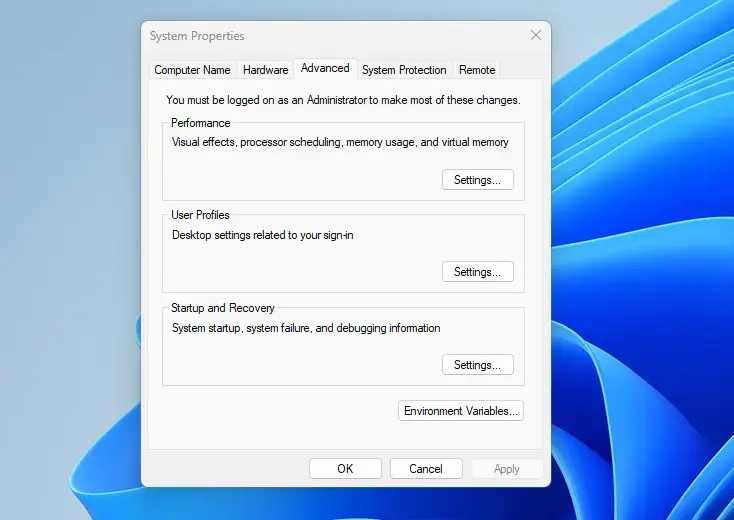
Click the Advanced tab at the top of the window.
Click the Settings button in the Performance section. The Performance Options window opens.
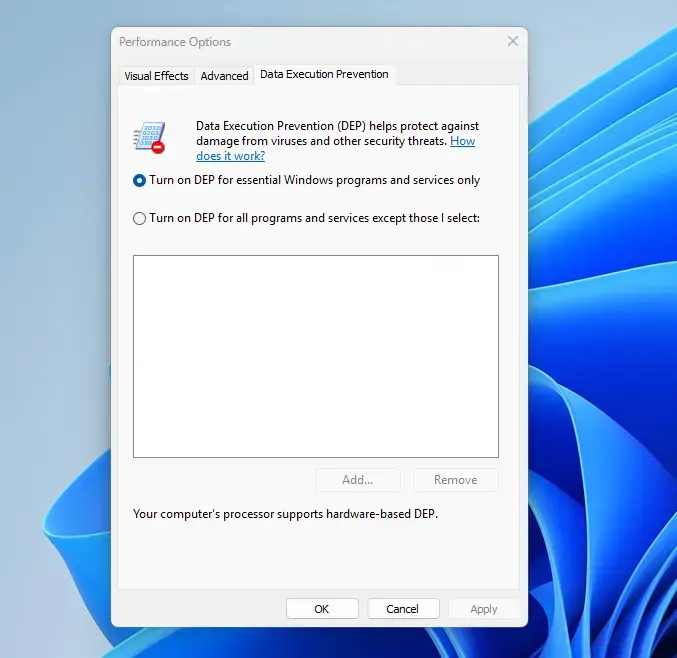
Click the Data Execution Prevention tab.
Near the bottom, a note tells you whether your processor supports hardware-based DEP.
Select Turn on DEP for all programs and services except those I select. The Add button becomes available.
Click the Add button, browse to the executable file (.exe) of the program you want to exclude from DEP checking, and select it. The program now appears in the list with a check mark.
Click Apply, then click OK to save your changes. Restart your 🔄 computer if prompted. The change does not take effect until you restart.
Some limits are worth knowing:
Exceptions only work for 32-bit programs. If you try to add a 64-bit program, Windows refuses, because 64-bit programs always run with DEP.
If the options or the Add button are greyed out, you are probably not signed in as an administrator. It can also mean the system policy is set to always on, which this window cannot override.
To undo an exception, return to the same tab, select the program in the list, and click Remove. You can also switch back to Turn on DEP for essential Windows programs and services only. Click Apply and restart again.
Advertisement
Windows 11 also has a newer place to set per-app DEP exceptions: Windows Security›App & browser control > Exploit protection. This page has two tabs. System settings covers protections for the whole system, including DEP. Program settings lets you add one program and override DEP for it alone. For per-app exceptions, this is the modern way. The same caution applies: any program you exclude loses that protection, so keep the list short and remove entries you no longer need. You need administrator rights to change these settings, and you may need to restart the affected program or the PC before a change applies.
What to do next
You can now check which DEP policy your PC uses, add an exception for a single stubborn program, and recognize when a crash comes from memory protection. Before you add an exception, check whether the vendor has released an update. Newer versions of an app rarely need one, and keeping software current means you can leave DEP fully on.
📬 Get new Windows tips in your inbox
One email when we publish something worth your time. No spam, unsubscribe anytime.
Have a question about this guide?
Answered by AI from this guide. Good questions may be added to this page — please don't include personal details.
Richard is a writer at Geek Rewind who turns complex IT tasks into clear, step-by-step guides. He draws on years of hands-on experience in system administration and enterprise IT operations, focusing on Windows, Linux and WordPress: the problems people actually run into, and the fixes that work.
His server and WordPress guides come from systems he runs himself. Richard builds and maintains the platform behind Geek Rewind, from its Ubuntu servers and Nginx configuration to its custom WordPress plugins.
Many new tutorials start with readers' questions, and he's always glad to answer them in the comments.
One email when we publish a guide worth your time — new Windows features, the fixes that actually
work, and a heads-up when Microsoft breaks something. Unsubscribe in one click.
📬 Get new Windows tips in your inbox
One email when we publish something worth your time. No spam, unsubscribe anytime.


No comments yet — be the first to share your thoughts!