How to Enable or Disable Clipboard Sync Across Devices in Windows 11

- 14 steps
- Needs administrator rights
- Group Policy needs Windows 11 Pro, Enterprise or Education
- Includes a restart or sign-out
Clipboard sync in Windows 11 lets you copy text or pictures on one computer and paste them on another that uses the same Microsoft account. The clipboard history stores up to 25 recent items, and the synced items are held in cloud storage so you can reach them from all your Windows devices.
The simplest way to turn the feature on or off is the Settings app. Sign in with the exact same Microsoft account on every PC you want to link. A local account can’t sync the clipboard, and neither can two different Microsoft accounts. If the option is missing or greyed out, check that you are signed in with a Microsoft account and that your PC is online. Also check whether your organization manages the PC. A policy set by an administrator overrides the Settings toggle, and the later sections of this guide cover those policies.
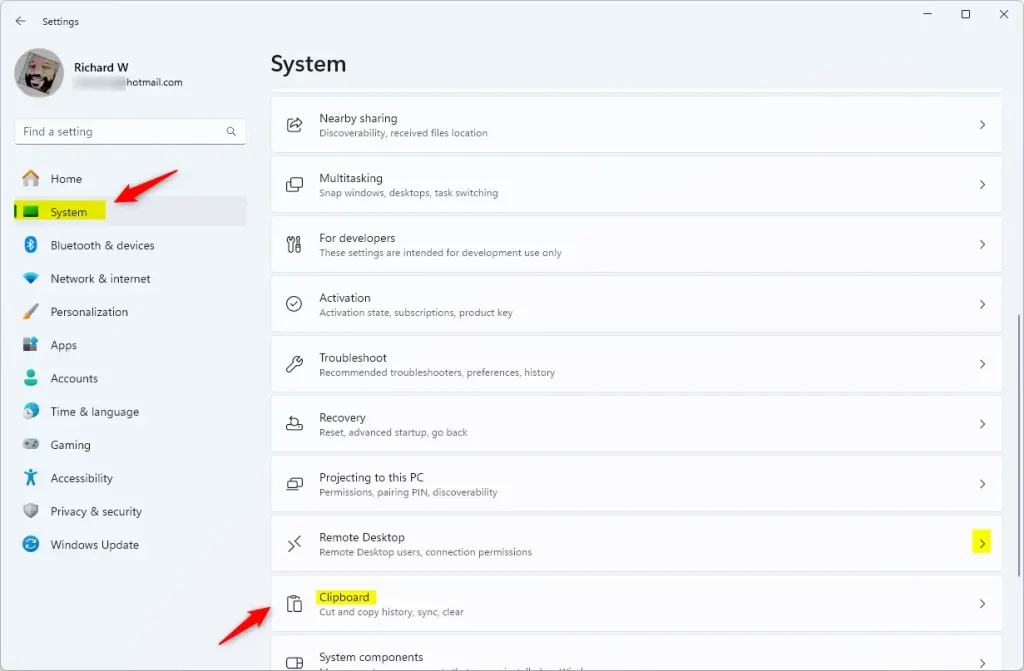
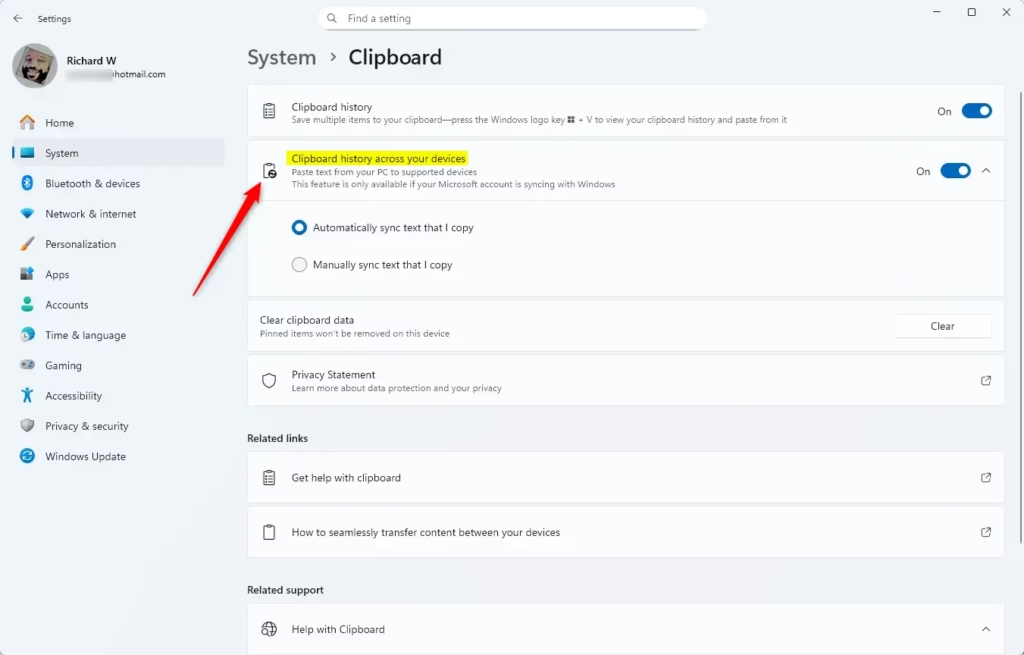
Open Settings by pressing Win+I. Navigate to System, then Clipboard. Toggle “Clipboard history across your devices” to On or Off to enable or disable sync.
How to Turn On or Off Clipboard Sync (Easy Way)
- Press Win+I to open Settings .
- Click System in the left menu, then click Clipboard on the right. The clipboard options appear.
- Find the option Clipboard history across your devices.
- Turn it On or Off as you want. Turning it off stops new items from syncing to your other devices.
- If you turn it on, choose one of these:
- Automatically sync text that I copy – everything you copy syncs right away.
- Manually sync text that I copy – you pick which clipboard items to sync.
- Close Settings when done.
No restart is needed. The change takes effect straight away. To undo it, come back to the same page and flip the toggle the other way. Repeat the setup on each PC, because the setting belongs to each device, not to the account.
In short: open Settings, go to System, click Clipboard, and use the toggle for syncing across your devices.
Using Clipboard History
To check that everything works, press Win+V to open your clipboard history. Everything you copied appears here, and you can pin or delete items as needed. If Windows asks you to turn on clipboard history the first time, accept the prompt. Pinned items stay in the list, while unpinned ones drop off as new ones arrive.
More Advanced Options
Change Clipboard Sync Using Registry Files
You can also control clipboard sync with the Registry Editor if you prefer to make direct system changes. This works on every edition, including Windows 11 Home. It is also useful when the Settings page is restricted or unavailable. The values below sit under the 🗝️HKEY_CURRENT_USER\
Before you start, open the Registry Editor from the Start menu search and consider backing up the key you are about to change. Sign out and back in, or restart, if the change doesn’t show up in Settings right away.
To enable automatic clipboard syncing:
reg add "HKEY_CURRENT_USER\Software\Microsoft\Clipboard" /v CloudClipboardAutomaticUpload /t REG_DWORD /d 1 /f
reg add "HKEY_CURRENT_USER\Software\Microsoft\Clipboard" /v EnableCloudClipboard /t REG_DWORD /d 1 /f
To enable clipboard syncing with manual selection:
reg add "HKEY_CURRENT_USER\Software\Microsoft\Clipboard" /v CloudClipboardAutomaticUpload /t REG_DWORD /d 0 /f
reg add "HKEY_CURRENT_USER\Software\Microsoft\Clipboard" /v EnableCloudClipboard /t REG_DWORD /d 1 /f
To disable clipboard syncing (the default setting):
reg add "HKEY_CURRENT_USER\Software\Microsoft\Clipboard" /v EnableCloudClipboard /t REG_DWORD /d 0 /fChange Clipboard Sync for All Users via Group Policy (For 🪟 Windows 11 Pro, Enterprise, or Education)
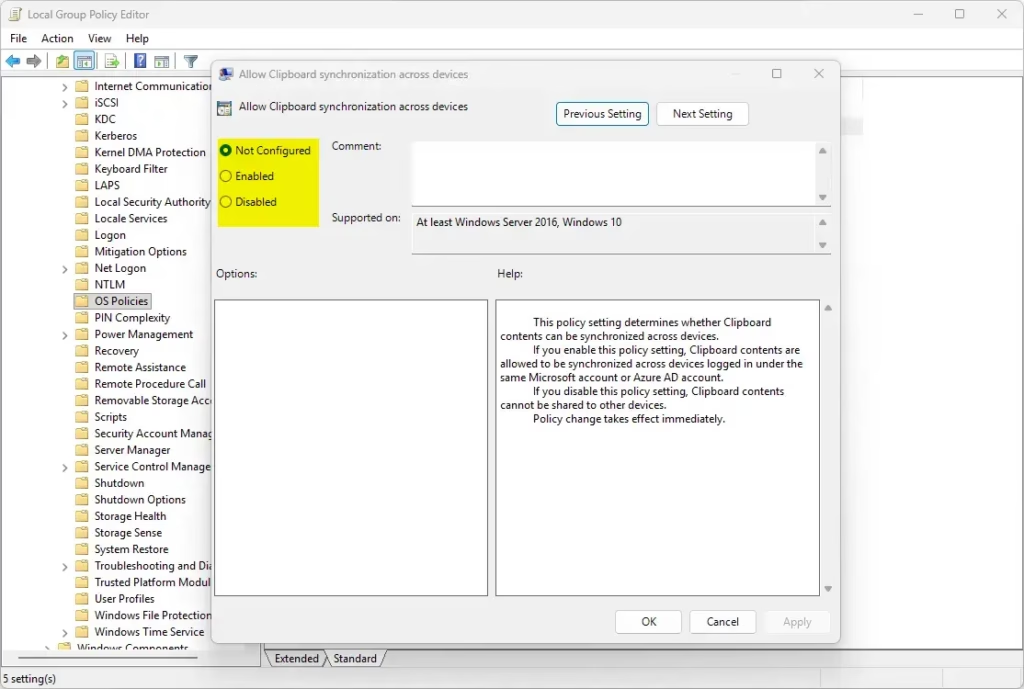
The Local Group Policy Editor (a tool for managing system-wide settings) lets you control clipboard sync for every user account on the computer. It is only available in Windows 11 Pro, Enterprise, and Education. Windows 11 Home does not include it, so Home users should use the registry method instead. The policy sits under Computer Configuration, so it affects all users on the PC.
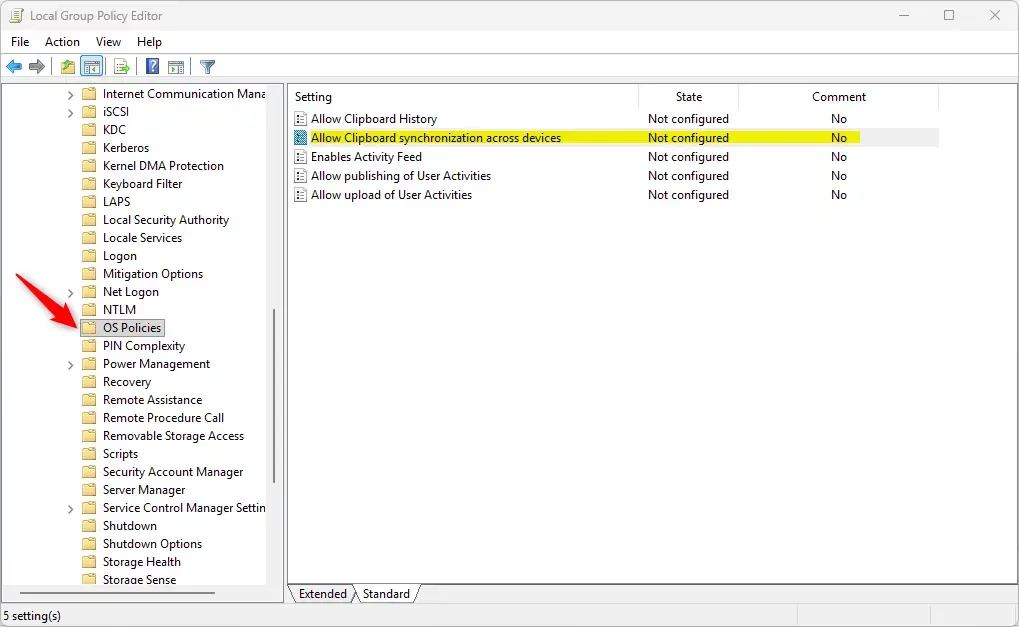
- Go to Computer Configuration Administrative Templates System OS Policies.
- Double-click Allow Clipboard synchronization across devices. A settings window for the policy opens.
- To allow syncing, select Not Configured. To block syncing, select Disabled.
- Click Apply, then click OK.
- Close the Group Policy Editor.
Policy changes usually apply within a short time, but signing out and back in or restarting the PC makes sure they take effect. With the policy set to Disabled, users can’t turn sync on from Settings, and the option may appear greyed out. To undo it, set the policy back to Not Configured.
Change Clipboard Sync for All Users via Registry (Administrator access needed)
You can also force clipboard sync on or off for all user accounts on a PC by editing the system registry. This is the registry equivalent of the Group Policy method, and it works on Windows 11 Home too. You need administrator access. You add or delete the AllowCrossDeviceClipboard value under the 🗝️HKEY_LOCAL_MACHINE\
Back up the registry or create a restore point first, since this change affects every user. Restart the PC afterward so the change applies to all accounts.
To enable clipboard sync for all users:
reg delete "HKEY_LOCAL_MACHINE\SOFTWARE\Policies\Microsoft\Windows\System" /v AllowCrossDeviceClipboard /fTo disable clipboard sync for all users:
Windows 11 clipboard sync lets you copy items on one device and paste them on another. This clipboard sync feature keeps a history of up to 25 items and supports text, images, and HTML. Important items can be pinned, and syncing functions automatically or manually. Clipboard sync works when signing in with a Microsoft or work account.
To undo either change, delete the AllowCrossDeviceClipboard value you added. Users can then control syncing from Settings again.
Have a question about this guide?
Answered by AI from this guide. Good questions may be added to this page — please don't include personal details.
Did this guide fix your problem?

About the Author
Richard
Tech Writer, IT Professional
Richard is a writer at Geek Rewind who turns complex IT tasks into clear, step-by-step guides. He draws on years of hands-on experience in system administration and enterprise IT operations, focusing on Windows, Linux and WordPress: the problems people actually run into, and the fixes that work. His server and WordPress guides come from systems he runs himself. Richard builds and maintains the platform behind Geek Rewind, from its Ubuntu servers and Nginx configuration to its custom WordPress plugins. Many new tutorials start with readers' questions, and he's always glad to answer them in the comments.
No comments yet — be the first to share your thoughts!