How to Turn On Enhanced Phishing Protection in Windows 11

Enhanced Phishing Protection is available in Windows 11 version 22H2 and newer. It warns you when you type your Microsoft account password into an unsafe website or app. It catches risky password use the moment it happens, so hackers have a harder time stealing your login details.
The feature relies on Microsoft Defender SmartScreen, which runs quietly in the background alongside Microsoft Defender. Reusing one password across several sites puts all your accounts at risk if any one of those sites gets hacked. That is the situation this warning is meant to catch.
Enhanced Phishing Protection sits in the same area of Windows Security as these other protections, so you will see them nearby:
- Controlled folder access
- Real-time protection
- Tamper protection
- Ransomware protection
Windows triggers an immediate warning whenever you type your Microsoft account password into an unverified platform.
Microsoft Edge and other Chromium-based browsers, such as Google Chrome, both support this protection natively. You also get an immediate warning if you enter credentials on a web page that Microsoft Defender SmartScreen has flagged as malicious.
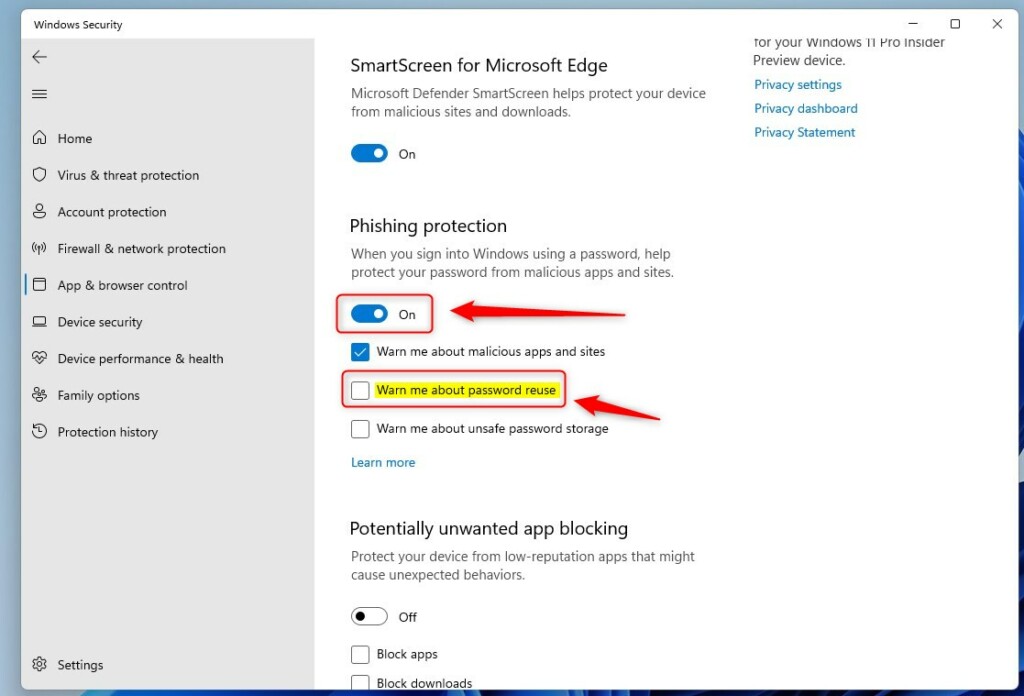
Open Windows Security, go to App & browser control, scroll to Reputation-based protection settings, and set the Phishing protection switch to On. Under Phishing protection, tick Password reuse to enable Enhanced Phishing Protection. No restart needed.
How to Turn On or Off Password Reuse Warnings in 🪟 Windows 11
Open it from the search box, go to App & browser control, and open Reputation-based protection settings. This works on both Windows 11 Home and Pro. If the option is missing, check that you are on version 22H2 or newer by running Windows Update.
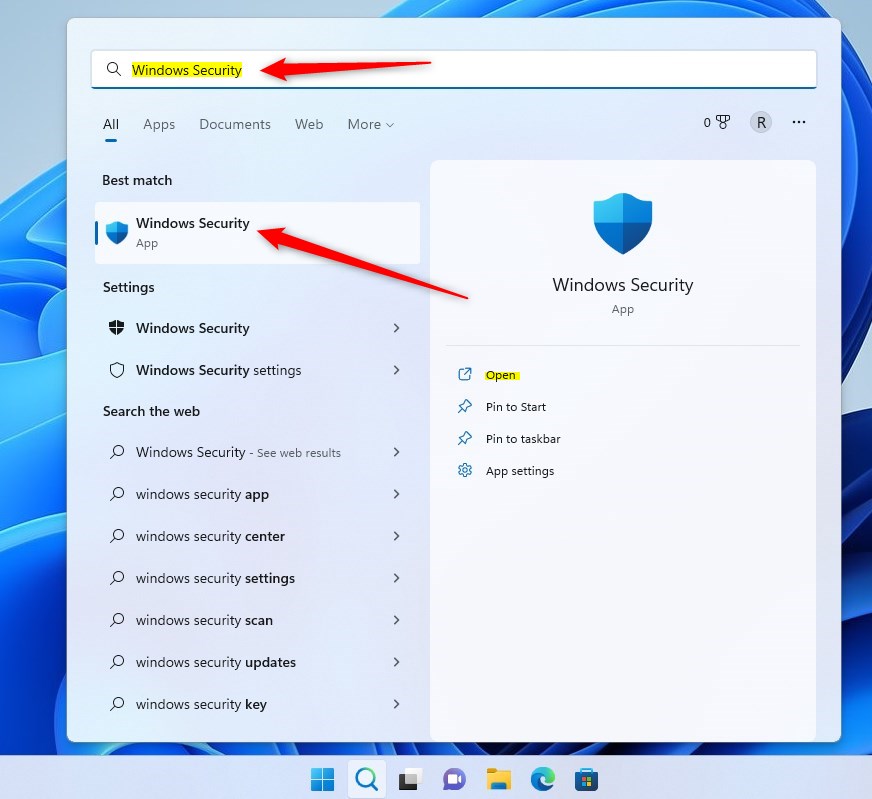
- Click the Search box on your taskbar (bottom-left corner).
- Type Windows Security and click the Windows Security app in the search results. The Windows Security window opens with a list of protection areas on the left.
Next:
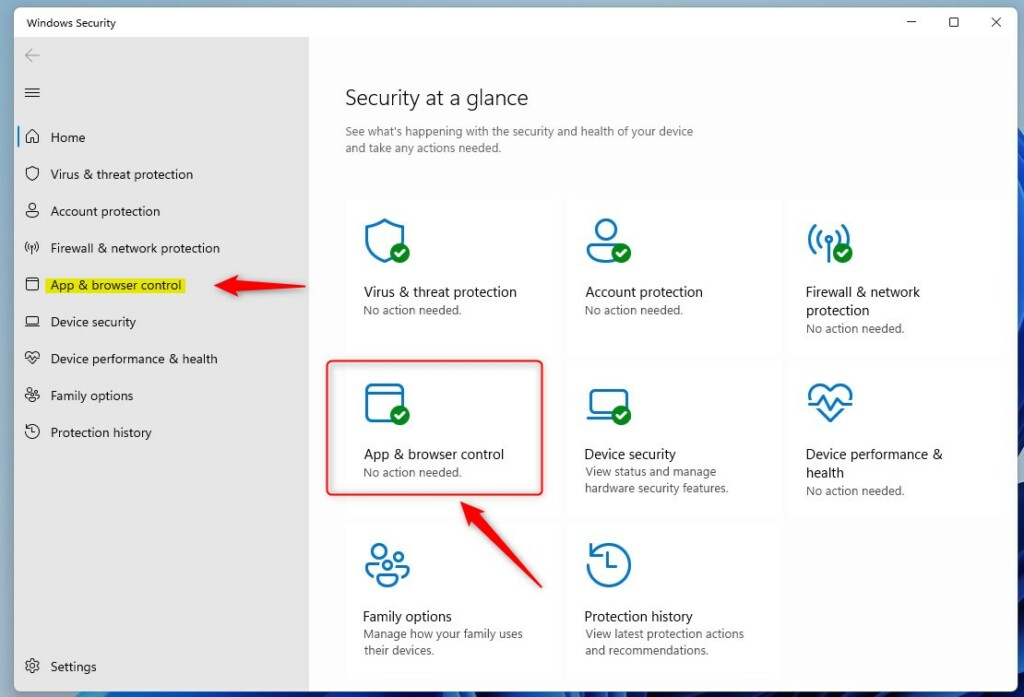
- In Windows Security, click App & browser control. The SmartScreen and exploit protection options appear on the right.
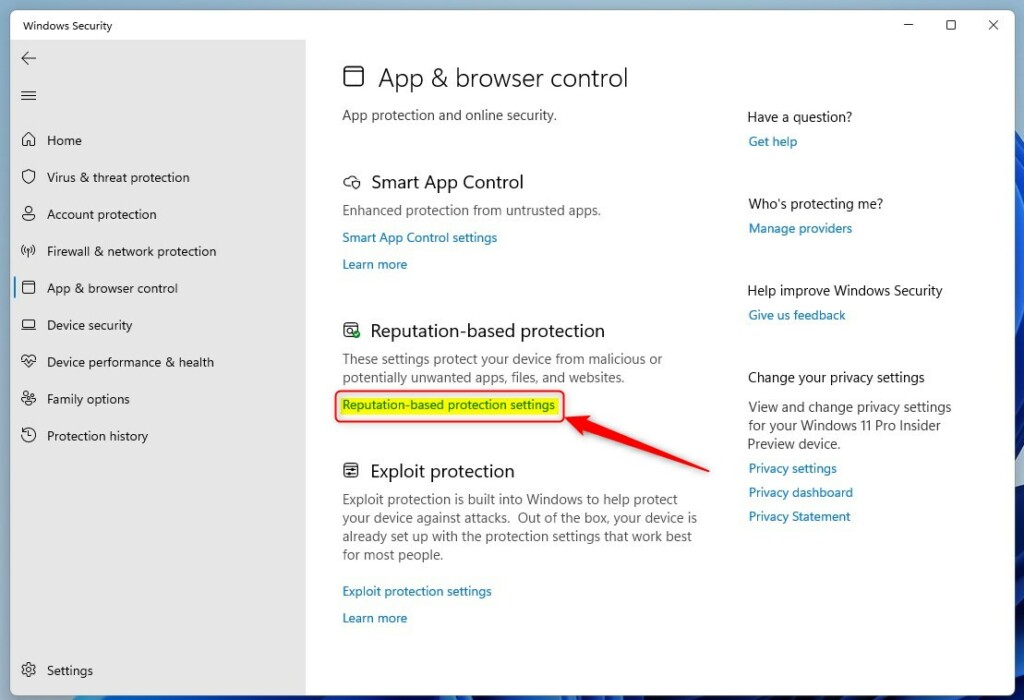
- Scroll down and click Reputation-based protection settings. A page opens listing the SmartScreen options.
- Under Phishing protection, set the switch to On to enable Enhanced Phishing Protection, or to Off to disable it. If Windows asks for permission, click Yes.
Once the protection is on, you can choose which situations trigger a warning:
- Malicious apps and websites
- Password reuse
- Unsafe password storage
Tick the ones you want. No restart is needed, and you can undo the change by returning to this page and switching the setting off. If the options are greyed out, or a message says some settings are managed by your organization, a policy is controlling them. That is common on work or school PCs. In that case you will need to ask your administrator, or change the policy as described in the next section.
Advanced Option: Using Local Group Policy Editor
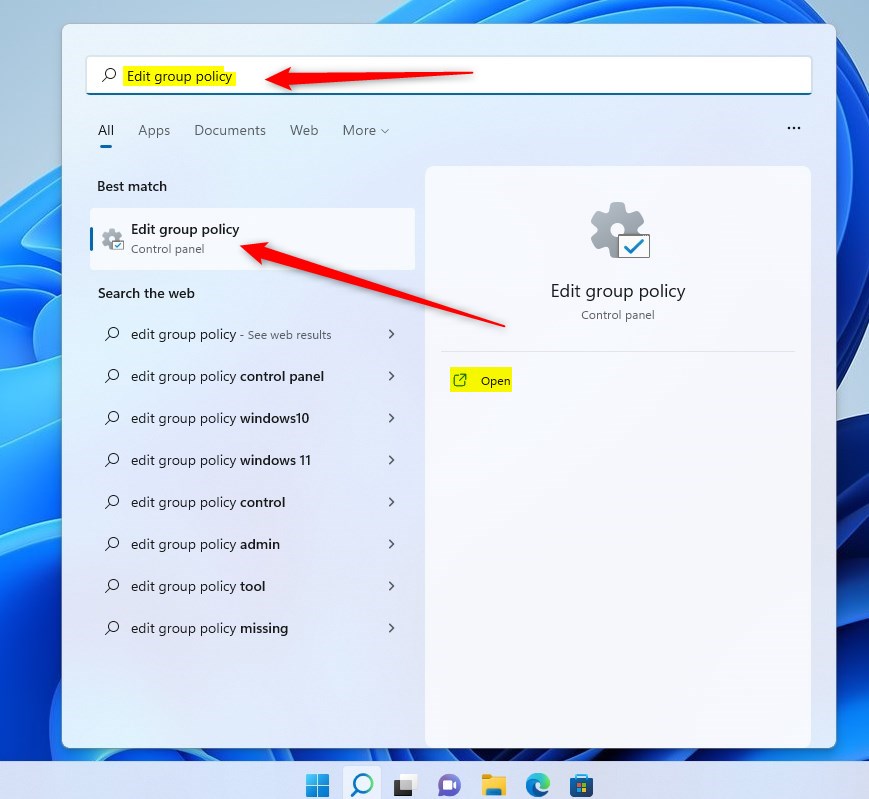
Open the Start menu, search for Edit group policy, and browse to the Windows Defender SmartScreen folder to find the settings. The Local Group Policy Editor is included in Windows 11 Pro, Enterprise and Education. It is not available in Windows 11 Home, so Home users should stick with the Windows Security method above.
- Click the Start Menu button and type Edit group policy.
- Click Edit group policy from the search results. The Local Group Policy Editor opens.
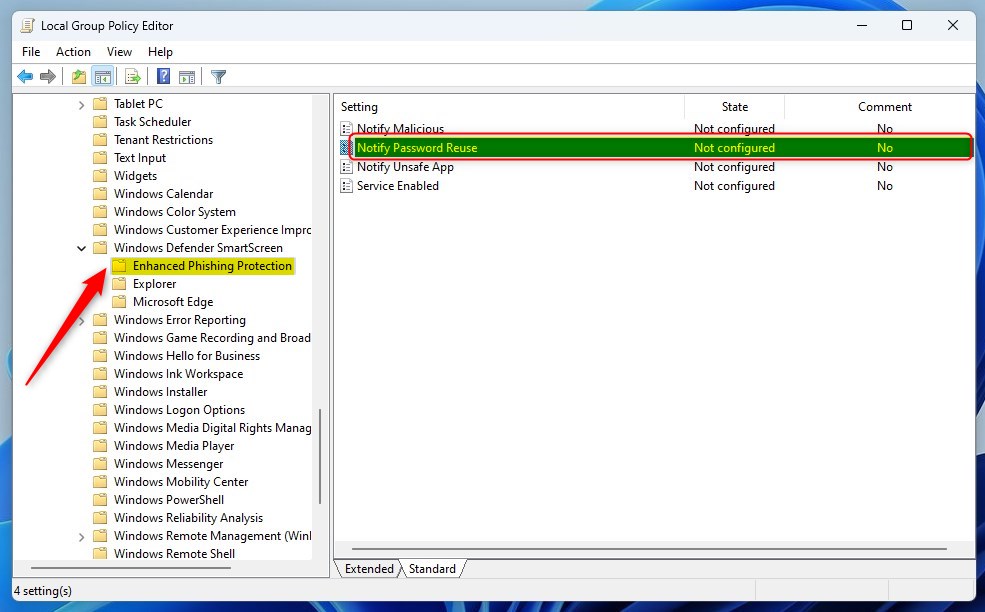
In the Local Group Policy Editor window, expand the folders in the left pane until you reach the Windows Defender SmartScreen folder, then open its Enhanced Phishing Protection folder:
Computer Configuration > Administrative Templates > Windows Components > Windows Defender SmartScreen > Enhanced Phishing Protection
Then:
- Find and double-click Notify Password Reuse in the right pane. A settings window for that policy opens.
Choose one of the following options:
- Not Configured (default setting)
- Enabled (turns on password reuse warnings)
- Disabled (turns off password reuse warnings)
To undo your change later, set the policy back to Not Configured. Once a policy is set to Enabled or Disabled, the matching switch in Windows Security is usually locked, which is why it can appear greyed out.
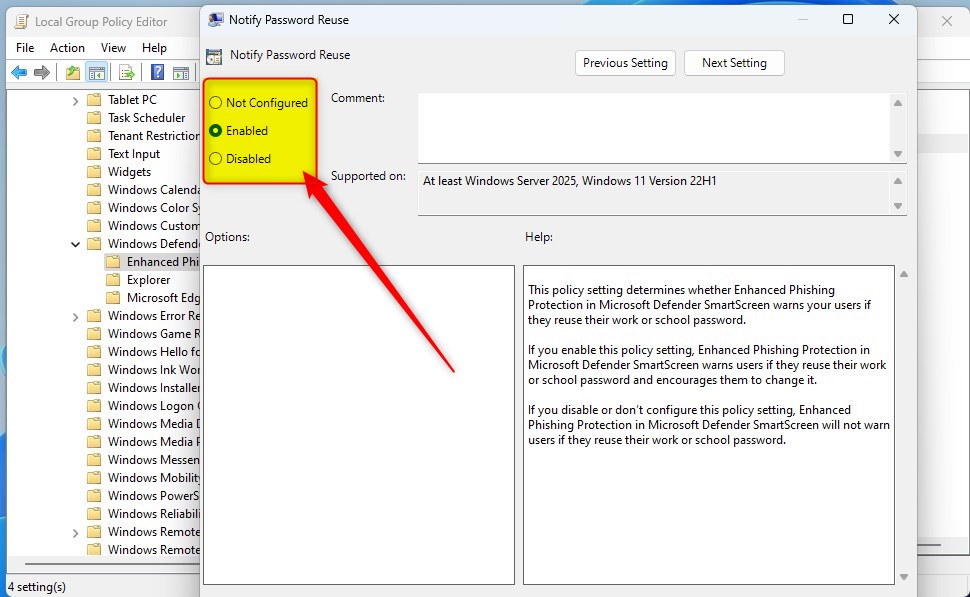
Click OK to save changes before closing the Local Group Policy Editor. Policy changes normally apply within a short time. If the warnings do not change right away, restart the PC or sign out and back in.
Summary
- Enhanced Phishing Protection helps keep your passwords safer by warning you if you reuse your Microsoft account password on other sites or apps.
- This feature works with Microsoft Defender for better security on your device and in the cloud.
- You can turn it on or off easily through Windows Security, or use the Local Group Policy Editor (Pro, Enterprise and Education) for advanced settings.
- Following these steps helps you stay safer while browsing and using apps on Windows 11.
Enhanced Phishing Protection in Windows 11 helps keep your personal info safe by warning you if you reuse your Microsoft account password on unverified websites or apps. This built-in security feature works alongside Microsoft Defender to protect your device, and you can turn it on through Windows Security in a few clicks.
Have a question about this guide?
Answered by AI from this guide. Good questions may be added to this page — please don't include personal details.
Did this guide fix your problem?

About the Author
Richard
Tech Writer, IT Professional
Richard is a writer at Geek Rewind who turns complex IT tasks into clear, step-by-step guides. He draws on years of hands-on experience in system administration and enterprise IT operations, focusing on Windows, Linux and WordPress: the problems people actually run into, and the fixes that work. His server and WordPress guides come from systems he runs himself. Richard builds and maintains the platform behind Geek Rewind, from its Ubuntu servers and Nginx configuration to its custom WordPress plugins. Many new tutorials start with readers' questions, and he's always glad to answer them in the comments.
No comments yet — be the first to share your thoughts!