How to List User Profiles and Accounts in Windows 11

Listing user profiles and accounts in Windows 11 shows you exactly which folder belongs to each person on your PC.
A user profile is like a digital backpack for each person using your computer. It holds their unique settings, documents, and desktop look, making their Windows experience personal.
Windows stores these profiles in the 📁C:\Users folder, creating a separate folder for every account. This is especially helpful in Windows 11 because changing a user’s account name doesn’t automatically change their profile folder’s name, which can be confusing.
View profile folders in File Explorer by navigating to C:Users and enabling hidden items. Use the Command Prompt with `net user` or `wmic useraccount get name,SID` for a technical list. The Registry Editor at 🗝️HKEY_LOCAL_MACHINESOFTWAREMicrosoftWindows NTCurrentVersionProfileList also links accounts to their paths.
Step 1View Profile Folders in File Explorer
To see all profile folders currently on your computer, open File Explorer and navigate to:
C:\Users
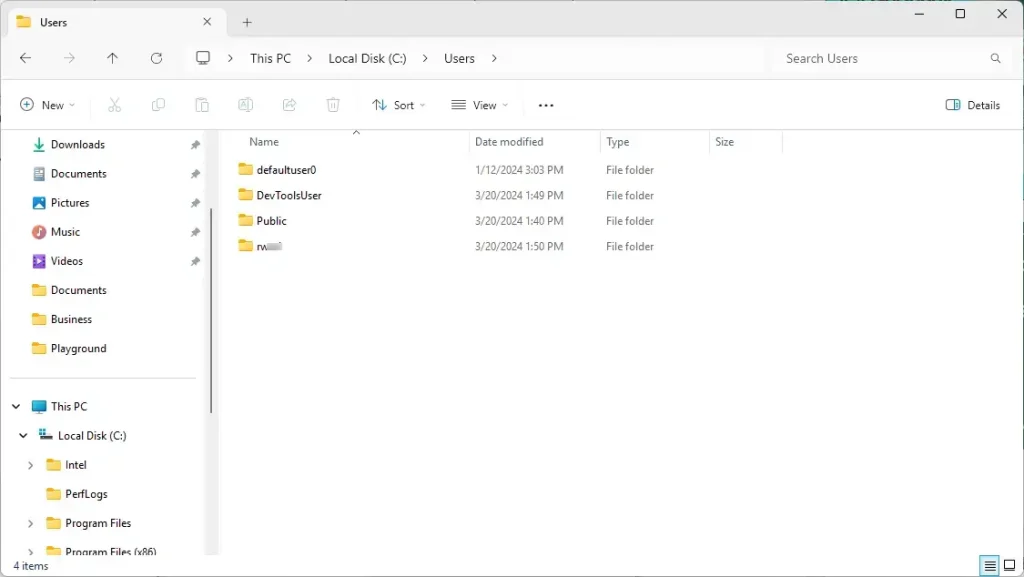
Note that some folders might be hidden. To view them, click the View menu in File Explorer , then select Show, and check Hidden items.
Step 2Using the Command Line to List Accounts
You can list all user accounts on your Windows 11 PC using the Command Prompt or PowerShell. Open the Windows Terminal with administrator privileges and type 'net user' to see a list of account names. For more details, such as the Security Identifier (SID)—a unique number identifying each account—you can use the 'wmic useraccou' command.
Open the Windows Terminal with administrator privileges. To list all local user accounts, type the following command and press Enter:
net user
This command will show you a list of account names. To see more detail, including the Security Identifier (SID), use this command:
wmic useraccount get name,SID
Step 3Matching Profiles via Registry Editor
Windows connects each user account to its specific profile folder through the system's registry (a database of settings and configurations). To find this connection, you can check a particular location within the Registry Editor. After opening regedit, navigate to HKEY_LOCAL_MACHINE\SOFTWARE\Microsoft\Windows NT\CurrentVersion\ProfileList and look through the S-1-5 folders for the ProfileImagePath value.
Win + R, type regedit, and press Enter.2. Navigate to:
HKEY_LOCAL_MACHINE\SOFTWARE\Microsoft\Windows NT\CurrentVersion\ProfileList3. Click through the folders starting with
S-1-5 to see the ProfileImagePath value.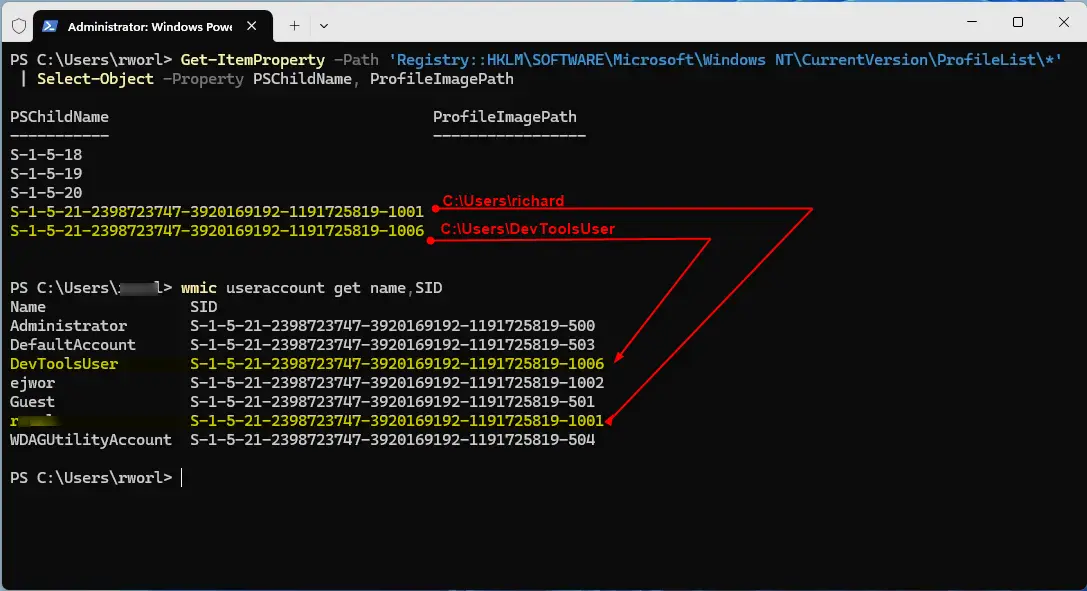
Step 4Using Advanced Management Tools
Win + R, type lusrmgr.msc, and press Enter. This provides a visual interface to manage accounts, disable users, or reset passwords without needing command-line knowledge.Summary
Managing user profiles is vital for system health. Using the command line, Registry Editor, or Local Users and Groups tool lets you accurately map user accounts to their folders. This ensures you know exactly where your data is stored and helps maintain a clean, organized Windows 11 environment.
Why are some user profiles hidden in 🪟 Windows 11?
Windows hides certain profiles, such as the Default or Public accounts, to prevent users from accidentally deleting critical system files. These folders are essential for the operating system to function correctly. You can view them by enabling the 'Hidden items' option in the File Explorer View menu settings.
What is the difference between a local user and a Microsoft account profile?
A local user account is specific to just one PC, meaning settings and files are only stored there. A Microsoft account, however, uses your email address to sign in and syncs your settings and files across multiple devices, keeping them the same wherever you log in.
Warning: Never manually rename or delete folders inside C:\Users. Doing so will corrupt the user profile and cause Windows to create a temporary profile, leading to potential data loss. Always use the official Settings app to delete user accounts.
Can I see when a user profile was last accessed?
Yes, you can see when a user profile was last accessed by checking the 'Date modified' time on the NTUSER.DAT file within that user's folder.
Was this guide helpful?

About the Author
Richard
Tech Writer, IT Professional
Richard, a writer for Geek Rewind, is a tech enthusiast who loves breaking down complex IT topics into simple, easy-to-understand ideas. With years of hands-on experience in system administration and enterprise IT operations, he’s developed a knack for offering practical tips and solutions. Richard aims to make technology more accessible and actionable. He's deeply committed to the Geek Rewind community, always ready to answer questions and engage in discussions.

[…] account name, the profile folder will not reflect the account’s new name. You may want to list and match the profile folder to the account name to ensure you’re not deleting the wrong […]