
This article explains how to list and match user profiles and account names in Windows 11.
Windows automatically creates a profile for a new account when the user signs in for the first time.
A user Profile folder is a folder that contains user-specific data and settings related to a particular user account on a computer. It includes desktop settings, application data, documents, downloads, and more.
Each user on a Windows computer has a unique profile folder stored in a specific location on the hard drive. By default, user profile folders are located in the “C:\Users” directory (ex. C:\Users\<username>).
If a user changes his account name, the profile folder will not be changed and will not match the new account name. If you want to know which profiles belong to which accounts, use the steps below.
List and match user profiles and accounts in Windows
As mentioned, the steps below show you how to list and match user profiles and account names in Windows.
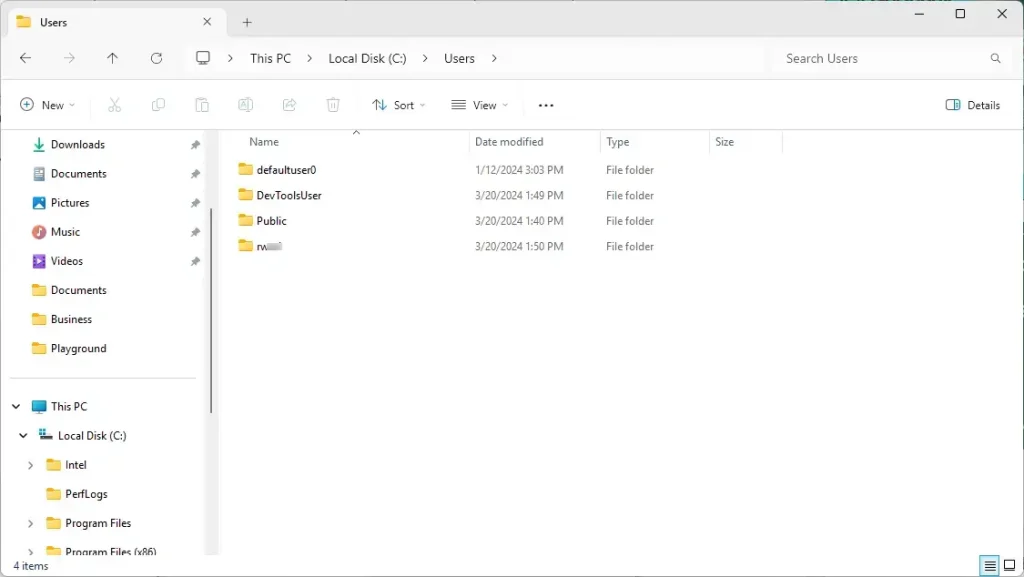
To list the current profile folders for the account on a Windows machine, go to the path below in File Explorer.
C:\Users
To match profile folders to account names, use the steps below.
First, open the Windows Terminal app and select the PowerShell tab.
Then, copy and paste the command below on the terminal windows and press Enter.
Get-ItemProperty -Path 'Registry::HKLM\SOFTWARE\Microsoft\Windows NT\CurrentVersion\ProfileList\*' | Select-Object -Property PSChildName, ProfileImagePath
Next, run the command below to list, compare, and match profile folders with account names.
wmic useraccount get name,SID
Use the list to compare and match profile folders (ProfileImagePath) and account names.
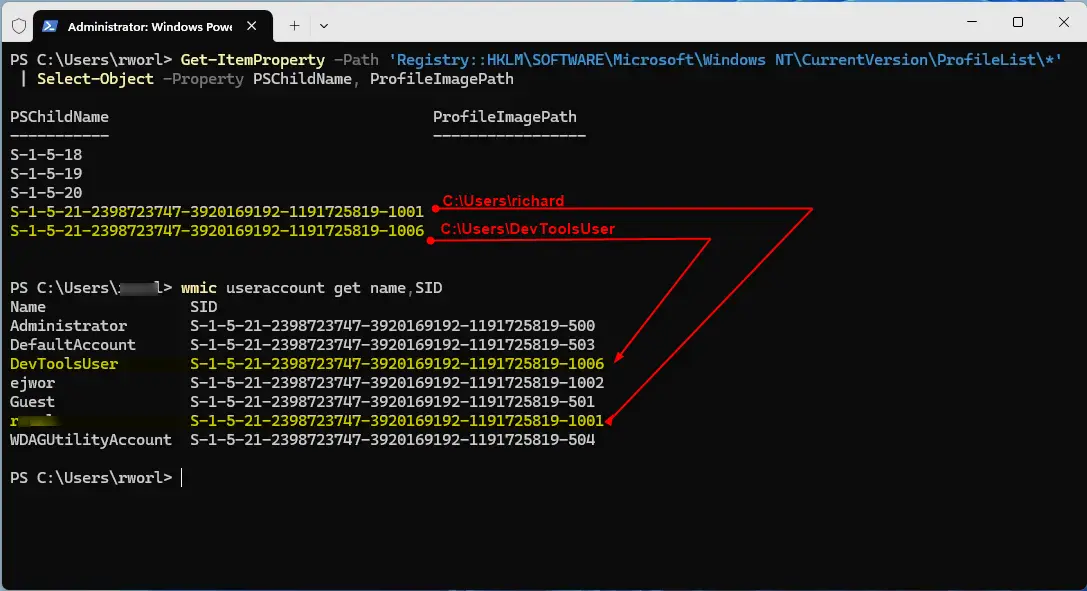
Using the user account name filter, you can use the information to tell which PSChildName goes with which ProfileImagePath.
The ProfileImagePath should match the account name (C:\Users\<username>).
That should do it!
Conclusion:
- Understanding how to list and match user profile folders with account names in Windows 11 is crucial for system management and troubleshooting.
- By following the provided steps, users can accurately identify and correlate profile folders with their respective account names, ensuring seamless administration of user accounts.
- The utilization of PowerShell commands and the Windows Terminal app streamlines the process, offering an efficient and effective way to manage user profiles.
- The ability to compare and match profile folders with account names enhances user account management and facilitates a deeper understanding of the Windows 11 environment.

Leave a Reply to How to Delete User Profile of an Account in Windows 11 - Geek Rewind Cancel reply