How to Reset Screenshot Index Counter in Windows 11

Every time you press Windows key + Print Screen, Windows 11 saves a PNG file and gives it the next number in a running count. That count is the screenshot index. Resetting it sets the counter back to 1, so the next file starts the numbering over.
The counter is stored per user account. It is not worked out from the files in your folder, so deleting or renaming old screenshots does not reset it. The number keeps climbing until you reset the stored value.
Open Windows Terminal, paste REG ADD 🗝️HKCU\
Why Reset Your Screenshot Counter?
Resetting is useful when you have cleared out an old batch of screenshots and want a fresh sequence. It also helps when you are collecting images for a document or tutorial and want them numbered from 1, so they are easy to find and keep in order.
Some things to know before you start:
- The index only applies to screenshots saved automatically with Windows key + Print Screen. These go to Pictures Screenshots. Snips saved by hand from the Snipping Tool, or images pasted from the clipboard, are named differently and do not use this counter.
- Resetting does not touch files you already have. Older screenshots keep their names, so move or archive them first if you want a clean folder.
- If the reset involves editing system settings, as the steps in this guide may, make sure you are signed in to the account whose screenshots you want to reset. Each account has its own counter.
What Happens When Done?
After resetting, your next screenshot will be named Screenshot (1).png instead of continuing with the next number in sequence.
To check that it worked:
- Press Windows key + Print Screen. The screen dims briefly while Windows saves the capture.
- Open File Explorer and go to Pictures Screenshots
- Look for the newest file. It should carry the number 1 in its name.
Windows can keep the old value in memory until the session ends. If it still does not change, check that you reset the counter for the account you are actually signed in to.
The counter simply counts up from 1 again with each new screenshot, so you can reset it as often as you like.
Option 1Use Command Line
You can reset your screenshot counter in Windows 11 back to 1 using the Command Line. Just open Windows Terminal, paste a specific command, and press Enter to reset the numbering for your screenshots.- Open Windows Terminal. Choose either Windows PowerShell or Command Prompt.
- Copy and paste this command into Windows Terminal and press Enter:
REG ADD HKCU\SOFTWARE\Microsoft\Windows\CurrentVersion\Explorer /V ScreenshotIndex /T REG_DWORD /D 1 /F - [Admin Required] You may need to approve this action.
- If you want screenshots to start at a different number instead of 1, change the final "1" in the command to that number.
- Close Windows Terminal when done.

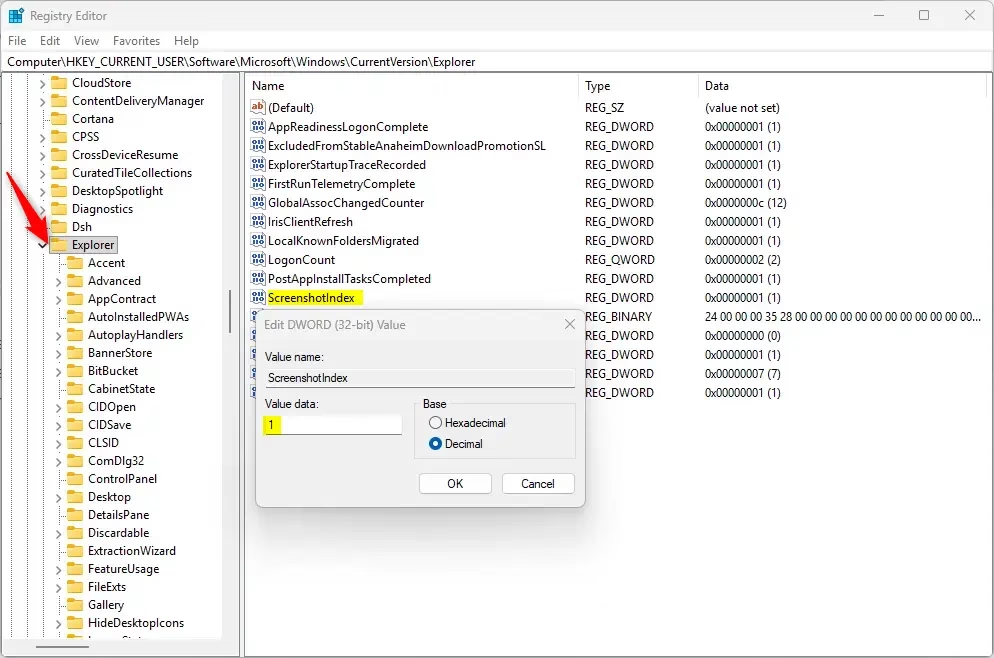
Option 2Use Registry Editor
- Open Windows Terminal.
- Browse to the Registry key HKEY_CURRENT_USER\SOFTWARE\Microsoft\Windows\CurrentVersion\Explorer
- Edit the ScreenshotIndex REG_DWORD and change the value to 1.
Summary
Resetting your screenshot counter in Windows 11 is a simple process that helps you organize your screenshots by starting the numbering fresh from 1.
How to change screenshot folder location in 🪟 Windows 11?
Windows 11 always saves Windows key + Print Screen screenshots to Pictures Screenshots by default, and you cannot change this built-in location. To store screenshots elsewhere, use the Snipping Tool instead—it lets you choose where to save each image, or copy to clipboard and paste into any folder.
How do I crop out a screenshot?
Press Windows key + Shift + S to open the Snipping Tool, then select Rectangle from the toolbar. Click and drag to draw a box around the part you want, release to capture, then save or edit. You can also crop in the preview window before saving.
How do I change my screenshot number?
The screenshot counter is stored in the Windows registry. Open Registry Editor, navigate to HKEY_CURRENT_USER\Software\Microsoft\Windows\CurrentVersion\Explorer\Shell Folders, find the ScreenshotIndex entry, and change its value to reset the count. The next screenshot will use the new number.
How to disable 🪟 Windows 11 auto screenshot?
Windows key + Print Screen cannot be disabled as a system command, but you can use AutoHotkey or third-party apps to remap or block the hotkey. Alternatively, use the Snipping Tool instead—press Windows key + Shift + S to capture without saving automatically.
Was this guide helpful?
0% of readers found this helpful (1 votes)

About the Author
Richard
Tech Writer, IT Professional
Richard is a writer at Geek Rewind who turns complex IT tasks into clear, step-by-step guides. He draws on years of hands-on experience in system administration and enterprise IT operations, focusing on Windows, Linux and WordPress: the problems people actually run into, and the fixes that work. His server and WordPress guides come from systems he runs himself. Richard builds and maintains the platform behind Geek Rewind, from its Ubuntu servers and Nginx configuration to its custom WordPress plugins. Many new tutorials start with readers' questions, and he's always glad to answer them in the comments.
No comments yet — be the first to share your thoughts!